Sambar: The Complete South Indian Guide
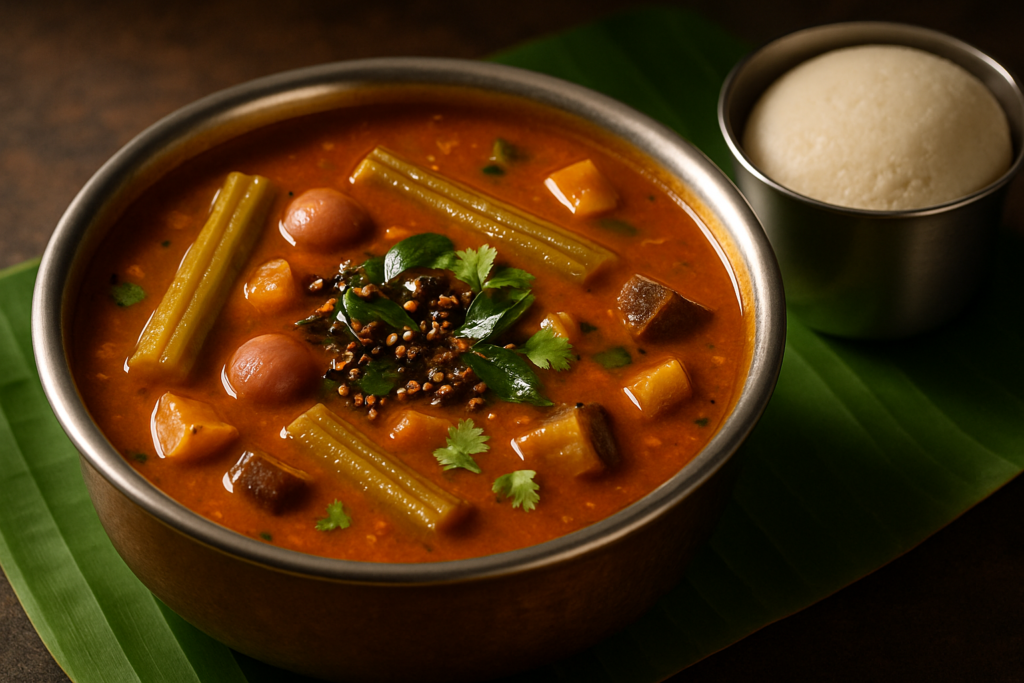
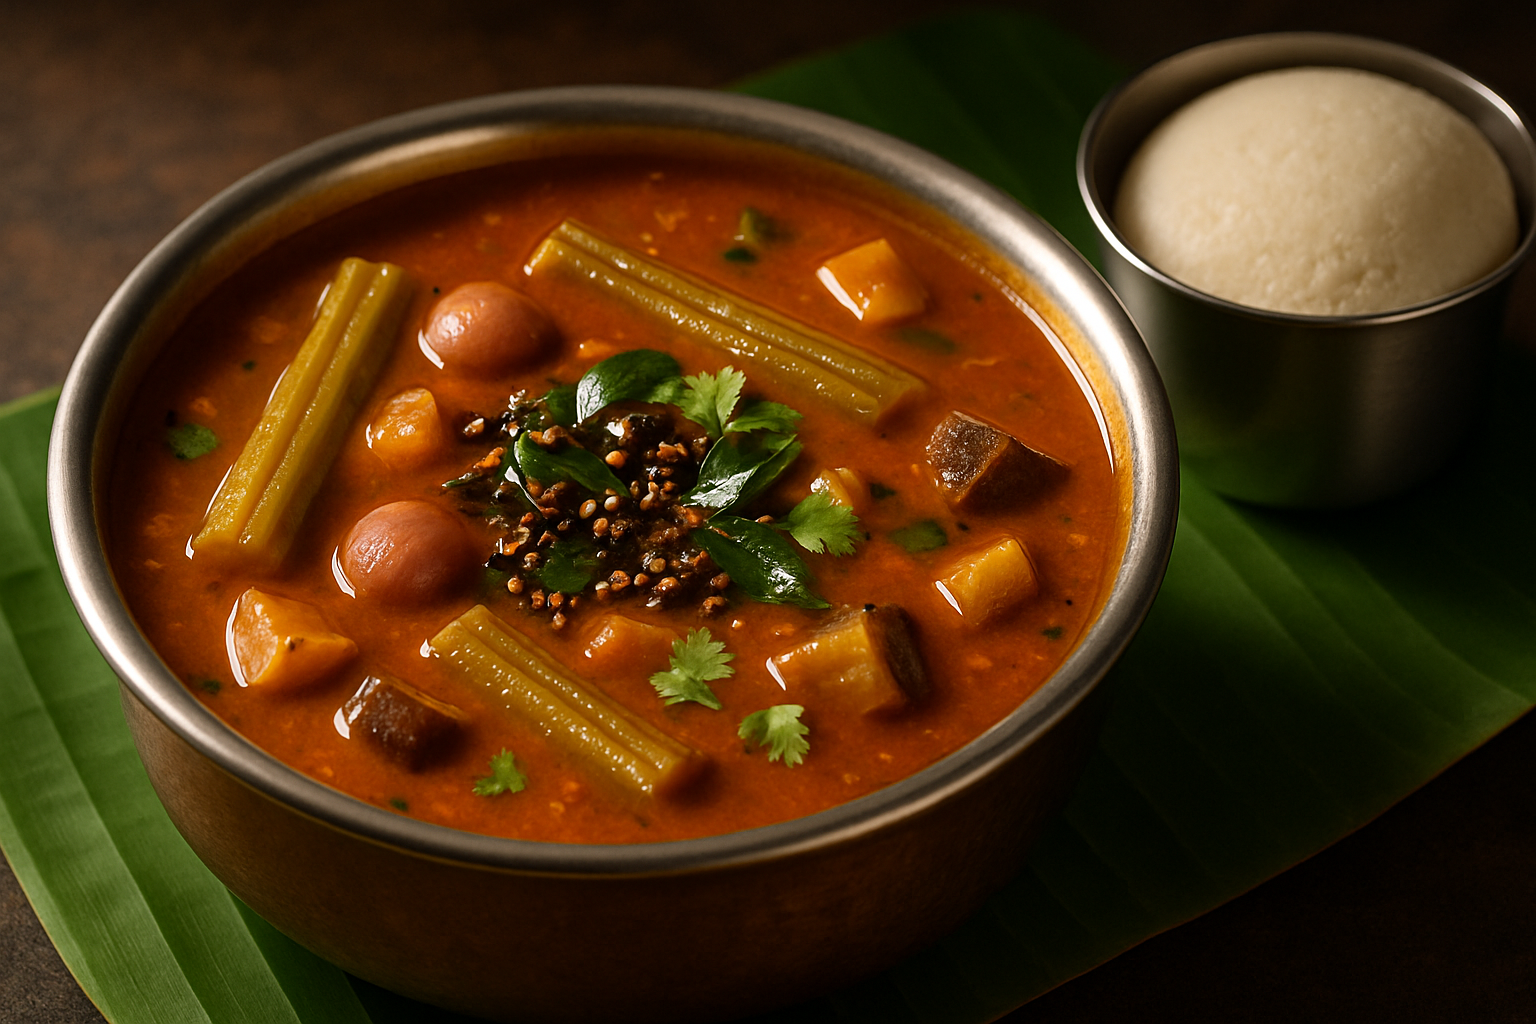
Sambar is the beating heart of South Indian cooking. It’s the broth that turns an idli from breakfast into an experience, and the thing that makes a steel plate of rice feel complete. This post covers everything: a reliable everyday sambar recipe, a homemade sambar powder that takes 10 minutes and genuinely outperforms any packet, a full guide on what vegetables to add, and six regional varieties explained in detail. Whether you’re a complete beginner or someone who grew up eating sambar but never made it from scratch, this is the only guide you’ll need.
Quick Recipe Summary
Prep Time: 20 minutes | Cook Time: 40 minutes | Total Time: 60 minutes | Servings: 6
This South Indian sambar recipe is made with toor dal, tamarind, tomatoes, mixed vegetables, and a fragrant homemade sambar powder that you can prepare in 10 minutes. It’s the kind of deeply layered, tangy, spiced lentil soup that pairs beautifully with rice, idli, dosa, or vada — and tastes even better the next day.
For the dal base
- 3/4 cup toor dal split pigeon peas; masoor dal works for a milder version
- 1/4 teaspoon turmeric
- 1 teaspoon ghee or oil
- 2 1/2 cups water
For the tamarind base
- 30 g tamarind lemon-sized ball soaked in 1 1/2 cups warm water, or 2 tbsp tamarind paste
For the vegetables
- 2 drumsticks cut into 3-inch pieces
- 1 medium tomato chopped
- 10-12 pearl onions peeled, or 1/2 regular onion
- 1 medium brinjal cubed
For the sambar
- 2-3 teaspoons sambar powder homemade or store-bought
- salt to taste
- jaggery small piece, optional
- fresh coriander leaves chopped, to finish
For the tadka
- 2 tablespoons coconut oil or any neutral oil
- 1 teaspoon mustard seeds
- 1/2 teaspoon cumin seeds
- 2 dried red chillies
- 1 sprig curry leaves about 10-12 leaves
- 1 pinch asafoetida (hing)
- 1 small onion sliced, optional
Soak and rinse the toor dal: Wash the toor dal in 2-3 changes of water until the water runs mostly clear. Soak for 20-30 minutes if you have time — it speeds up cooking and improves texture. Drain before pressure cooking.
Pressure cook the dal: Add the washed dal to a pressure cooker with 2.5 cups water, turmeric, and a teaspoon of ghee or oil. Cook on high flame until you get 3 whistles, then lower the flame and cook for 2 more minutes. Turn off and let the pressure release naturally. If you're using an Instant Pot, cook on Manual/Pressure Cook for 10 minutes with natural pressure release. The dal should be completely mushy — no visible whole lentils. Mash it vigorously with a whisk or the back of a ladle until smooth. This step determines the texture of your sambar.
Prepare the tamarind water: While the dal cooks, soak the tamarind in 1.5 cups of warm water for 15 minutes. Use your fingers to squeeze and extract all the pulp. Strain through a sieve, pressing the pulp hard to get every bit of flavour. Discard the fibrous bits. If using tamarind paste, just dilute 2 tablespoons in 1.5 cups warm water and you're done.
Cook the vegetables: In a large, wide pot (a 4-litre steel vessel works well), add the tamarind water, pearl onions, drumstick pieces, tomato, and brinjal. Bring to a boil on medium-high heat. The tamarind water will look pale at first — don't worry. Add the sambar powder, turmeric, and salt. Stir well. Let this simmer for 12-15 minutes until the vegetables are cooked through. The drumsticks should be tender enough that the flesh scrapes away easily. The brinjal should have completely softened and almost disappeared into the broth — and that's exactly what you want.
Add the cooked dal: Pour the mashed, cooked dal into the pot with the vegetables. Stir everything together vigorously. If the sambar is too thick (it should coat a spoon lightly but still be pourable), add ½ to 1 cup of hot water. Add the jaggery if using. Taste for salt, sourness, and spice. This is the moment to adjust — more tamarind if it needs zing, more sambar powder if it feels flat, more salt. Let everything simmer together for another 8-10 minutes on low-medium heat. The colour will deepen from pale yellow to a rich amber-orange — that's when it's ready.
Make the tadka: Heat coconut oil in a small tadka pan on medium-high heat until shimmering. Add the mustard seeds and wait — in about 30 seconds they'll start spluttering furiously. The moment they do, add the cumin seeds, dried red chillies, and asafoetida in quick succession. Then add the curry leaves — stand back, they'll spit dramatically. If you're adding onion to the tadka, add it now and cook until the edges are just beginning to turn golden, about 2-3 minutes.
Pour the tadka and finish: Pour the sizzling tadka directly into the simmering sambar. Stir gently. Add a generous handful of chopped fresh coriander leaves. Cover the pot immediately and let it sit for 5 minutes — this traps the tempering aromas and infuses them into the sambar. Don't skip this resting step. Serve hot.
Why You’ll Love This Sambar Recipe
- One recipe, endless versatility: Change the vegetables, adjust the tamarind, add or skip coconut — and it’s a completely different dish every single time.
- The homemade sambar powder is a game changer: It takes 10 minutes and the difference in flavour is honestly embarrassing compared to the packet version.
- Protein-rich and genuinely nutritious: Toor dal is one of the best plant-based protein sources — a meal that’s good for you without anyone feeling like they’re missing out.
- Beginner-friendly: Every step is written with enough detail that even if you’ve never cooked Indian food before, you’ll land a sambar that makes you proud.
- Freezes beautifully: A double batch every Sunday means the second half is ready when you need it.
Homemade Sambar Powder — The Secret Nobody Tells You About
Getting the sambar powder right is more than half the battle. This recipe makes about ½ cup of sambar powder, which will last 3–4 weeks stored in an airtight container at room temperature, or up to 3 months in the fridge. Please make this at least once before defaulting to the packet. I know purists will disagree with the addition of a small amount of black pepper and fenugreek in slightly higher quantity than traditional recipes, but it adds a beautiful depth.
Homemade Sambar Powder Ingredients
- 8 dried red chillies (Byadgi for colour and mild heat, or Guntur for more spice — use what you love)
- 3 tablespoons coriander seeds
- 1 tablespoon chana dal (split Bengal gram)
- 1 tablespoon urad dal (split black gram)
- 1 teaspoon cumin seeds
- 1 teaspoon black peppercorns
- ½ teaspoon fenugreek seeds (methi dana)
- ½ teaspoon mustard seeds
- 8-10 fresh curry leaves
- 1 tablespoon desiccated coconut (optional)
- ¼ teaspoon turmeric powder (add after roasting, don’t roast this)
- A tiny pinch of asafoetida (hing)
How to Make Sambar Powder at Home
- Heat a dry iron kadai or heavy-bottomed pan on very low flame. Dry roast the dried red chillies first, pressing them gently with a spatula, until they puff up slightly and turn fragrant — about 2 minutes. Remove and set aside.
- In the same pan, add the coriander seeds and roast until they turn a shade darker and smell nutty — another 2 minutes. Remove.
- Add the chana dal and urad dal together and roast until golden, stirring constantly so they don’t burn. The moment you smell something toasty, take it off the heat.
- Roast the cumin, peppercorns, fenugreek, and mustard seeds together for 1 minute, swirling the pan. They’ll start jumping — that’s your cue to remove them.
- If using fresh curry leaves, dry them in the same pan for 1-2 minutes until they crisp up completely. If using desiccated coconut, roast separately until just golden.
- Let everything cool completely — this step is non-negotiable, or your powder will turn damp and clump.
- Blend everything together along with the turmeric powder and asafoetida into a fine powder.
- Store in an airtight glass jar. Use 2-3 teaspoons per batch of sambar.
Ingredients You’ll Need for the Sambar Recipe
This is an everyday South Indian sambar recipe — the kind that comes together in under an hour. Notes are included for those cooking from outside India, because substitutions for harder-to-find ingredients are a common and reasonable concern.
For the Dal Base
- ¾ cup toor dal (split pigeon peas) — This is the standard choice. You can find it at any Indian grocery abroad. In a pinch, red lentils (masoor dal) cook faster and work reasonably well, though the flavour is milder.
- ¼ teaspoon turmeric
- 1 teaspoon ghee or oil (added to dal while pressure cooking — makes it creamier)
- 2.5 cups water for cooking the dal
For the Tamarind Base
- Lemon-sized ball of tamarind (about 30g) soaked in 1.5 cups warm water — or 2 tablespoons tamarind paste if you’re short on time. If tamarind is unavailable, 2 tablespoons of kokum water gives a slightly different but lovely sourness, or a splash of fresh lime juice added at the very end works in a pinch (though this changes the flavour profile significantly).
For the Vegetables
- 2 drumsticks (Moringa sticks), cut into 3-inch pieces — the classic. Frozen drumsticks from Indian stores abroad work well.
- 1 medium tomato, chopped
- 10-12 pearl onions (small shallots), peeled — or ½ regular onion, quartered
- 1 medium brinjal (eggplant/aubergine), cubed
- See the full vegetable guide section below for more options
For the Sambar
- 2-3 teaspoons homemade sambar powder (or good-quality store-bought — MTR and Aachi are reliable choices)
- Salt to taste
- Small piece of jaggery (optional — adds a pleasant sweet-sour balance, particularly in Udupi-style sambar)
- A small bunch of fresh coriander leaves for finishing
For the Tadka (Tempering) — The Soul of Any South Indian Recipe
- 2 tablespoons coconut oil (or regular oil — coconut oil gives the most authentically South Indian result)
- 1 teaspoon mustard seeds
- ½ teaspoon cumin seeds
- 2 dried red chillies
- 1 sprig curry leaves (about 10-12 leaves)
- A generous pinch of asafoetida (hing)
- 1 small onion or 5-6 pearl onions, sliced (optional in tadka)
Step-by-Step South Indian Sambar Recipe
- Soak and rinse the toor dal: Wash the toor dal in 2-3 changes of water until the water runs mostly clear. Soak for 20-30 minutes if you have time — it speeds up cooking and improves texture. Drain before pressure cooking.
- Pressure cook the dal: Add the washed dal to a pressure cooker with 2.5 cups water, turmeric, and a teaspoon of ghee or oil. Cook on high flame until you get 3 whistles, then lower the flame and cook for 2 more minutes. Turn off and let the pressure release naturally. If you’re using an Instant Pot, cook on Manual/Pressure Cook for 10 minutes with natural pressure release. The dal should be completely mushy — no visible whole lentils. Mash it vigorously with a whisk or the back of a ladle until smooth. This step determines the texture of your sambar.
- Prepare the tamarind water: While the dal cooks, soak the tamarind in 1.5 cups of warm water for 15 minutes. Use your fingers to squeeze and extract all the pulp. Strain through a sieve, pressing the pulp hard to get every bit of flavour. Discard the fibrous bits. If using tamarind paste, just dilute 2 tablespoons in 1.5 cups warm water and you’re done.
- Cook the vegetables: In a large, wide pot (a 4-litre steel vessel works well), add the tamarind water, pearl onions, drumstick pieces, tomato, and brinjal. Bring to a boil on medium-high heat. The tamarind water will look pale at first — don’t worry. Add the sambar powder, turmeric, and salt. Stir well. Let this simmer for 12-15 minutes until the vegetables are cooked through. The drumsticks should be tender enough that the flesh scrapes away easily. The brinjal should have completely softened and almost disappeared into the broth — and that’s exactly what you want.
- Add the cooked dal: Pour the mashed, cooked dal into the pot with the vegetables. Stir everything together vigorously. If the sambar is too thick (it should coat a spoon lightly but still be pourable), add ½ to 1 cup of hot water. Add the jaggery if using. Taste for salt, sourness, and spice. This is the moment to adjust — more tamarind if it needs zing, more sambar powder if it feels flat, more salt. Let everything simmer together for another 8-10 minutes on low-medium heat. The colour will deepen from pale yellow to a rich amber-orange — that’s when it’s ready.
- Make the tadka: Heat coconut oil in a small tadka pan on medium-high heat until shimmering. Add the mustard seeds and wait — in about 30 seconds they’ll start spluttering furiously. The moment they do, add the cumin seeds, dried red chillies, and asafoetida in quick succession. Then add the curry leaves — stand back, they’ll spit dramatically. If you’re adding onion to the tadka, add it now and cook until the edges are just beginning to turn golden, about 2-3 minutes.
- Pour the tadka and finish: Pour the sizzling tadka directly into the simmering sambar. Stir gently. Add a generous handful of chopped fresh coriander leaves. Cover the pot immediately and let it sit for 5 minutes — this traps the tempering aromas and infuses them into the sambar. Don’t skip this resting step. Serve hot.
What Vegetables to Add in Sambar — The Complete Guide
Almost any vegetable works in sambar, but some combinations are truly magical. Here’s a tried-and-tested guide:
Classic Vegetables That Always Belong in Sambar
- Drumstick (Moringa): The undisputed king. It imparts a distinctive flavour to the sambar liquid itself, not just to the vegetable.
- Pearl onions (Sambar onions / small shallots): They sweeten and thicken the base. Tamilnadu-style pearl onion sambar uses a generous quantity and is better for it.
- Tomatoes: Add body, slight acidity, and colour. Almost every version uses them.
- Brinjal/Eggplant: Absorbs the tamarind-spice liquid beautifully and adds a subtle smokiness.
- Ash gourd (white pumpkin): Lends creaminess and mild sweetness.
Vegetables That Work Wonderfully
- Radish (Mooli): Surprising but brilliant — cook it down until meltingly soft. Particularly popular in Karnataka-style sambar.
- Raw banana: Adds an earthy starchiness that makes the sambar more substantial.
- Yam (Suran): Gives a gorgeous, almost silky texture.
- Bottle gourd (Lauki): Light and cooling — great for summer sambar.
- Pumpkin: Sweet, soft, lovely. Works well for sambar that needs to appeal to younger palates.
- Capsicum/Bell pepper: I know some traditionalists will come for me, but a bit of capsicum added in the last 5 minutes of cooking adds a fresh, slightly sweet note that works.
- Potato: Yes! Boiled potato cubes added towards the end make a heartier, more filling sambar.
- Spinach or Amaranth leaves: Added in the last 3 minutes. Makes a nutritious green sambar.
Vegetables I’d Avoid
- Beetroot (it turns everything purple and the sweetness is overpowering)
- Bitter gourd on its own (too harsh — better in its own curry)
- Cabbage (goes mushy and loses its character in the tamarind)
Types of Sambar Across South India — A Love Letter to Regional Cooking
One of the genuinely moving things about South Indian food culture is how one dish — the sambar recipe — can taste so completely different depending on which state, which district, which family you’re eating with. Sambar’s history goes back centuries in South Indian cuisine, and the regional variations are a testament to how deeply it’s woven into daily life. Here are the six types worth knowing:
1. Kuzhambu-Style Tamilnadu Sambar (Thick and Tangy)
Heavy on tamarind, heavier on pearl onions, with a sambar powder that has more dried red chillies and fenugreek. Often made without coconut. The consistency is thicker than other regional versions — almost gravy-like. This is what you get at a proper Tamilnadu meals restaurant poured over steaming white rice in a steel plate.
2. Karnataka Bisi Bele Bath Sambar
Technically Bisi Bele Bath is its own dish, but the sambar component that goes into it is distinctly Kannadiga — slightly sweeter (thanks to jaggery), with rice and vegetables cooked together in the sambar itself. It’s warming and substantial, particularly popular in Mysore and Bangalore. The Karnataka-style plain sambar also tends to be less sour and milder than its Tamil neighbour.
3. Kerala Parippu Curry (The Coconut Cousin)
Kerala’s version uses coconut milk or freshly ground coconut paste stirred in at the end — this gives it a creamy, sweet, mellow quality that’s quite different from the sharp tang of Tamil sambar. Coconut oil for tempering is essential. Often made with just a couple of vegetables, or even just tomatoes. Served with rice and a papad.
4. Andhra Pulusu (The Fiery One)
Andhra Pradesh’s sambar — locally called pulusu — is not for the faint of heart. More tamarind, more chilli, more everything. The heat hits you at the back of the throat in the best possible way. Often made with raw mango or unripe tamarind during season, and the tempering includes generous amounts of green chillies alongside the dried ones.
5. Udupi Sambar (The Jaggery-Kissed Version)
From the temple town of Udupi in coastal Karnataka, this sambar has a distinct sweet-sour-spicy balance that’s unlike anything else. Coconut is ground into the masala, and the vegetables tend to include a mix of seasonal produce. Less aggressive than Andhra, more complex than standard Tamilnadu. Adding jaggery to this style creates that characteristic balance. This is the version served in Udupi restaurants across the world.
6. Hotel Sambar (The Beloved Idli-Dosa Sambar)
“Hotel” here means the small South Indian restaurants — what are locally called hotels — and their sambar is a category unto itself. Thinner, lighter, slightly sweeter, designed specifically to be a dipping broth for idli and dosa rather than a meal with rice. The vegetables are usually cooked down so fine they’re almost invisible. If you’ve been to a South Indian restaurant anywhere in the world and had that perfect, light, fragrant dipping sambar with your idli — this is what you were eating. It deserves its own separate detailed post.
Tips for Perfect Sambar Recipe Every Time
- Cook the dal properly and mash it well: Under-cooked or insufficiently mashed dal gives you a grainy, thin sambar. The dal should be completely smooth before it goes into the pot. When in doubt, cook it longer.
- Don’t rush the tamarind: Properly extracted, well-simmered tamarind is what gives sambar its backbone. If you add the tamarind and immediately add the dal, the dal will curdle slightly and the sambar will taste raw and flat. Let the tamarind and vegetables simmer together for at least 12-15 minutes first.
- The tadka must be hot and smoking: A halfhearted tadka made with warm oil produces a flat result. The oil must be properly hot, the mustard seeds must fully splutter, and the curry leaves must crackle and spit. That sizzle when it hits the sambar is the flavour you’re chasing.
- Taste and adjust at the end — always: Sambar’s final flavour depends on the sourness of your tamarind (it varies batch to batch), the heat of your sambar powder, and the saltiness you prefer. Develop the habit of tasting before you cover and rest.
- Let it rest before serving: Five to ten minutes covered after the tadka is added makes a noticeable difference. The flavours marry in a way that they simply don’t if you serve it straight off the flame.
Variations to Make This Sambar Recipe Work for Everyone
Jain Sambar (No Onion, No Garlic, No Root Vegetables)
Skip the pearl onions and any root vegetables. Use tomatoes, ash gourd, raw banana, and drumsticks. Replace asafoetida with a slightly larger pinch of good-quality hing (some Jains also avoid hing — in that case, skip it entirely). The tomatoes do the heavy lifting for body and flavour.
No-Onion No-Garlic Sambar
Simply skip the onions from both the vegetable base and the tadka. Increase the tomatoes by one and add an extra piece of drumstick. Asafoetida (hing) is what saves the depth of flavour here — don’t skip it. Many temple-style sambar recipes are made this way and they’re absolutely beautiful.
Vegan Sambar
Good news — this recipe is already vegan if you use oil instead of ghee to pressure cook the dal. Coconut oil for the tadka keeps it authentically South Indian and completely plant-based. Toor dal is an excellent plant-based protein source, making this a nutritionally complete vegan meal with rice.
Gluten-Free Sambar
Standard sambar is naturally gluten-free. Just ensure that your asafoetida (hing) is gluten-free — many commercial hing brands contain wheat flour as a filler. Look for “pure asafoetida” or “compounded asafoetida without wheat” on the label, or simply skip it if you can’t verify.
Instant Pot / Pressure Cooker One-Pot Sambar
Add the dal, vegetables, tamarind water, sambar powder, tomatoes, onions, and salt all together in the Instant Pot. Cook on Manual for 12 minutes. Natural pressure release. Mash partially, taste, adjust. Make the tadka separately in a small pan and pour over. A reliable weeknight shortcut.
What to Serve With This South Indian Sambar Recipe
- Steamed white rice: The ultimate pairing. Pour sambar over a mound of hot rice, add a small dollop of ghee, and eat with your hand for the full experience. Pair with a simple South Indian potato fry and it’s a complete meal.
- Idli or Dosa: Pour sambar into a small bowl and dunk your idli or dosa into it. This is what millions of South Indians have for breakfast every single morning and there’s a very good reason for that. Check my soft idli recipe for the perfect pairing.
- Medu Vada: A crispy, golden medu vada dunked into sambar — sometimes called “vada sambar” — is one of the great pleasures of South Indian cooking. The vada soaks up the sambar while staying just barely crisp at the centre. Also see my coconut chutney recipe which goes alongside beautifully.
Storage and Reheating
At room temperature: Sambar is fine on the countertop for up to 8 hours in cooler weather. In hot and humid conditions, refrigerate within 2-3 hours.
Refrigerator: Store in an airtight container for up to 4 days. Sambar actually tastes better on day two — the flavours deepen and the tamarind mellows beautifully overnight.
Freezer: Sambar freezes brilliantly for up to 3 months. Freeze in individual portions in ziplock bags laid flat. Thaw in the refrigerator overnight or run the sealed bag under warm water.
Reheating: Always reheat sambar on the stovetop over low-medium heat, not in the microwave — the microwave heats it unevenly and often makes the dal grainy. Add a splash of water if it’s thickened too much during storage. Bring it to a gentle boil, taste for seasoning, and serve. A fresh sprig of curry leaves thrown in while reheating revives it wonderfully.
Frequently Asked Questions About Sambar Recipe
Can I make sambar without a pressure cooker?
Absolutely. Soak the toor dal for at least an hour, then cook it in a covered pot with plenty of water on medium-low heat for 40-50 minutes until completely soft and mashable. It takes longer but works well. Alternatively, use a slow cooker on high for 3-4 hours.
Why does my sambar taste sour but flat — like it’s missing something?
This is almost always a tadka problem. Either the oil wasn’t hot enough, or the mustard seeds didn’t fully splutter before you added the curry leaves and chillies. The aromatic compounds in the tempering spices need high heat to bloom. Redo the tadka in freshly heated oil and pour it over — that’s usually enough to rescue a flat sambar. Also check whether it needs more salt, which amplifies all other flavours.
What’s the difference between sambar powder and rasam powder?
Great question. Sambar powder has more coriander seeds and dried red chillies for body and heat, plus dals (chana and urad) which add a roasted, slightly nutty base note. Rasam powder has a higher proportion of black pepper and cumin, which gives rasam its piercing, pungent quality. They’re not interchangeable — using rasam powder in sambar gives you something thin and sharp without the rounded depth you want.
Can I add coconut to this sambar recipe?
Yes! Grind ¼ cup of fresh or desiccated coconut with a little water to a smooth paste and stir it into the sambar about 5 minutes before you finish cooking. This is how Kerala-style and Udupi-style sambar is made. It adds creaminess and a natural sweetness. Reduce the jaggery if using coconut, as the coconut already brings sweetness.
My sambar is too thick / too thin. How do I fix it?
Too thick: Simply add hot water (not cold, which shocks the dal and can make it lumpy), stir well, bring back to a simmer, and taste for seasoning. Too thin: Either let it simmer uncovered on medium heat for 10-15 more minutes to reduce, or mash some of the cooked vegetables against the side of the pot to release their starch and thicken the broth naturally. Don’t add flour or cornstarch — that’s not how this dish works.

One thought on “Sambar Recipe: The Ultimate South Indian Guide with Homemade Powder, 6 Regional Varieties & Every Vegetable Tip”