Chole Recipe: Best Amritsari Chole with Dark, Smoky Masala Gravy
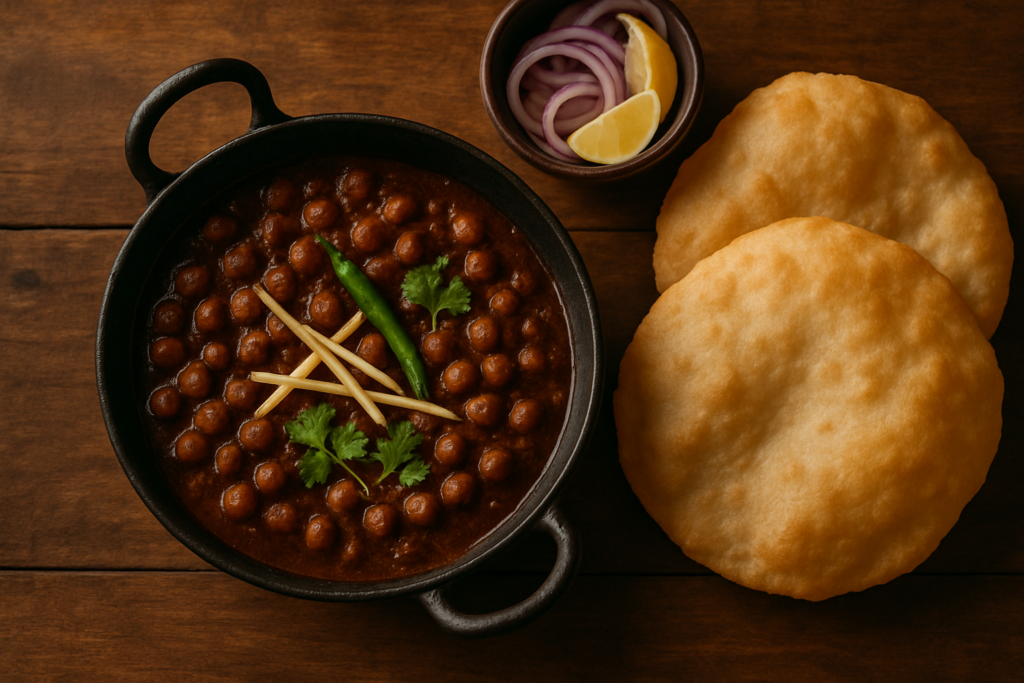
Amritsari Chole: Dark, Smoky Masala Gravy
This chole recipe delivers the deeply dark, smoky, tangy chickpea curry characteristic of Amritsari cooking. The colour comes entirely from black tea and dried amla — no food colouring needed. Mustard oil, anardana powder, and a proper Punjabi chole masala provide the layered depth that sets this apart from basic chana masala. Serve with bhature, kulcha, or jeera rice.
Quick Recipe Summary
Prep Time: 20 minutes (plus overnight soaking)
Cook Time: 60 minutes
Total Time: 80 minutes active (plus soaking)
Servings: 4
This authentic Amritsari chole recipe delivers deeply dark, smoky, tangy chickpea curry using black tea and amla for natural colour — no artificial colouring needed. The slow-cooked mustard oil masala with anardana and chole masala is what makes it taste exactly like your favourite dhaba. Perfect with bhature, kulcha, or jeera rice.
Why You’ll Love This Chole Recipe
- Naturally dark colour, no shortcuts: Tea bags and dried amla do all the work — no food colouring, no tamarind paste hacks needed.
- Authentic Amritsari flavour: Mustard oil, anardana, and proper Amritsari chole masala give this depth that basic chana masala recipes simply don’t reach.
- Beginner-friendly with clear cues: Every step tells you exactly what to look for — colour changes, smells, textures — so you’re not guessing.
- Meal-prep champion: This chole tastes even better the next day as the spices settle in, making it perfect for batch cooking.
- Naturally vegan and high-protein: Chickpeas are an excellent plant-based protein source, making this a genuinely nourishing meal that also happens to taste incredible.
Ingredients You’ll Need for This Amritsari Chole Recipe
The Chickpeas
- 1.5 cups dried white chickpeas (kabuli chana): Always dried, always soaked overnight. Canned is tempting — see the FAQ below for how to manage that — but dried chickpeas pressure-cooked with tea are a completely different beast. Please soak them.
- 2 black tea bags: Plain, unflavoured Brooke Bond or Lipton. NOT green tea, NOT masala chai tea bags. The tannins are what create that dark colour.
- Dried amla (Indian gooseberry): 2-3 small dried pieces. This is the other secret weapon. Amla has been used in Indian cooking for centuries and adds a subtle sourness alongside the darkening effect. If you can’t find it outside India, skip it — the tea bags alone still do a great job.
The Whole Spices (for Pressure Cooking)
- 2 black cardamom pods (badi elaichi) — don’t substitute green cardamom, the flavour is completely different
- 1 inch cinnamon stick
- 2 bay leaves
The Masala Gravy
- Mustard oil: This is non-negotiable for Amritsari chole. It gives that signature slightly sharp, pungent base that no other oil replicates. If you absolutely cannot find it, use a neutral oil, but know that the flavour profile will be different. In the UK, US, Canada, and Australia, mustard oil is widely available at Indian grocery stores.
- Anardana powder (dried pomegranate seed powder): This is what gives Amritsari chole its distinctive sourness — sharper and earthier than amchur. Available at most Indian stores. If you can’t find it, increase the amchur to 2 tsp, but do try to find anardana — it’s worth it.
- Amritsari/Punjabi Chole Masala: MDH Chana Masala or Everest Chole Masala are the top picks. These pre-blended mixes have a specific spice ratio developed specifically for this dish. Available on Amazon internationally or at any Indian grocer.
- Kashmiri red chilli powder: For deep red colour without too much heat. If substituting with regular chilli powder, use half the quantity.
- Black salt (kala namak): Just half a teaspoon, but it adds a sulphuric, almost eggy depth that regular salt cannot replicate. Don’t skip this one.
How to Make Chole Masala — Step-by-Step
- Soak the chickpeas overnight. Add dried chickpeas to a large bowl, cover with at least 3 times their volume of cold water, and leave for a minimum of 8 hours (12 hours is better). They’ll swell up dramatically. Drain and rinse well before cooking. Skipping or shortening the soak means uneven cooking — some chickpeas will be mushy while others are still hard in the centre. Even a 4-hour soak gives tough, unevenly cooked chickpeas that take forever to digest.
- Pressure cook with tea and whole spices. Transfer soaked chickpeas to your pressure cooker. Add 3 cups water, both tea bags (just drop them in whole, strings and tags removed), dried amla pieces, black cardamom, cinnamon, bay leaves, and 1 tsp salt. Seal and pressure cook on high flame for 4-5 whistles. Then lower the flame and cook for 15 more minutes. Turn off and let the pressure release naturally — this takes about 20 minutes. Don’t rush and release pressure manually or your chickpeas won’t be as soft.
- Check the chickpeas and save the liquid. Once safe to open, remove and discard the tea bags, amla, and whole spices. The chickpeas should be a beautiful dark brownish-grey and completely tender — press one between your thumb and index finger and it should mash easily with zero resistance. If not, reseal and give it 2-3 more whistles. Before draining, scoop out and reserve 1 full cup of that dark cooking liquid — it’s liquid gold for your gravy.
- Heat mustard oil until smoking point. In a heavy-bottomed kadai or Dutch oven, heat the mustard oil over high flame until you see the first wisps of smoke rising. This removes the raw, bitter notes from mustard oil and is an essential step. Now reduce the flame to medium and add cumin seeds and dried red chillies. They’ll splutter immediately — let them go for 30 seconds until fragrant.
- Cook the onions low and slow (the most important step). Add all finely chopped onions at once and cook on medium-high heat for 12-15 minutes, stirring every couple of minutes. Look for a deep golden-brown colour — not pale yellow, not burnt, but the colour of strong tea with milk. If they start catching at the bottom, add a tablespoon of water and scrape up the fond. These caramelised onions are the backbone of the entire dish. Rushing this step will leave the chole tasting flat.
- Add ginger-garlic paste. Drop in the ginger-garlic paste and stir immediately. Cook for 2-3 minutes on medium heat, stirring continuously. The paste will hiss and splutter. It’s done when the raw garlicky smell disappears completely and the mixture looks slightly dry and has stopped steaming aggressively.
- Cook the tomato masala until oil separates. Add the tomato puree all at once and stir to combine. Cook on medium heat for 8-10 minutes, stirring every 2 minutes or so. The masala will go from bright red to a darker, brownish-red, and — this is your signal — little puddles of orange oil will form around the edges and on the surface. That’s the oil separating, and it means the masala is properly cooked and ready for spices.
- Add all the dry spices. Tip in the coriander powder, cumin powder, Kashmiri red chilli powder, amchur, anardana powder, black salt, and Amritsari chole masala. Stir quickly to combine everything. Cook for 2-3 minutes, stirring often, until the oil separates again from the spice-laden masala. Don’t skip this extra cook time for the spices or they’ll taste raw.
- Add chickpeas and reserved cooking liquid. Tip in all the dark, pressure-cooked chickpeas and pour in the reserved cooking liquid. Stir everything together gently — coat every single chickpea in that masala. Add an extra half cup of plain water if you prefer a slightly thinner, restaurant-style gravy. Bring everything to a rolling boil.
- Simmer until gravy thickens. Once boiling, lower the flame and let the chole simmer uncovered for 15-20 minutes. Stir every few minutes to prevent sticking. About halfway through, take the back of a ladle or a potato masher and very lightly mash about 4-5 chickpeas against the side of the pot — not all of them, just a few. The starchy mash dissolves into the gravy and thickens it naturally, giving a luxurious, clingy consistency.
- Final seasoning and garam masala. Taste and adjust salt. Add the garam masala, stir, and cook for exactly 1 minute more. Turn off the heat. Garam masala always goes in at the end — add it too early and the delicate volatile oils that make it fragrant cook away and are wasted.
- Garnish and serve immediately. Pile on fresh coriander leaves, julienned ginger strips, and a slit green chilli on top. Serve hot with bhature, puri, kulcha, or paratha.
Tips for Perfect Chole Recipe Every Time
1. The Overnight Soak Is Not Optional
Skipping or shortening the soak means uneven cooking — some chickpeas will be mushy while others are still hard in the centre. If you forgot to soak overnight, do a quick soak: cover chickpeas in boiling water and soak for 2-3 hours minimum before pressure cooking.
2. Don’t Rinse Away the Dark Water
After pressure cooking, that dark liquid in the cooker is flavour. Scoop out a cup before doing anything else, because once the chickpeas are drained, it’s gone. That reserved liquid deepens the gravy’s colour and adds body.
3. Mustard Oil Must Be Heated to Smoke Point First
Raw mustard oil has a sharp, almost unpleasant pungency. Heating it briefly to smoking point burns off the erucic acid and mellows the oil into something with a beautiful, nutty warmth. This 30-second step changes everything.
4. Cook the Masala Until You See Oil Separation — Twice
Once after the tomatoes, and once after adding the dry spices. This isn’t fussiness — it’s chemistry. Oil separation means all the moisture has cooked out and the spices are properly bloomed, not raw and grainy.
5. Let It Rest Before Serving
I know purists will disagree because chole is always served piping hot, but resting for even 10 minutes off the heat lets the spices settle and the gravy thicken to a perfect consistency. Next-day chole is genuinely better than same-day chole — I will die on this hill.
Variations for This Amritsari Chole Recipe
Jain / No Onion No Garlic Chole
Skip the onion and ginger-garlic paste entirely. Instead, build the base with an extra tomato, 1 tsp asafoetida (hing), and a little extra oil. The flavour is different but still very good. Double up on cumin and coriander powder to compensate for the missing aromatics.
Vegan Version
Great news — this chole recipe is already 100% vegan as written. No dairy, no ghee, nothing. The depth of flavour comes entirely from spices, caramelised onions, and the chickpeas themselves.
Gluten-Free Version
Also already naturally gluten-free! Just double-check that your chole masala blend doesn’t contain any additives with wheat — most don’t, but it’s worth reading the label if you’re cooking for someone with coeliac disease.
Pressure Cooker vs. Instant Pot
For an Instant Pot, cook on Manual High Pressure for 35 minutes with natural pressure release. Everything else in the recipe stays the same.
What to Serve With This Chole Masala
- Bhature: The classic, iconic pairing. Puffy, deep-fried leavened bread and dark Amritsari chole is one of the great food combinations in the entire world. Check out my foolproof bhature recipe for the perfect fluffy result.
- Kulcha: If deep-frying feels like too much effort, stuffed kulcha from the oven or tawa is incredible with this chole and far easier to make at home. See my Amritsari kulcha guide for details.
- Jeera Rice: For a weeknight meal where you want the chole to be the star without the effort of bread, simple jeera rice is perfect. The plain, fluffy rice lets the complex chole gravy shine.
On the side, always serve sliced raw onions, a wedge of lime or lemon, and a green chilli. That’s non-negotiable in any Punjab-adjacent household.
Storage and Reheating
Refrigerator: Cool completely before storing in an airtight container. Chole keeps beautifully in the fridge for up to 4-5 days. The flavour genuinely improves by day 2 — the spices integrate and mellow, the gravy deepens in colour, and every bite tastes more rounded and complex.
Freezer: This chole recipe freezes exceptionally well. Store in freezer-safe containers or zip-lock bags (lay flat to save space) for up to 3 months. Thaw overnight in the fridge before reheating.
Reheating: Reheat on the stovetop over low-medium flame with a splash of water to loosen the gravy — it thickens considerably in the fridge. Stir gently and heat through for 5-7 minutes. A very quick reheat in the microwave works too, but stovetop gives better results. Don’t boil it aggressively or the chickpeas can get mushy.
Frequently Asked Questions About This Chole Recipe
How do I get the dark colour in chole naturally without food colouring?
The secret is cooking the chickpeas with black tea bags and dried amla (Indian gooseberry). The tannins in both ingredients dye the chickpeas a beautiful deep brown. Some Punjabi households also add a small piece of dried tamarind or a tiny bit of dried pomegranate skin to the pressure cooker. No artificial colour needed whatsoever — and anyone telling you to add food colour is, with respect, doing it wrong.
Can I make this chole recipe without a pressure cooker?
Absolutely. Soak the chickpeas for a full 12 hours and then cook them in a large pot with plenty of water, tea bags, and whole spices on a low simmer for about 60-75 minutes, checking regularly and topping up water as needed. They take longer but taste just as good. An Instant Pot works great too — cook on high pressure for 35 minutes with natural release.
What is Amritsari chole masala and where can I find it abroad?
Amritsari chole masala is a pre-blended spice mix with a specific blend of anardana, dried ginger, black pepper, and other whole spices that gives Punjabi chole its signature tangy-earthy depth. MDH Chana Masala and Everest Chole Masala are the most commonly available brands internationally. If you’re outside India, check any Indian grocery store or order on Amazon. In a pinch, you can skip it and double up on anardana powder and add a pinch of extra garam masala — it won’t be identical but still very good.
Why does my chole gravy taste flat even after adding all the spices?
Two most common reasons: the onions weren’t cooked long enough (they need to turn properly deep golden-brown, not just translucent), and the tomato masala wasn’t cooked until oil separated properly. Both steps build the foundational flavour. Also, don’t skip the anardana powder and amchur — that tartness is what makes chole taste alive and bold. A pinch of black salt at the end also adds remarkable complexity that regular salt can’t replicate.
Can I use canned chickpeas for this chole recipe?
You can, but canned chickpeas are pre-cooked without tea or amla, so the dark colour won’t develop in the same way. If using canned, drain and rinse them, then simmer them in a strong black tea solution (2 bags, 2 cups water) with a pinch of salt for 20-30 minutes before adding to the masala. It won’t reach quite the same depth of colour or flavour, but it’s a genuinely solid weeknight shortcut. Reserve the tea liquid to use in your gravy.