Rajma Masala Recipe: The Thick, Deep-Red Punjabi Curry That Tastes Exactly Like Old Delhi
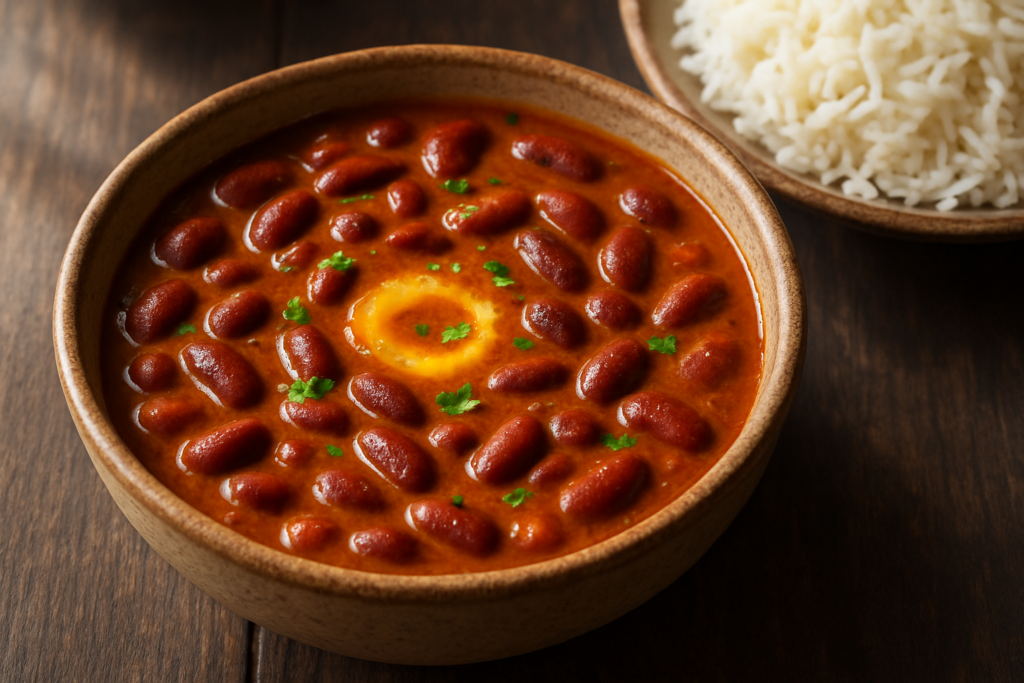
Rajma masala is a thick, brick-red Punjabi kidney bean curry built on a deeply caramelised onion-tomato base, whole spices, and slow simmering. This recipe covers everything needed to get genuine depth of flavour at home: why the gravy goes watery, how to achieve that dark restaurant colour, and the one mashing step most people skip.
Quick Answer: Rajma Masala Recipe at a Glance
- Prep Time: 20 minutes (plus overnight soaking)
- Cook Time: 60 minutes
- Total Time: 1 hour 20 minutes (active)
- Servings: 4
This authentic Punjabi rajma masala recipe delivers a thick, deeply flavoured kidney bean curry with a rich tomato-onion base. Slow-cooked in aromatic whole spices and finished with ghee, it pairs perfectly with steamed basmati rice. Every step here is designed to build maximum flavour from scratch.
Why You’ll Love This Rajma Masala Recipe
- Genuinely thick gravy — the mashed-bean trick thickens the curry naturally, no flour or cream needed.
- Deep, complex flavour from properly caramelised onions and bhuno’d masala — this is what separates home-cooked rajma from the real thing.
- Make-ahead friendly — rajma tastes even better the next day once the beans absorb all that masala overnight.
- Budget-friendly and protein-packed — dried kidney beans are one of the most economical sources of plant protein available anywhere in the world.
- Easy to adapt — works for Jain, no-onion-garlic, and vegan variations without losing its soul.
Ingredients You’ll Need for Punjabi Rajma Masala
A few notes before we begin, especially for anyone reading this from outside India:
- Dried rajma (kidney beans): Ideally the small, speckled chitra rajma from Jammu — find it at any Indian grocery store. Large dark red kidney beans from a Western supermarket work perfectly fine. Just soak them longer, at least 10-12 hours.
- Mustard oil: This gives Punjabi rajma its signature slightly pungent depth. If you genuinely can’t find it, use a neutral oil like sunflower — but you’ll miss something. Mustard oil is widely available at South Asian grocery stores globally.
- Kashmiri red chilli powder: This is non-negotiable for that beautiful deep red colour without excessive heat. Available on Amazon or any Indian store. In a pinch, use half sweet paprika and half regular chilli powder.
- Black cardamom (badi elaichi): That smoky, camphor-like whole spice that floats in the pot. Find it at Indian grocers. If you absolutely can’t get it, just leave it out — but don’t substitute with green cardamom, they taste completely different.
- Amchur (dry mango powder): Adds tartness at the end. Substitute with a squeeze of lemon or a little tamarind water.
- Ghee: For finishing. Use good quality ghee — it makes a visible difference. Ghee contains beneficial fatty acids and has a high smoke point, making it ideal for Indian cooking. Vegans can skip this or use coconut oil.
How to Make Rajma Masala Recipe — Step by Step
Step 1: Soak and Pressure Cook the Rajma
Soak 1.5 cups dried rajma in plenty of water overnight — at least 8 hours, ideally 10-12. The beans will swell and almost double in size. Drain and rinse well.
Add to a pressure cooker with 4 cups fresh water, 1 teaspoon salt, and your black cardamom. Cook on medium-high for 6-7 whistles, then lower heat and cook 10 more minutes. Let pressure release naturally — never force it. Press a cooked bean between your fingers; it should mash completely with no resistance. Reserve the cooking liquid — you’ll need it for the gravy.
Step 2: Build the Aromatic Base
Heat mustard oil in a heavy kadai until it smokes, then reduce the flame. This smoking step removes the raw bitterness. Add your cumin seeds, bay leaves, cinnamon, and cloves. They’ll splutter and become fragrant within 30 seconds — you’ll smell the difference immediately.
Add finely chopped onions and cook on medium heat for 15-18 minutes. Stir every 3-4 minutes. The onions should turn a deep, dark golden-brown — not pale yellow, not burnt black. This is the flavour foundation of the entire rajma curry.
Step 3: Add Ginger-Garlic and Spices (The Bhuno Step)
Add ginger-garlic paste and slit green chillies. Sauté for 2-3 minutes until the raw smell completely disappears. Lower the heat before adding your spice powders — Kashmiri chilli, coriander, turmeric, cumin. Stir fast for 30 seconds — the spices will sizzle and darken. Immediately pour in the tomato puree to stop them from burning.
Now cook this masala on medium heat for 10-12 minutes, stirring regularly. You’re waiting for the oil to separate from the masala and pool at the edges. When you see orange-red oil appearing at the sides, the masala is ready. This bhuno stage is what most people cut short, and it’s exactly why their rajma lacks depth.
Step 4: Add Rajma and Simmer Low and Slow
Add the boiled rajma with about 1.5-2 cups of its reserved cooking liquid. Stir to combine. Now here’s the trick that makes all the difference: use the back of your spoon to mash 5-6 beans directly against the side of the pot. Don’t mash all of them — just enough. The released starch will naturally thicken your gravy as it simmers. No cornflour, no cream, no shortcuts.
Bring to a boil, then simmer uncovered on low-medium heat for 15-20 minutes. The gravy will darken to a gorgeous deep brick-red, the beans will absorb the masala, and the whole pot will become deeply fragrant.
Step 5: Finish and Serve
Add garam masala, amchur, and a generous tablespoon of ghee. Stir, taste, and adjust salt. Simmer 2 more minutes. Garnish with fresh coriander and thin ginger juliennes. Serve immediately.
Tips for Perfect Rajma Masala Every Time
- Never skip the soak. Beans can be cooked without soaking, but the texture and digestibility of properly soaked beans is noticeably better, and they will cook more evenly throughout.
- Use the bean cooking liquid, not plain water. That starchy, slightly seasoned liquid from pressure cooking adds body, colour, and flavour to the gravy. Don’t discard it.
- Don’t panic about the oil separating in the masala. In Indian cooking, seeing oil separate from the masala is a good sign — it means the tomatoes are properly cooked and the spices have bloomed. This is how you know the masala is ready.
- Rajma is always better the next day. Make it a day ahead if you can. The beans soak up the masala overnight and the flavours deepen significantly. Reheat gently with a splash of water.
- The right pot matters. A thick-bottomed heavy kadai or Dutch oven distributes heat evenly and prevents the masala from burning. Thin stainless steel pans make this much harder to control.
Variations of This Rajma Curry Recipe
Jain Rajma (No Onion, No Garlic, No Root Vegetables)
Skip onions, garlic, and ginger. Build the masala with asafoetida (hing), extra cumin, and a cashew-tomato base for richness. It won’t be the same, but it’s still really good. Add more garam masala and a teaspoon of fennel powder to compensate for the missing aromatics.
Vegan Rajma Masala
This recipe is already plant-based! Just swap the ghee for coconut oil or good quality vegan butter at the finishing stage. Everything else stays the same.
Gluten-Free
This rajma masala recipe is naturally gluten-free. Just ensure your spice powders are from a certified GF brand, as cross-contamination can sometimes happen with packaged spices.
Quick Weeknight Version (Canned Beans)
I know purists will disagree, but on a Wednesday evening when you’re exhausted, two cans of rinsed kidney beans are perfectly acceptable. Skip the pressure cooking, add beans directly to the finished masala with 1 cup water, and simmer for 20 minutes. The kidney bean has been cultivated for thousands of years and tastes delicious no matter the form. Don’t let anyone tell you otherwise.
What to Serve With Rajma Chawal (and Beyond)
- Steamed basmati rice (rajma chawal): The classic combination. Cook rice simply with a pinch of salt and a drop of oil. The starchy plain rice and spiced rajma together is one of the greatest food pairings in human history — I will die on this hill. Check out my guide to cooking perfect basmati rice.
- Tandoori roti or phulka: For a more traditional Punjabi meal, serve with fresh hot rotis. The bread scoops up the thick gravy beautifully. Try it with my whole wheat phulka recipe.
- A simple raita and raw onion salad: A quick cucumber-tomato raita cools everything down, and thin slices of raw onion with a squeeze of lemon on the side is exactly how they serve it in Delhi. Don’t skip this.
Storage and Reheating
Rajma keeps beautifully. Store in an airtight container in the refrigerator for up to 4 days. It actually improves as it sits — the beans soak up more flavour overnight, and the gravy deepens. To reheat, add a splash of water (the gravy thickens significantly when cold), heat gently in a pot on low flame, and stir occasionally. Don’t microwave on high — the beans can burst and turn mushy.
For freezing, rajma masala freezes extremely well for up to 3 months. Freeze in individual portions in zip-lock bags or containers. Thaw overnight in the fridge and reheat as above. Making a double batch and freezing half is well worth the effort.
Find more make-ahead Indian curry ideas in my freezer-friendly Indian curries collection.
Frequently Asked Questions About Rajma Masala Recipe
Why is my rajma watery and not thickening?
This is the most common rajma problem, and it almost always comes down to one of two things. Either the onion-tomato masala wasn’t cooked long enough (the oil should visibly separate before you add the beans), or you didn’t mash any beans into the gravy. Mash 5-6 cooked beans against the pot wall — the starch releases and naturally thickens everything as it simmers. Also, simmer uncovered for at least 15-20 minutes to let excess liquid evaporate.
Why is my rajma not getting the deep red colour?
Two things create that gorgeous deep red: Kashmiri red chilli powder (use a full 1.5 teaspoons — it’s mild, not hot) and sufficiently caramelised onions. If your onions are only pale golden, the masala base will look orange and thin rather than deep brick-red. When in doubt, cook the onions a little longer than you think necessary, and add an extra teaspoon of Kashmiri chilli.
Can I use canned kidney beans instead of dried rajma?
Absolutely — two 400g cans work for this recipe. Drain, rinse, and add directly to the finished masala with about 1 cup of water. Simmer for 20-25 minutes. The flavour won’t be quite as deep as beans cooked from scratch with whole spices, but it’s a completely respectable weeknight version.
How long should I soak rajma before cooking?
A minimum of 8 hours, but overnight (10-12 hours) is better. If you forgot to soak, use the quick soak method: cover beans with water, bring to a boil, cook 2 minutes, turn off the heat, cover and let soak for 1 hour. Drain, rinse, and cook as normal. The texture won’t be quite as creamy, but it works in a pinch.
Is rajma masala good for weight loss or high protein diets?
Rajma is genuinely one of the most nutritious foods in the Indian pantry. Kidney beans are an excellent source of plant-based protein (about 15g per cooked cup) and are very high in fibre, which keeps you full for longer. The main thing to watch if you’re tracking calories is the amount of oil and ghee used — but for a wholesome, satisfying meal, this rajma masala recipe is hard to beat nutritionally.