
Paneer Butter Masala Recipe: The Best Dhaba-Style Version You’ll Ever Make at Home
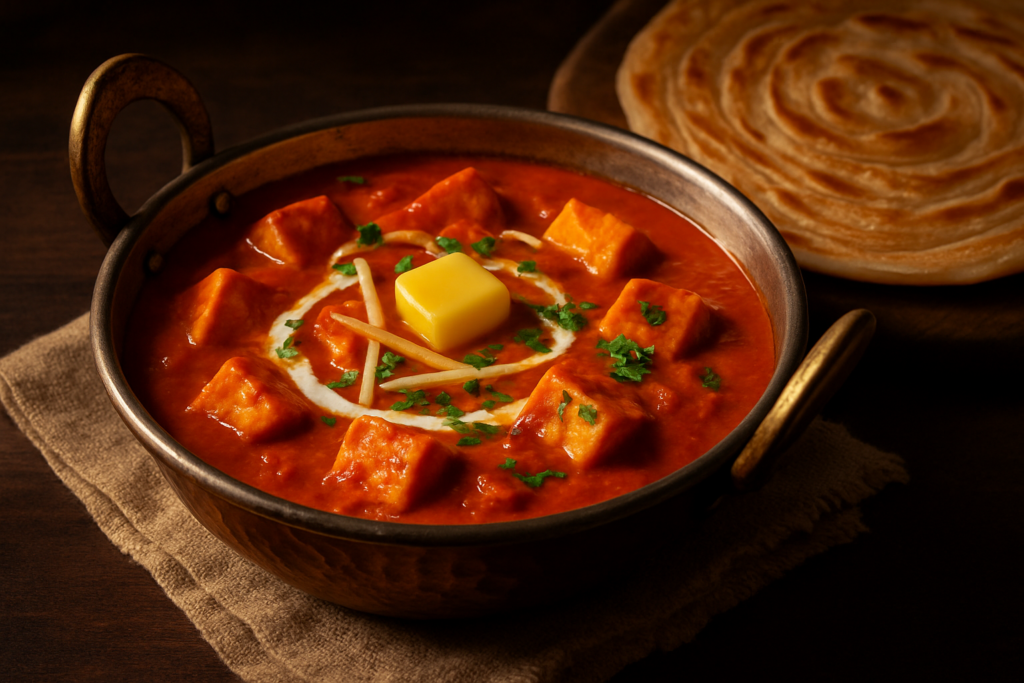
Paneer Butter Masala: Dhaba-Style at Home
This dhaba-style paneer butter masala delivers something bolder and smokier than the standard restaurant version. The difference comes from slightly charring the onions, using black cardamom in the tadka, and not skimping on butter. Prep takes 20 minutes, cooking 35 — and the gravy base can be made ahead and frozen.
Quick Recipe Overview
- Prep Time: 20 minutes
- Cook Time: 35 minutes
- Total Time: 55 minutes
- Servings: 4
This dhaba-style paneer butter masala recipe uses charred whole spices, a slow-cooked tomato-onion base, and a generous hand with butter to create a deeply flavoured, smoky gravy that’s richer and bolder than anything you’ll get at a restaurant. Perfect with buttery naan or plain basmati rice.
Why You’ll Love This Paneer Butter Masala Recipe
- That dhaba smokiness is real: We use a simple technique — dry-charring whole spices and slightly blackening the onions — that gives the gravy a depth restaurants skip for the sake of uniformity.
- It’s genuinely not that hard: Once you’ve made this base, you’ll want to use it for everything. It’s forgiving, flexible, and gets better the next day.
- No cream dependency: The richness here comes from butter and a well-cooked cashew paste — you can skip the cream entirely and it still tastes indulgent.
- Customisable heat level: Scale the Kashmiri chillies up or down. This recipe works across the heat spectrum.
- Meal-prep friendly: Make the gravy base on Sunday and you’ve got a weeknight dinner sorted in under 15 minutes.
Paneer Butter Masala vs Paneer Makhani — Let’s Settle This
Most restaurants use the terms interchangeably, which is genuinely frustrating. Here’s the real difference. Paneer makhani (literally “buttery paneer”) is traditionally a milder, sweeter dish — it originated in Delhi and uses a tomato-based gravy with a generous amount of butter and cream, and very little spice. Think silky, slightly sweet, and luxurious. Paneer butter masala, on the other hand, has more masala in it — more spices, more heat, and a more complex flavour profile. The dhaba version leans even further in that direction, with charred notes and whole spices that give it a completely different character.
Today we’re making the masala version — the one with attitude.
You can read more about the history of the origins of butter-based Indian curries on Wikipedia, which is a fascinating rabbit hole if you’re into food history.
Ingredients You’ll Need for This Paneer Butter Masala Recipe
For the Gravy Base
- 3 tablespoons butter — Use unsalted if you can. Amul butter is a great go-to, but any good-quality butter works. Don’t substitute oil here; the butter is non-negotiable in this recipe.
- 1 tablespoon neutral oil — Adding this to the butter prevents it from burning. Sunflower or refined groundnut oil works perfectly.
- 3 medium onions, roughly chopped — We want them a bit larger than usual because we’re going to char them slightly.
- 2 teaspoons ginger paste — Fresh is best. If you’re abroad and can’t find fresh ginger, the tube pastes from Indian grocery stores are perfectly acceptable.
- 2 teaspoons garlic paste — Same rules apply. Fresh garlic pounded in a mortar is ideal.
- 6-8 medium tomatoes, roughly chopped — Use ripe, red tomatoes. In winter when good tomatoes are hard to find, a mix of fresh and a tablespoon of good tomato paste works well to compensate.
- 15-18 cashews — Soaked in warm water for 20 minutes. This is what gives the gravy that velvety body. If you’re nut-free, melon seeds (magaz) work as a substitute, or skip and add an extra tablespoon of cream at the end.
- 2 tablespoons Kashmiri red chilli powder — This is primarily for colour and mild heat. Kashmiri chilli is key to that gorgeous orange-red colour without making it painfully spicy. If you can’t find it abroad, use 1.5 tablespoons sweet paprika + ½ tablespoon regular chilli powder.
- 1 teaspoon regular red chilli powder — For actual heat.
- 1.5 teaspoons coriander powder
- ½ teaspoon turmeric
- 1 teaspoon garam masala — Added at the end, not while cooking.
- Salt to taste
- 1 teaspoon sugar — Just a pinch to balance the tomato acidity. Don’t skip this.
- 3 tablespoons fresh cream — Optional but recommended for finishing.
The Dhaba Tadka (What Makes It Different)
- 2 dry red chillies — Whole, for tempering
- 1 teaspoon cumin seeds
- 2 green cardamoms
- 1 black cardamom — This is the secret weapon. That smoky, slightly camphor-like flavour of black cardamom is what screams “dhaba.” Don’t skip it.
- 1 small piece of cinnamon (1 inch)
- 2 cloves
- 1 bay leaf
For the Paneer
- 400g fresh paneer, cubed — Cut into 1.5-inch cubes. Homemade paneer is softer and absorbs flavour better, but store-bought works fine. If using packaged paneer, soak it in warm water with a pinch of salt for 15 minutes to soften it before using.
- 1 tablespoon butter — For lightly pan-frying the paneer (optional but worth it)
How to Make Paneer Butter Masala at Home — Step by Step
Step 1: Prep the Paneer
- If you’re using store-bought paneer, take it out of the packet, cut it into 1.5-inch cubes, and drop them into a bowl of warm salted water. Let them sit for 15 minutes while you work on everything else. This simple step makes packaged paneer taste almost homemade — softer, less rubbery.
- Optional but highly recommended: Heat 1 tablespoon butter in a flat pan on medium-high heat. Pat the paneer dry and shallow fry the cubes for about 1-2 minutes per side, just until they get a very light golden crust. Don’t overdo it — we’re not making paneer tikka here. A light golden colour is all we want. This adds a slight texture contrast to the finished dish. Set aside.
Step 2: Make the Dhaba-Style Gravy Base
- In a heavy-bottomed kadai or pot, heat 1 tablespoon butter + 1 tablespoon oil on medium heat. Once the butter melts and starts to foam slightly, add the whole spices: dry red chillies, cumin seeds, both cardamoms, cinnamon, cloves, and bay leaf. Let them sizzle for 30-40 seconds. You’ll hear a wonderful crackling sound and the kitchen will smell extraordinary. This is the dhaba tadka — don’t rush it.
- Add the roughly chopped onions. Here’s the dhaba trick: cook them on medium-high heat and don’t stir too frequently. We want some of the onion edges to catch and slightly char — not burn, but get deep brown-black edges. This takes about 12-15 minutes. Those slightly charred bits are where all the smoky complexity lives.
- Add ginger paste and garlic paste. Stir well and cook for 2 minutes until the raw smell disappears completely. The mixture should smell sweet and deeply savoury now.
- Add the roughly chopped tomatoes. Stir everything together, add the soaked cashews, and cook uncovered on medium heat for 10-12 minutes, stirring occasionally, until the tomatoes have completely broken down and the oil starts to separate at the edges. The mixture should look thick, jammy, and deeply red.
- Add Kashmiri chilli powder, regular chilli powder, coriander powder, and turmeric. Mix well and cook for another 2-3 minutes. The colour will deepen into that characteristic orange-red. If the mixture looks too dry, add a splash of water — just 2-3 tablespoons.
- Remove the bay leaf. Let the mixture cool for 5-10 minutes, then blend it to a completely smooth paste using a high-speed blender. Blend for a full 90 seconds to get that silky texture. Pour the blended gravy back through a fine mesh strainer into the same kadai, pressing through with a spoon. This straining step is the restaurant’s secret — it removes the skin and seeds and gives you that glossy, smooth gravy. Don’t skip it.
Step 3: Build the Final Gravy
- Add the remaining 2 tablespoons butter to the strained gravy in the kadai. Heat on medium and cook the gravy for 5-7 minutes, stirring frequently, until the butter emulsifies into it and the whole thing looks glossy and thick. You’ll see the butter rising to the surface and then getting absorbed back in — this is what you want.
- Add about ¾ cup of water (or more, depending on how thick you like your gravy — medium-thick, almost like a thick soup, is a good benchmark). Add salt and sugar. Stir and bring to a gentle simmer.
- Add the paneer cubes. Stir very gently — paneer breaks easily and we want beautiful whole cubes in the final dish. Simmer for 3-4 minutes so the paneer absorbs some of the gravy flavour.
- Add the garam masala and fresh cream. Stir gently. Cook for just 1 more minute — we don’t want to boil the cream, just warm it through.
- Taste and adjust salt. If it tastes too acidic, add another half teaspoon of sugar. If it’s too thick, add a tiny splash of water. If it needs more richness, add another small cube of butter right at the end. That’s the dhaba way — never shy with the butter.
Step 4: Serve Like a Dhaba
- Ladle into a serving bowl or bring the kadai straight to the table (it keeps the food hotter and looks dramatic). Top with a small cube of butter, a swirl of cream, some julienned ginger, and freshly chopped coriander leaves. Serve immediately.
Tips for Perfect Paneer Butter Masala Every Time
- The char is your friend: Letting those onion edges slightly blacken is what separates this recipe from the restaurant version. If you’re nervous, just let 20-30% of the onion pieces get those dark edges — that’s enough.
- Black cardamom is non-negotiable for the dhaba flavour: I know purists will say paneer butter masala doesn’t traditionally use black cardamom — and they’re right that it’s not in every recipe. But it appears consistently in dhaba cooking, and the smoky difference it makes is unmistakable once you’ve tasted it.
- Blend warm and strain always: Blending the gravy while it’s still warm (not boiling, just warm) gives a much smoother result than cold blending. And please, please strain it. Ten extra seconds of effort, transformational result.
- Quality butter matters more than you think: This dish is named after butter — use the good stuff. In India, Amul is excellent. Abroad, look for European-style butter with higher fat content (around 82-84%). The flavour difference is real.
- Don’t add paneer too early: Paneer only needs 3-4 minutes in the gravy. Add it too early and it becomes tough and rubbery. The paneer goes in right at the end — treat it like a guest of honour who arrives just before dinner is served.
Variations of This Paneer Butter Masala Recipe
Jain Version (No Onion, No Garlic)
Skip the onions and garlic entirely. Instead, double the cashews (to about 30-35) and add 2 tablespoons of melon seeds for body. Use asafoetida (hing) in place of the garlic for a pungent note. The gravy will be lighter but still deeply flavoured.
Vegan Version
Replace butter with good-quality vegan butter (Miyoko’s works well, as does refined coconut oil). Replace cream with full-fat coconut cream or cashew cream. Use tofu pressed and cut into cubes instead of paneer — firm tofu works best. Press it well, pan-fry it to get a crust, and the texture is surprisingly satisfying.
Gluten-Free
This recipe is naturally gluten-free as written — just double-check that your garam masala blend doesn’t contain any fillers, and verify that your butter brand is certified GF if you’re cooking for someone with coeliac disease.
Lower Calorie Version
Reduce butter to 1 tablespoon total and skip the cream — the cashew paste gives enough body that you won’t miss it terribly. You can also use low-fat paneer. It’s not quite the same dish, but it’s still very good on a weeknight when you’re trying to be sensible.
What to Serve With This Paneer Butter Masala
- Butter Naan: The classic pairing and for good reason. The slightly charred, pillowy naan soaked in this gravy is one of life’s great pleasures. Here’s my easy stovetop butter naan recipe if you don’t have a tandoor at home (none of us do).
- Plain Basmati Rice: Restaurants often serve this with jeera rice, and that’s lovely too, but plain steamed basmati lets the gravy shine without competing flavours. How to cook perfect basmati rice every time.
- Laccha Paratha: For a full dhaba experience at home, laccha paratha is the most authentic accompaniment. The layers soak up the gravy beautifully.
Storage and Reheating
Refrigerator: Store in an airtight container for up to 3 days. The flavour actually improves overnight as the paneer absorbs the spices.
Freezer: The gravy base (without paneer) freezes beautifully for up to 2 months. Make a big batch of the gravy and freeze it in portions. To serve, defrost the gravy, heat it up, add fresh paneer, and dinner is done in 10 minutes. This is the biggest meal-prep advantage of this recipe.
Reheating: Always reheat on the stovetop on low heat with a splash of water or milk to loosen it up. Microwave reheating works in a pinch but can make the paneer tough — heat in 60-second bursts and stir between each one. Add a small cube of fresh butter while reheating to revive that richness.
You can learn more about the nutritional benefits of paneer on Healthline — it’s genuinely one of the best plant-based protein sources available, which makes this dish as nutritious as it is delicious.
Also, if you loved this recipe, you might want to try my paneer tikka masala recipe next — it’s got a completely different personality but uses some of the same spice logic.
Frequently Asked Questions About This Paneer Butter Masala Recipe
What is the difference between paneer butter masala and paneer makhani?
They’re often used interchangeably, but technically paneer makhani is sweeter, milder, and richer in butter and cream, with a tomato-forward base. Paneer butter masala has more spices (the “masala” component), more complexity, and a bolder flavour. The dhaba version described here is firmly in the butter masala camp — spiced, smoky, and assertive.
Can I make the paneer butter masala gravy ahead of time?
Absolutely — and it’s worth encouraging. The gravy base (blended, strained, and cooked down) keeps in the fridge for 3-4 days and in the freezer for 2 months. When you’re ready to serve, just heat the gravy, add fresh paneer, and finish with garam masala and cream. The whole thing comes together in under 10 minutes from a pre-made base.
My gravy looks orange but tastes bland — what went wrong?
The colour comes from Kashmiri chilli powder, but the flavour comes from properly cooked onions and tomatoes. If the gravy tastes thin or bland, the most likely culprit is that the onion-tomato base wasn’t cooked long enough — you need to see oil separating at the edges before you blend. Also, make sure you’re adding enough salt (under-salting is the most common reason Indian gravies taste flat) and don’t skip the final 5-7 minutes of cooking the strained gravy in butter.
Can I use frozen paneer for this recipe?
Yes, but defrost it completely and then soak it in warm salted water for 20 minutes before using. Frozen paneer can get a slightly spongy, uneven texture, and the warm water soak helps soften it. With this extra step it works perfectly fine.
How do I make this recipe spicier without ruining the colour?
Add more regular red chilli powder rather than adding more Kashmiri chilli (Kashmiri chilli is mainly for colour, not heat). You can also finely chop 1-2 green chillies and add them along with the ginger-garlic paste. Another dhaba trick: add a teaspoon of chilli oil (the kind you get at Chinese restaurants) to the finished gravy — it adds heat without disturbing the colour or the flavour profile significantly.
2 thoughts on “Paneer Butter Masala Recipe: The Best Dhaba-Style Version You’ll Ever Make at Home”