Panjiri Recipe: The Best Traditional Janmashtami Prasad That’s Also a Postpartum Superfood
Panjiri: Traditional Janmashtami Prasad and Postpartum Superfood
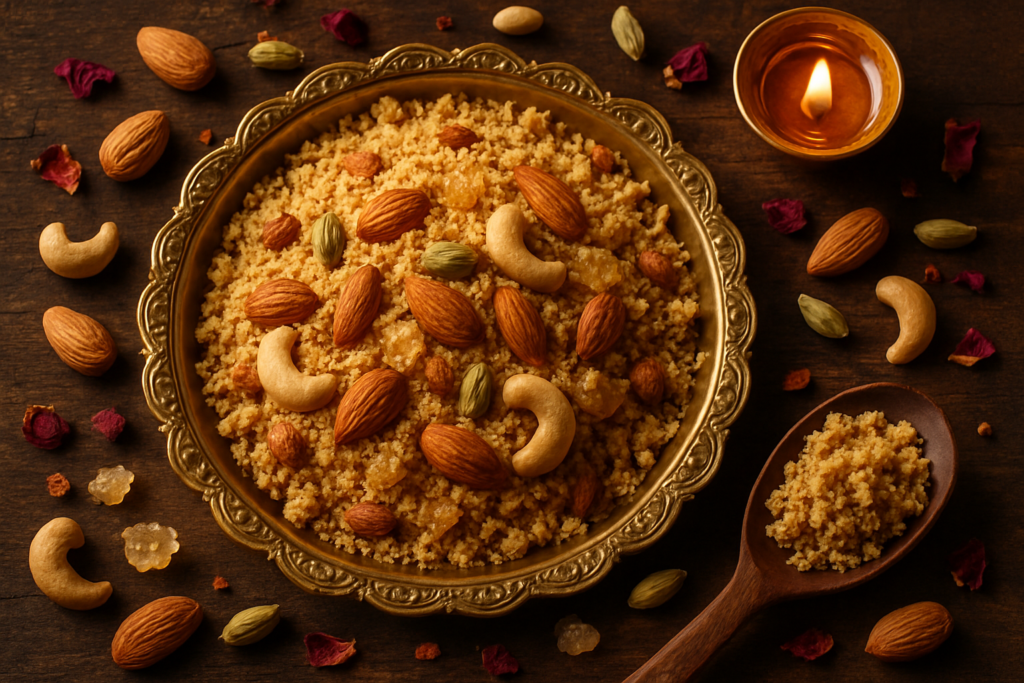
Panjiri is a traditional North Indian sweet made by slowly roasting whole wheat flour in desi ghee, then combining it with powdered sugar, dry fruits, edible gum (gond), and warming spices. It serves two purposes: as sacred prasad offered to Lord Krishna on Janmashtami, and as a calorie-dense, nutrient-rich preparation for postpartum recovery. Here is a complete guide to making it.
What makes this dish remarkable is how one recipe carries two completely different meanings depending on the season. Around Janmashtami, it’s devotion — offered to Lord Krishna and distributed as prasad. In the postpartum context, it’s medicine. Loaded with the remarkable healing properties of ghee, warming spices like dry ginger and edible gum, and calorie-dense nuts, it helps new mothers recover strength and supports lactation. Same recipe, two beautiful purposes.
Why You’ll Love This Panjiri Recipe
- Ready in about 30 minutes — It’s genuinely one of the simpler festive recipes once you understand the roasting process.
- No fancy equipment needed — A heavy-bottomed kadhai, a spatula, and your full attention. That’s it.
- Scales up beautifully — Making panjiri for a big Janmashtami pooja? Just double or triple the quantities. It stores well too.
- Dual purpose — Works as sacred prasad AND as a nutritious postpartum ladoo or loose mixture for new mothers.
- Deeply satisfying and warming — Even outside festivals, a small bowl of panjiri with warm milk on a cold morning is honestly one of life’s great pleasures.
Prep Time: 10 minutes
Cook Time: 25 minutes
Total Time: 35 minutes
Servings: 8–10 (about 300g of panjiri)
Panjiri is a traditional North Indian sweet made by slowly roasting whole wheat flour in generous amounts of desi ghee, then mixing in powdered sugar, dry fruits, edible gum (gond), and warming spices. It’s made as prasad for Janmashtami and as a postpartum superfood for new mothers.
Panjiri Ingredients and Benefits — What Goes In and Why
One of the things worth addressing here is the why behind each ingredient, because panjiri isn’t just a random mix of things — it’s a carefully thought-out Ayurvedic formulation that traditional cooks understood intuitively even if they never used that word.
Main Ingredients
- Whole wheat flour (atta) — 1 cup: The base. Use coarse atta for better texture. Fine maida won’t give you that earthy, nutty flavour.
- Desi ghee — 4–5 tablespoons: Please don’t substitute with oil. Ghee is what makes panjiri panjiri. It also helps your body absorb fat-soluble nutrients from the dry fruits and spices. If you’re abroad, look for cultured butter ghee or make your own.
- Powdered sugar (boora/khand) — ½ cup: Traditionally, raw cane sugar powder (khand or boora) is used. It’s less processed and adds a slight caramel note. Regular powdered sugar works perfectly fine if you can’t find it.
- Edible gum (gond/gaund) — 2 tablespoons: This is the postpartum powerhouse. Gond is fried in ghee until it puffs up beautifully and adds a lovely crunch. Edible gum is known for its bone-strengthening and energy-boosting properties. For the diaspora — you’ll find this at any Indian grocery store labelled as “edible gum” or “gond.”
- Dry ginger powder (sonth) — 1 teaspoon: Warming, digestive, anti-inflammatory. Non-negotiable for the postpartum version. You can reduce it slightly for the prasad version if you prefer milder flavour.
- Green cardamom powder — ½ teaspoon: Fragrant, digestive, and just beautiful.
- Black pepper powder — ¼ teaspoon: Tiny but important. It activates other nutrients and adds warmth. Skip if making for young children or very sensitive palates.
- Almonds — 2 tablespoons, roughly chopped: Blanched or with skin, your choice. With skin adds extra fibre.
- Cashews — 2 tablespoons, roughly chopped
- Raisins (kishmish) — 1 tablespoon
- Melon seeds (magaz) — 1 tablespoon: These are optional for the prasad version but lovely. They’re sometimes called muskmelon seeds at Indian grocery stores.
- Desiccated coconut — 2 tablespoons (optional): Adds a lovely texture and subtle sweetness.
- Poppy seeds (khus khus) — 1 teaspoon (optional)
Substitutions for the Indian Diaspora
Can’t find gond? Some people use puffed lotus seeds (makhana, which is also a traditional Janmashtami ingredient!) for a similar texture, though the nutritional profile is different. Can’t find boora/khand? Regular icing sugar or powdered jaggery work well. For a nut-free version (allergies), replace nuts with more seeds — hemp seeds, sunflower seeds, and pumpkin seeds all work beautifully.
How to Make Panjiri — Step-by-Step Instructions
Step 1: Fry the Gond First
Heat 1 tablespoon of ghee in your heaviest kadhai or pan on medium-low heat. Add the edible gum pieces. They’ll start puffing up within 30–60 seconds — watch them carefully because they can burn fast. They should puff into light, airy, golden clusters. Remove immediately with a slotted spoon and set aside on a plate. Let them cool completely, then crush them lightly with your fingers or a rolling pin. Don’t powder them — you want small crunchy pieces.
Step 2: Lightly Toast the Dry Fruits and Coconut
In the same pan, add a little ghee (just a teaspoon) and lightly toast the almonds, cashews, and melon seeds for 2–3 minutes until they’re just golden and fragrant. Don’t over-roast them — they’ll continue cooking slightly from residual heat. Add the desiccated coconut in the last 30 seconds. Remove and set aside.
Step 3: The Most Important Step — Roasting the Atta
This is where patience matters. Add the remaining ghee (about 3–4 tablespoons) to the kadhai on low-medium heat. Once the ghee is warm but not smoking, add the whole wheat flour. Now stir. And keep stirring. Constantly. The flour will first look pale and clumpy, then gradually turn golden and start smelling absolutely divine — nutty, rich, like the best thing you’ve ever smelled. This takes about 15–18 minutes on low heat. Don’t rush it by turning up the heat — you’ll burn the outside while the inside stays raw. The flour is ready when it turns a deep golden colour and ghee starts releasing slightly from the sides. You’ll also know by smell — it goes from smelling “floury” to smelling like roasted nuts and caramel.
Step 4: Add the Spices
Turn off the heat. Add the dry ginger powder, cardamom powder, and black pepper powder directly to the roasted flour. Stir well — the residual heat will bloom the spices beautifully without burning them.
Step 5: Cool Down Before Adding Sugar
This is the step most beginners skip and then wonder why their sugar melted. Let the roasted flour mixture cool down for at least 10–12 minutes. You want it warm, not hot. Once it’s warm to touch, add the powdered sugar and mix thoroughly until there are no lumps.
Step 6: Mix Everything Together
Add the crushed gond pieces, the toasted dry fruits and coconut, raisins, and poppy seeds if using. Mix gently but thoroughly. Taste it. Adjust sugar if needed. The panjiri should be crumbly, fragrant, golden, and have a pleasant warmth from the spices.
Step 7: Offer as Prasad or Store
For Janmashtami, this panjiri is offered to Lord Krishna and then distributed as prasad. For postpartum use, you can press small portions into ladoos while the mixture is still slightly warm, or simply serve it loose with a glass of warm milk.
Tips for Perfect Panjiri Every Time
- Low and slow is the only way: Medium-low heat the entire time for the atta roasting. High heat = burnt outside, raw inside, and a bitter taste. Set aside 20 full minutes and don’t multitask during this step.
- Use a heavy-bottomed kadhai: A thin pan will give you hotspots and uneven roasting. A cast iron or thick stainless steel kadhai works best.
- Cool before adding sugar: Hot flour will melt the powdered sugar into sticky clumps. Wait for it to be warm (not hot) before adding sugar.
- Don’t skimp on ghee: I know purists will disagree with people who try to make “lighter” versions of panjiri — but honestly, this recipe is supposed to be calorie-dense and nourishing. The ghee is what gives it that melt-in-your-mouth quality and carries the nutrients. You can reduce it slightly, but don’t go below 3 tablespoons for 1 cup of flour.
- Gond must be completely cool before crushing: Hot fried gond is pliable. Cool gond is crunchy and powders well. If you crush it hot, it’ll become sticky and clump together in your panjiri.
Panjiri Recipe Variations
Jain Version
This panjiri recipe is naturally Jain-friendly since it contains no root vegetables, no onion, and no garlic. Just skip any ingredients you observe restrictions on and enjoy freely.
No-Onion No-Garlic Version
The original recipe is already no-onion, no-garlic. You’re all set!
Vegan Version
Substitute ghee with refined coconut oil. The texture and flavour will be different — it won’t have that iconic ghee richness — but it’ll still be very good and nourishing. Use coconut oil at room temperature so it behaves similarly to ghee.
Gluten-Free Version
Replace whole wheat flour with a combination of buckwheat flour (kuttu atta) and amaranth flour (rajgira atta) — both are naturally gluten-free and actually traditional fasting flours in India. The texture will be slightly different but the flavour is wonderful.
Makhana Panjiri for Janmashtami
A popular variation specifically for Janmashtami involves adding roasted and crushed lotus seeds (makhana). This is actually Lord Krishna’s favourite food! Dry roast ½ cup of makhana separately until crispy, crush roughly, and fold into the panjiri. Beautiful texture addition. Check out our makhana recipe collection for more ideas.
What to Serve With This Panjiri
- Warm doodh (milk): The classic pairing. A small bowl of panjiri with a glass of warm milk is the traditional Janmashtami morning offering and the postpartum daily ritual. The fat in the milk enhances absorption of fat-soluble compounds in the panjiri.
- As part of a Janmashtami prasad thali: Pair with Panchamrit, charnamrit, and fresh fruits for a complete prasad spread.
- With chai: A cup of masala chai with a small serving of panjiri makes for a comforting winter evening snack.
Storage and Reheating
Room Temperature: Panjiri keeps beautifully at room temperature in an airtight container for up to 2–3 weeks, especially in cooler weather. The ghee acts as a natural preservative.
Refrigerator: In warmer climates (or Indian summers!), store in the refrigerator for up to 6 weeks. The ghee will solidify slightly, giving the panjiri a slightly different texture — which some people actually prefer.
Freezer: Yes, you can freeze panjiri! Especially useful if you’re preparing large postpartum batches in advance. Freeze in small portions for up to 3 months. Thaw at room temperature for a couple of hours before serving.
Reheating: Panjiri doesn’t really need reheating — it’s meant to be eaten at room temperature or slightly warm. If it’s come out of the fridge and feels too firm, let it sit at room temperature for 15–20 minutes. You can also warm it gently in a pan for 2–3 minutes. Don’t microwave for long or the ghee will separate.
Also see: our complete Janmashtami recipe roundup for more prasad ideas.
Frequently Asked Questions About Panjiri Recipe
Can I make panjiri without gond (edible gum)?
Yes, absolutely. The panjiri recipe works perfectly without gond — you’ll just miss that distinctive crunchy puffed element. If making panjiri purely as Janmashtami prasad (not for postpartum), you can skip it entirely. If you’re making it for a new mother, tracking down the gond is strongly recommended because it’s genuinely one of the most beneficial ingredients for postpartum recovery.
How much panjiri should a new mother eat per day?
Traditionally, new mothers are given 2–3 tablespoons (about 30–40g) of panjiri daily, typically in the morning with warm milk. It’s calorie-dense and rich in warming spices, so moderation is key. Always consult with your doctor or a registered nutritionist for personalised postpartum dietary guidance, especially if there are any health considerations.
Can I use suji (semolina) instead of atta for this panjiri recipe?
You can, and there is actually a suji-based panjiri variation that exists. But it’s a different recipe with a different texture — more granular and lighter. The traditional panjiri recipe for Janmashtami and postpartum use is specifically made with whole wheat atta because the fibre content is higher and the nutritional profile is different. Trying the atta version first before experimenting is recommended.
What’s the difference between panjiri and pinni?
Great question! Both are traditional Punjabi winter sweets made with atta and ghee. The main difference is that pinni is shaped into balls (ladoo form) and typically contains more jaggery and slightly different spices. Panjiri is the loose, crumbly version and is specifically associated with Janmashtami prasad. Think of panjiri as the prasad version and pinni as the festive sweet. Some families press leftover panjiri into ladoos — that’s the overlap you’ll often see.
Can I make panjiri in advance for Janmashtami?
Absolutely, and it’s actually recommended. Panjiri stores so well that making it 2–3 days before Janmashtami works perfectly. The flavours meld and deepen overnight. Just store it in a clean, airtight steel or glass container at room temperature and it’ll be perfect for the pooja. Making it fresh on the day of the fast while fasting and managing the pooja preparations is unnecessarily stressful.