Paneer Tikka Masala Recipe: Best Restaurant-Style Smoky Gravy Without a Tandoor
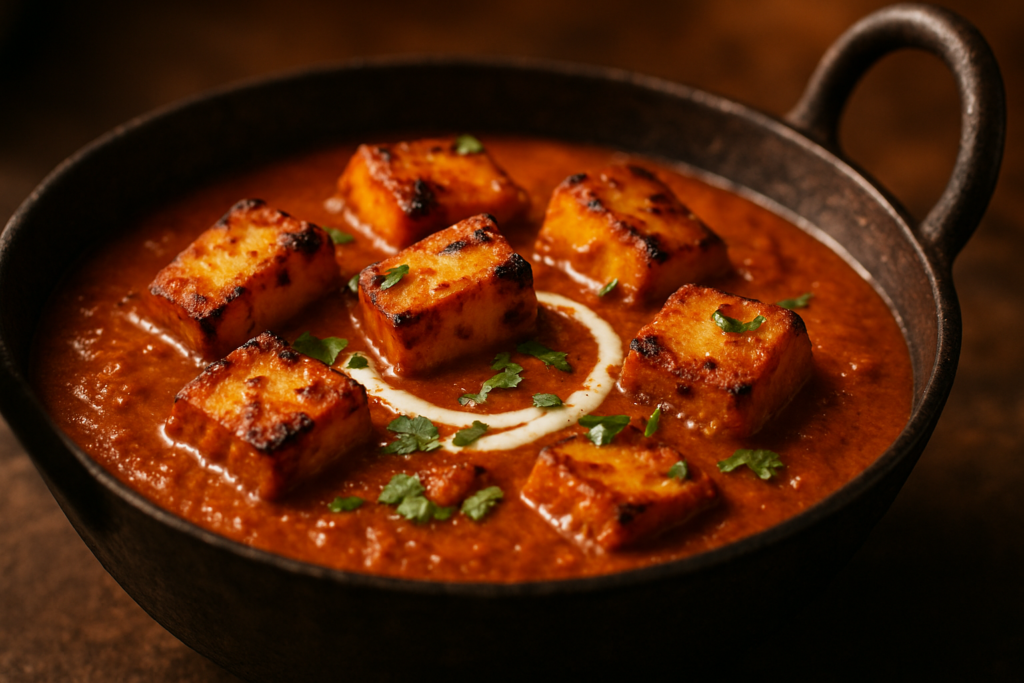
This paneer tikka masala recipe delivers restaurant-style smoky results on a home stovetop — no tandoor required. The method uses a screaming-hot cast iron tawa for genuine char marks, a cashew-thickened tomato gravy cooked until the oil separates, and a dhungar charcoal smoking step that takes three minutes and makes an enormous difference to the final flavour.
The two biggest secrets? High heat for the tikka, and the charcoal smoking step at the end. The dhungar smoke does more for this dish than any spice blend can. Let’s get into it.
Why You’ll Love This Paneer Tikka Masala Recipe
- No tandoor, no oven, no problem: A screaming hot cast iron pan gives you those gorgeous char marks on the stovetop.
- That real smoky depth: The dhungar charcoal technique is the same method used in professional Indian kitchens — and it takes just 5 minutes.
- Make-ahead friendly: Both the tikka and the gravy base can be prepped a day ahead, making this perfect for dinner parties.
- Completely customisable heat level: Kashmiri chilli gives gorgeous colour without killing heat — adjust to your family’s spice tolerance.
- Better than takeaway: Fresh charred paneer in homemade gravy beats reheated restaurant curry every single time.
Prep Time: 30 minutes (plus 2 hours marination) | Cook Time: 40 minutes | Total Time: ~3 hours 10 minutes | Servings: 4
This restaurant-style paneer tikka masala recipe starts with marinated, charred paneer tikka cooked on a stovetop tawa, then simmered in a rich, cashew-thickened tomato gravy, and finished with a dramatic charcoal smoke for that unmistakable dhaba depth. It’s the real deal — bold, smoky, and deeply satisfying.
Ingredients You’ll Need for This Paneer Tikka Masala Recipe
For the Tikka Marinade
- 500g paneer — fresh homemade is best, but good store-bought works fine. If it’s been refrigerated, soak in hot water for 10 minutes first.
- 3/4 cup thick hung curd (yogurt) — this is crucial. Watery yogurt will make the marinade slide off. Hang regular yogurt in a muslin cloth for 30 minutes, or use Greek yogurt if you’re abroad.
- 1 tablespoon besan (gram flour), roasted — roasting removes the raw taste and helps the marinade stick. Don’t skip roasting it.
- Kashmiri red chilli powder — gives that stunning red-orange colour with gentle heat. Outside India, find this in any South Asian grocery store or online. Paprika is a colour substitute but won’t taste the same.
- Mustard oil — traditional in tikka marinades and adds a lovely pungency. If you can’t find it, use any neutral oil, but the flavour will be slightly different.
- 1 tablespoon chaat masala — adds that tangy punch. Available at all Indian grocery stores. A squeeze of lemon plus a pinch of black salt is a workable substitute.
- Bell peppers and red onion — for the classic tikka vegetable mix. Yellow or orange peppers work beautifully too.
For the Masala Gravy
- 10-12 raw cashews — these are your gravy thickener and give creaminess without overwhelming dairy. Soaked almonds work as a substitute.
- 3 medium tomatoes — ripe, red ones please. Canned whole tomatoes work in a pinch — use about 1.5 cups.
- Fresh cream — adds richness at the end. Coconut cream works for a vegan version and adds a subtle sweetness that works well here.
- Kasuri methi (dried fenugreek leaves) — this is non-negotiable. It’s what gives North Indian restaurant gravies that distinctive finish. Find it at any Indian store.
- 1 piece natural charcoal + 1 teaspoon ghee — for the dhungar smoke. Buy natural lump charcoal, not briquettes with chemicals. This is the step that makes this a restaurant style paneer tikka masala.
For a detailed look at the history and nutritional profile of paneer, Wikipedia has a solid overview — it’s one of the most protein-rich fresh cheeses in South Asian cooking.
How to Make Paneer Tikka Masala at Home — Step by Step
Step 1: Make the Tikka Marinade
Dry roast the besan in a small pan on low heat, stirring constantly, for 2-3 minutes until it smells nutty and slightly toasty — you’ll know when it’s ready because the raw floury smell completely disappears. Let it cool for a few minutes.
In a large bowl, whisk together the hung curd, ginger-garlic paste, all the spices (Kashmiri chilli, turmeric, coriander powder, cumin powder, garam masala, chaat masala), the roasted besan, mustard oil, and salt. The marinade should be thick enough to coat the back of a spoon. If it looks too thin, your yogurt wasn’t hung enough — add another teaspoon of besan.
Step 2: Marinate the Paneer (Don’t Rush This)
Add paneer cubes, bell pepper squares, and onion squares to the marinade. Use your hands to coat everything gently and thoroughly. Cover the bowl with cling wrap and refrigerate for at least 2 hours. Overnight is ideal — the difference in flavour between 2-hour and overnight marination is significant. This step is where the tikka flavour lives.
Step 3: Char the Tikka on the Stovetop
Heat a cast iron tawa or heavy skillet over the highest flame your stove allows. Seriously — as hot as it goes. Brush lightly with oil. Place the marinated paneer and vegetables in a single layer, leaving space between pieces. Do not crowd the pan — work in two batches if needed.
Press each piece gently with a spatula. Leave completely undisturbed for 3-4 minutes. You want to hear sizzling, you want to see smoke, and you want proper dark char marks — not just brown patches. Flip carefully and char the other side for 2-3 minutes. The marinade should be dry and slightly blistered. Transfer to a plate and cover loosely. This is your paneer tikka without tandoor — and these char marks are every bit as good.
Step 4: Build the Gravy Base
In a deep pot, heat 1 tablespoon oil. Add the roughly chopped onions and cashews together. Sauté on medium heat for 7-8 minutes, stirring regularly, until the onions are golden and the cashews are lightly toasted. Add tomatoes and a splash of water. Cover and cook for 10 minutes until the tomatoes are completely broken down and jammy.
Let this mixture cool completely — blending hot liquids is a disaster waiting to happen. Blend to an absolutely smooth paste. Then pass it through a fine mesh strainer, pressing with the back of a spoon. This straining step is what separates a grainy home curry from a silky restaurant-style sauce. Don’t skip it on special occasions.
Step 5: Cook the Masala
In the same pot, heat butter and oil together. Add the whole spices (bay leaf, cardamoms, cinnamon) and let them bloom for 30 seconds — you’ll smell them immediately. Add ginger-garlic paste and cook for 2 minutes, stirring, until the raw smell is completely gone.
Pour in the strained tomato-cashew paste. It will splutter aggressively — lower the heat slightly and partially cover the pot. This phase requires patience: cook for 12-15 minutes, stirring every couple of minutes, until the masala thickens considerably, the colour deepens to a rich brick-orange, and you see oil separating and pooling around the edges. That oil separation is your sign the gravy is properly cooked.
Step 6: Spice and Simmer
Add the Kashmiri chilli powder, coriander powder, cumin powder, turmeric, and sugar. Stir well and cook for another 2 minutes to bloom the spices in the masala. Add 1 to 1.5 cups of water — less for a thick, restaurant-style coating gravy, more if you prefer a thinner sauce. Bring to a gentle boil. Taste and adjust salt.
Add the charred paneer tikka and vegetables. Stir gently — a silicone spatula helps avoid breaking the paneer. Simmer on low heat for 5 minutes so everything melds together beautifully.
Step 7: The Dhungar Smoke — The Secret Step
This is where the magic happens. Place a small piece of natural lump charcoal directly on your gas flame using metal tongs. Let it burn for 5 minutes until it’s glowing orange-red and you can see white ash forming on it. Meanwhile, place a small steel katori (bowl) in the center of your curry pot.
Working quickly: place the glowing charcoal in the katori. Immediately drizzle 1 teaspoon of ghee over it — it will smoke dramatically and gorgeously. Clap the lid on the pot as fast as you can and leave for 3-4 minutes. When you lift the lid, you’ll be hit with that unmistakable smoky aroma. That’s the restaurant. That’s the dhaba. That’s it.
Step 8: Finish and Serve
Remove the charcoal katori. Stir in the fresh cream and crushed kasuri methi. Heat gently for 2 minutes — do not boil after adding cream or it may split. Do a final taste check for salt and spice. Garnish with a swirl of cream, fresh coriander, and a pinch of garam masala. Serve immediately.
Tips for Perfect Paneer Tikka Masala Every Time
- High heat is everything for the tikka: If your pan isn’t smoking hot before the paneer goes in, you’ll steam it instead of char it. Take the pan temperature seriously — this single factor determines whether your tikka has restaurant-level char or looks pale and sad.
- Strain your gravy: That silky, velvety texture that makes a curry taste like a restaurant comes from straining. Do it at least when making this for guests.
- Use Kashmiri chilli, not regular chilli: Regular red chilli gives heat but not colour. Kashmiri chilli gives that deep red-orange restaurant colour with a gentler heat. These are genuinely different spices and not interchangeable here.
- Don’t add tikka to boiling gravy: Always lower the heat to a gentle simmer before adding the paneer. Vigorous boiling will break apart those beautiful charred pieces.
- Kasuri methi at the very end, crushed: Rub the dried fenugreek leaves between your palms before adding — this releases the volatile oils and the flavour is dramatically more intense than just crumbling it in.
Variations of This Paneer Tikka Masala Recipe
Jain / No-Onion-No-Garlic Version
Skip onions and garlic entirely. For the marinade, use asafoetida (hing) and extra ginger instead of ginger-garlic paste. For the gravy, use only tomatoes and cashews blended with a generous pinch of hing. The flavour will be different but still deeply satisfying.
Vegan Paneer Tikka Masala
Replace paneer with extra-firm tofu (press it well and freeze-then-thaw for a chewier texture). Use coconut yogurt for the marinade. Replace fresh cream with coconut cream or cashew cream. Skip the ghee in the dhungar step and use coconut oil instead. I know purists will disagree, but tofu tikka masala done right is genuinely delicious.
Gluten-Free Version
Good news — this recipe is naturally gluten-free as written. Just double-check that your garam masala and chaat masala blends don’t contain any wheat-based fillers, which some commercial brands unfortunately do add.
Extra Smoky Version (No Charcoal)
If you genuinely can’t find natural charcoal, add 1/2 teaspoon smoked paprika to the gravy and use a blowtorch briefly over the surface of the finished curry. It’s not identical, but it adds a layer of smokiness that improves the dish.
What to Serve With This Paneer Tikka Masala
- Butter Naan or Garlic Naan: The classic pairing. The soft, slightly charred bread is perfect for scooping up that rich gravy. Check out my homemade garlic naan recipe — it’s easier than you think.
- Jeera Rice: If you want a lighter, grain-based accompaniment, simple cumin-tempered basmati rice is perfect and lets the curry flavours shine. My perfect jeera rice recipe takes 15 minutes flat.
- Laccha Paratha: Layered, flaky whole wheat paratha is underrated with this dish — the layers catch and hold the gravy beautifully. Try my laccha paratha recipe for the flakiest result.
Storage and Reheating
Refrigerator: Store leftover paneer tikka masala in an airtight container in the fridge for up to 3 days. The flavours actually deepen overnight, so day-two leftovers are often even better.
Freezer: The gravy freezes beautifully for up to 2 months — but freeze it without the paneer, which can become grainy and crumbly after freezing. Add freshly made or purchased paneer when you reheat the defrosted gravy.
Reheating: Reheat gently on the stovetop over low-medium heat, adding a splash of water if the gravy has thickened too much in the fridge. Stir occasionally. Do not microwave on high power — paneer turns rubbery and the cream can split. If using a microwave, use 50% power in 90-second intervals, stirring in between.
If you’re curious about the health benefits of paneer and its nutritional value, Healthline has a thorough breakdown — it’s genuinely one of the best plant-based protein sources available.
Frequently Asked Questions About Paneer Tikka Masala Recipe
Can I skip the charcoal smoking step?
You can, and the dish will still be delicious. But if you want that authentic, restaurant-style smokiness, please don’t skip it. Even a 3-minute dhungar treatment makes a massive difference to the final flavour. If you genuinely can’t source natural charcoal, try adding a tiny pinch of smoked paprika to the gravy, or use a kitchen blowtorch briefly over the surface of the curry.
What’s the difference between paneer tikka masala vs paneer butter masala?
These two are confused constantly, and honestly the menus at many restaurants don’t help. Paneer butter masala uses raw or lightly sautéed paneer in a mildly sweet, creamy tomato-butter gravy — it’s gentle, silky, and slightly sweet. Paneer tikka masala uses marinated-and-charred paneer tikka pieces in a smokier, more robustly spiced gravy. The char on the paneer and the smoky depth is what sets tikka masala apart. It has more character and complexity, in my personal opinion.
Can I make restaurant-style paneer tikka masala without a tandoor?
Absolutely yes — that’s exactly what this entire recipe is designed to show you. A very hot cast iron tawa on your stovetop creates genuine char marks. The secret is using the highest heat your stove allows and having patience — don’t touch or move the paneer for the first 3-4 minutes. Let it develop proper char. Combine that with the dhungar smoking step and you genuinely cannot tell the difference from a restaurant version.
Can I use store-bought paneer for this recipe?
Yes, absolutely. If using refrigerated store-bought paneer, soak the cubes in hot water for 10-15 minutes before marinating. This softens the paneer and helps the marinade penetrate much better. Homemade fresh paneer is the first choice for texture, but good quality store-bought paneer works perfectly well.
Why does my paneer tikka masala gravy look orange-red in restaurants but mine looks pale?
Two reasons: Kashmiri red chilli powder quantity, and properly cooked-down masala. First, make sure you’re using Kashmiri chilli specifically — it has a very deep pigment. Second, cook your tomato-onion paste long enough that the oil fully separates — this is when the natural carotenoid pigments in the tomatoes and chilli become fat-soluble and the colour blooms. If you rush this cooking step, the gravy will look pale and taste raw. Patience in the masala cooking phase = the beautiful restaurant colour.