Dal Baati Churma Recipe: Authentic Rajasthani Step-by-Step Guide with That Perfect Smoky Finish
Dal Baati Churma: Authentic Rajasthani Step-by-Step Guide with That Perfect Smoky Finish
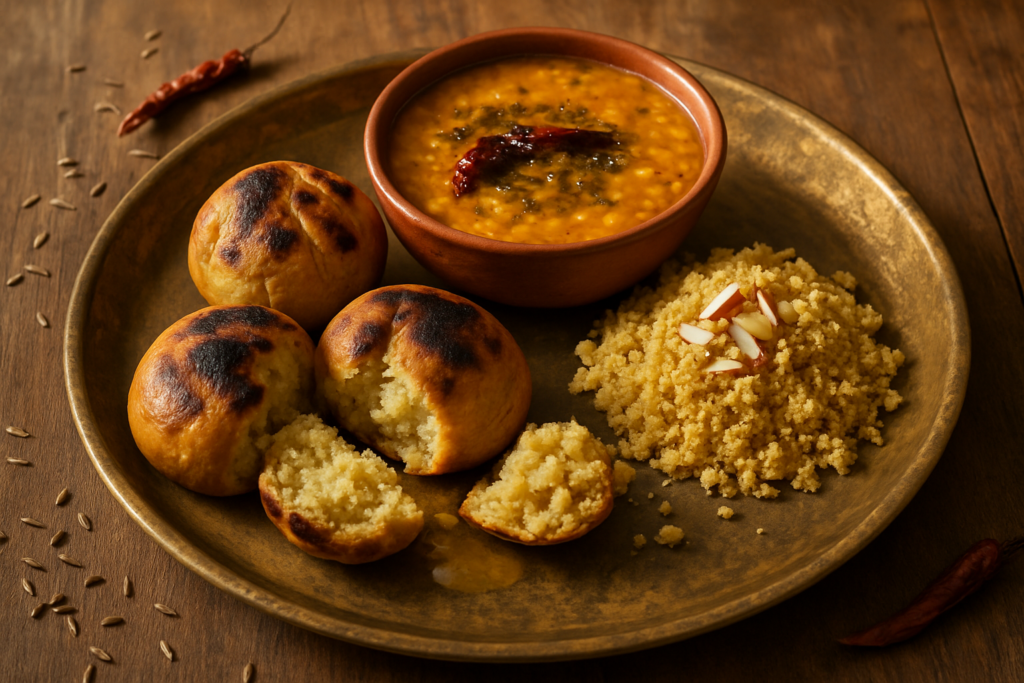
Dal baati churma is a complete Rajasthani meal: crispy whole-wheat baatis baked and finished over a flame, a hearty five-lentil panchratan dal with a smoky spiced tadka, and a sweet, ghee-laden crumbled churma. This guide covers every element with full quantities, sensory cues for doneness, and every mistake worth avoiding.
Prep Time: 30 minutes
Cook Time: 90 minutes
Total Time: 2 hours
Servings: 4–6 people
Summary: This authentic dal baati churma recipe features crispy whole-wheat baatis baked in the oven (with a gas flame finish for smokiness), a hearty five-lentil panchratan dal, and a sweet ghee-laden churma. It’s a complete, deeply satisfying Rajasthani thali experience made entirely at home.
Why You’ll Love This Dal Baati Churma at Home
- No tandoor needed: The oven-plus-gas-flame method genuinely replicates that charred, smoky exterior that makes baati so special.
- A full meal in one: You get protein, carbs, and dessert all from one cooking session — it’s meal-prep royalty.
- Scales beautifully: The ratios hold up perfectly whether cooking for 4 or 40.
- Customizable dal: You can use whatever lentils you have — the full panchratan recipe AND a simpler everyday version are both covered below.
Ingredients You’ll Need for This Rajasthani Dal Baati Recipe
For the Baati
- 2 cups whole wheat flour (atta) — Use a coarse chakki-ground atta if you can find it. It gives the baati that slightly rough, rustic texture. Abroad? Bob’s Red Mill whole wheat flour works fine.
- ¼ cup semolina (sooji/rava) — This is the secret to a baati with a slight crunch on the outside.
- ½ cup ghee (clarified butter) — Do NOT skimp here. Moyan (the fat you rub into the flour before kneading) is everything.
- ½ tsp carom seeds (ajwain)
- ½ tsp baking soda
- Salt to taste
- Water, as needed — roughly ¼ to ⅓ cup. Add slowly. The dough must be stiff, not soft.
- Extra ghee for dunking — At least ½ cup more. Rajasthani baati is traditionally drowned in ghee before serving.
For the Panchratan Dal
- ¼ cup chana dal
- ¼ cup toor dal
- 2 tbsp moong dal (yellow, split)
- 2 tbsp urad dal (white, split)
- 2 tbsp masoor dal (red lentils)
- 1 medium tomato, finely chopped
- 1 medium onion, finely chopped (skip for no-onion version — see Variations)
- 1 tsp ginger-garlic paste
- 2 green chillies, slit
- 1 tsp cumin seeds
- ½ tsp mustard seeds
- ½ tsp turmeric powder
- 1 tsp red chilli powder (adjust to taste)
- 1 tsp coriander powder
- ½ tsp garam masala
- 2 tbsp ghee for tadka
- Salt to taste
- Fresh coriander and a squeeze of lemon to finish
- Optional but wonderful: 1 dried red Kashmiri chilli and a pinch of hing (asafoetida) in the tadka
For the Churma
- 1.5 cups whole wheat flour (atta)
- 3 tbsp semolina (sooji)
- ¼ cup ghee — for the dough
- Water, as needed — just enough to bind; keep the dough stiff
- Oil or ghee for frying — roughly 2–3 cups in a deep pan
- ½ cup powdered sugar or jaggery powder — jaggery gives a more authentic, earthy sweetness. Abroad? Grated piloncillo or coconut sugar work.
- ½ tsp cardamom powder
- 2 tbsp mixed dry fruits: roughly chopped almonds, cashews, raisins
- 2–3 tbsp warm ghee to mix into the churma at the end
Step-by-Step Instructions for Authentic Dal Baati Churma
Part 1: Making the Baati Dough
- Start with the moyan (fat incorporation): In a large mixing bowl, combine whole wheat flour, semolina, ajwain, baking soda, and salt. Now add the ½ cup ghee. Using your fingers, rub the ghee into the flour until the mixture looks like coarse breadcrumbs and holds its shape when you press a fistful of it. This step is called moyan lagana and it’s what creates those beautiful flaky layers inside. Don’t rush this — spend at least 3–4 minutes working the ghee in thoroughly.
- Knead a stiff dough: Now add water, just a little at a time. You’re aiming for a dough that is considerably stiffer than roti dough — think plasticine, not Play-Doh. If the dough feels sticky or soft, add a little more flour. Cover and rest for 20 minutes. This rest is non-negotiable — it helps the gluten relax and the baati hold its shape.
- Shape the baatis: Divide the dough into 12–14 equal portions (roughly the size of a golf ball). Roll each one between your palms into a smooth ball, then gently press a small indent with your thumb in the centre. This indent helps the baati cook evenly inside. They should look like little round buns with a belly button.
Part 2: Baking Baati in the Oven
- Preheat your oven to 180°C (350°F). Line a baking tray with parchment paper or lightly grease it. Place the shaped baatis on the tray with about an inch of space between them. Bake for 30–35 minutes, flipping them halfway through at the 15-minute mark. You’re looking for an even golden-brown colour all around. When you tap a baati, it should sound hollow — that’s your cue that they’re cooked through. If the outside colours too quickly and you’re not sure about the inside, lower the temperature to 160°C and give them another 8–10 minutes.
- The gas flame finish (the smoky magic): This step is what separates a good baati from a great baati. Once the baatis are fully baked, turn your gas burner to medium-high and place each baati directly on the flame using tongs, turning it every 15–20 seconds until you see charred spots appear and the outer shell gets that deep brown, slightly smoky crust. Each baati takes about 60–90 seconds over the flame. The aroma will tell you you’re on the right track.
- Ghee dunking — mandatory: Melt at least half a cup of ghee in a wide bowl. Using a clean kitchen towel, crack each hot baati open slightly (some people break them fully in half, Rajasthani style) and dunk them in the warm ghee, letting them soak for 30 seconds. The baatis will absorb the ghee and develop a gorgeous shine. Place them back on the tray. I know purists will disagree with me on quantity, but I genuinely think you need to be generous here — a dry baati is a sad baati.
Part 3: Making the Panchratan Dal
- Wash and soak the dals: Rinse all five lentils together until the water runs clear. Soak them together for 30 minutes if you have time — it reduces cooking time significantly. Drain.
- Pressure cook the dals: Add the soaked lentils to a pressure cooker with 3 cups of water, turmeric, and a pinch of salt. Cook on high heat for 3–4 whistles (or 15 minutes in an Instant Pot on high pressure with natural release). The dals should be completely soft and mashable — not watery soup, but not a stiff paste either. If needed, add a splash of water and mash gently with the back of a spoon.
- Make the tadka: Heat 2 tbsp ghee in a heavy kadhai or pan over medium-high heat. Once the ghee shimmers, add the hing (if using). Add cumin seeds — they should sizzle and turn golden within 20 seconds. Now add mustard seeds and let them pop. Add the dried red chilli. Toss in the chopped onion and cook, stirring often, until it turns deep golden-brown — this takes a good 8–10 minutes on medium heat. Don’t rush the onion. Add ginger-garlic paste and cook for 2 minutes until the raw smell disappears. Add the tomatoes, green chillies, and all the dry spice powders. Cook this masala until the ghee starts to separate at the edges and the tomatoes are completely broken down — another 6–8 minutes.
- Combine and simmer: Pour the cooked, mashed dals into the masala. Stir well, taste for salt, and adjust consistency with water — you want it flowing but not thin. Bring to a boil, then lower heat and simmer for 10 minutes so all the flavours marry. Finish with garam masala, fresh coriander, and a squeeze of lemon.
Part 4: Making the Churma
- Make the churma dough: Mix whole wheat flour, sooji, ghee, and just enough water to bring it together into a very stiff dough — even stiffer than baati dough. Divide into 4–5 large rounds (not as refined as baati; these are just for frying and crumbling).
- Fry the churma rounds: Heat oil or ghee in a deep pan over medium heat. Fry the dough rounds on low-medium heat for 12–15 minutes, turning occasionally, until they are golden brown all over and completely cooked through. They should feel light and sound hollow when tapped. Drain on paper towels and cool completely before the next step. Don’t rush this frying — raw dough inside will ruin the texture.
- Crumble and grind: Once cooled, break the fried rounds into rough pieces and pulse them in a mixer/grinder until you get a coarse, crumbly powder. Don’t over-grind — you want texture, not fine flour. A few chunky bits are perfectly welcome.
- Mix the churma: Transfer the crumbled mixture to a bowl. Add jaggery powder (or powdered sugar), cardamom powder, chopped dry fruits, and the warm ghee. Mix with your hands until everything is combined and the churma holds together loosely when pressed. Taste and adjust sweetness. Shape into loose mounds or small ladoo-style balls if serving for a party. A few strands of saffron dissolved in a teaspoon of warm milk is a traditional addition for special occasions.
Tips for Perfect Dal Baati Churma Every Time
- The moyan ratio is everything: For baatis, use a thumb rule — the ghee should be about 25% of the flour’s weight. Too little and the baati will be hard and dry; too much and it won’t hold its shape. A kitchen scale is helpful when making a big batch.
- Stiff dough = good baati: Soft baati dough doesn’t work. The dough should feel quite firm to the touch — like putty. If it’s giving and pliable like roti dough, you’ve added too much water.
- Don’t skip the gas flame finish: If you have an induction cooktop and no gas, place the baked baatis under the broiler/grill for 3–4 minutes at maximum heat as an alternative. It’s not identical, but it gives a similar char and colour.
- Dal consistency matters: The dal should be thicker than dal makhani but looser than hummus. It thickens as it sits, so always keep it slightly more liquid than you think you need — by the time it reaches the table, it’ll be perfect.
- Make churma last: Churma sits well at room temperature for hours. Make it while the baatis are in the oven so everything comes together at roughly the same time without stress.
Variations to Suit Every Kitchen and Diet
Jain / No-Onion-No-Garlic Dal Baati Churma
Skip the onion and garlic entirely from the dal tadka. Instead, increase the hing to a good pinch and add an extra tomato. The dal will taste different but is still deeply satisfying. Many Rajasthani families make it this way on religious occasions — it’s not a compromise, it’s a tradition.
Vegan Version
Replace ghee in the baati dough and tadka with refined coconut oil. The baati won’t have the same richness, but it’ll still be good. For churma, use coconut oil and coconut sugar. The flavour profile shifts slightly towards the tropical, which is interesting in its own way.
Gluten-Free Adaptation
This one is tricky — baati is fundamentally a wheat product — but versions made with a 50:50 blend of chickpea flour (besan) and rice flour are possible. The texture is very different, more like a firm fritter, but the dal and churma can be made gluten-free easily. Check that your hing brand is gluten-free (some are processed with wheat flour).
Air Fryer Baati
Preheat your air fryer to 170°C. Place baatis in a single layer and cook for 20–22 minutes, flipping at the 10-minute mark. Then do the gas flame finish as described. Works surprisingly well and saves oven space when making a large batch.
What to Serve With This Rajasthani Dal Baati Churma Recipe
- Lehsun ki chutney (garlic chutney): A fiery, pungent raw garlic chutney is the traditional accompaniment and cuts through the richness of all that ghee beautifully. Here’s my Rajasthani lehsun chutney recipe.
- Ker Sangri sabzi: This dried desert bean and berry vegetable curry is as Rajasthani as it gets. It’s earthy, tangy, and the perfect salty contrast to the sweet churma. Read my ker sangri recipe here.
- Buttermilk (chaas): A tall, cold glass of salted chaas with a pinch of roasted cumin and ginger is genuinely the best beverage decision you can make alongside this meal. It aids digestion and cools everything down.
Storage and Reheating
Baati: Store at room temperature in an airtight container for up to 2 days, or refrigerate for up to 5 days. To reheat, place in a preheated oven at 160°C for 8–10 minutes until warmed through. You can also reheat directly on a gas flame for 1–2 minutes for that fresh smoky quality. Do not microwave — they turn rubbery.
Dal: Refrigerates beautifully for up to 4 days. It thickens considerably in the fridge, so always reheat with a splash of water and stir well. Can be frozen for up to 1 month.
Churma: This is the one that actually improves with age. Store in an airtight jar at room temperature for up to 5 days, or refrigerate for up to 2 weeks. The dry fruits plump slightly and the flavours deepen. Bring to room temperature before serving — cold churma tastes flat.
Leftover baati broken into the dal the next day with a fresh tadka poured over the top makes an excellent breakfast. Learn more about the history and regional significance of dal baati churma if you’re curious about where this dish comes from.
Frequently Asked Questions About Dal Baati Churma
Can I make baati without an oven — just on the gas stove?
Absolutely, and this is actually the traditional method. You’ll need a thick-bottomed kadhai or a traditional baati maker (a covered iron plate with a domed lid, available on Amazon India). Place the baatis in the kadhai on a very low flame, cover, and cook for 30–35 minutes, turning every 8–10 minutes. They’ll be slower and require more attention but taste just as good. Then finish them on the open flame as described in the recipe.
My baati came out raw and doughy inside — what went wrong?
This is the most common dal baati problem and it’s almost always one of two things: either the dough was too soft (too much water), or the oven temperature was too high and the outside cooked before the inside had time to follow. Next time, make the dough firmer, lower the oven temperature to 160°C, and extend the baking time. The thumb-press indent in the centre also helps heat penetrate more evenly.
What is panchratan dal exactly — can I use just one type of lentil?
Panchratan means “five jewels” — it’s a blend of five lentils (chana, toor, moong, urad, and masoor) that gives the dal its complex, layered flavour. Each lentil contributes differently: chana dal adds body, masoor adds creaminess, moong lightens it. You can absolutely use just toor dal or a mix of whatever you have — it’ll taste different but still be delicious. The Healthline breakdown of lentil nutrition and health benefits is worth a read if you want to understand why this five-lentil combination is so nutritionally complete.
How much ghee is actually needed — can I reduce it?
You can reduce it, but you’ll taste the difference. The minimum for good baati is about ¼ cup ghee in the dough for 2 cups flour. For the dunking, you can use less if you like — brush them with melted ghee rather than dunking. For the churma, the ghee is non-negotiable for texture. This is a celebratory dish and ghee is baked into its DNA. There’s more on cooking with ghee here if you’re curious about the traditional perspective on it.
Can I make this dal baati churma recipe a day ahead for a party?
Yes, and it actually works well for parties. Make and bake the baatis the night before — they reheat brilliantly in the oven. The dal is always better the next day after the flavours have had time to settle (just reheat with a fresh tadka poured over the top for best results). The churma can be made 2–3 days ahead and stored in an airtight container. On the day, all you need to do is reheat the dal and baatis, and your Rajasthani feast is ready.