Instant Pot Indian Dal Recipes: 8 Classic Lentil Dishes You’ll Make on Repeat
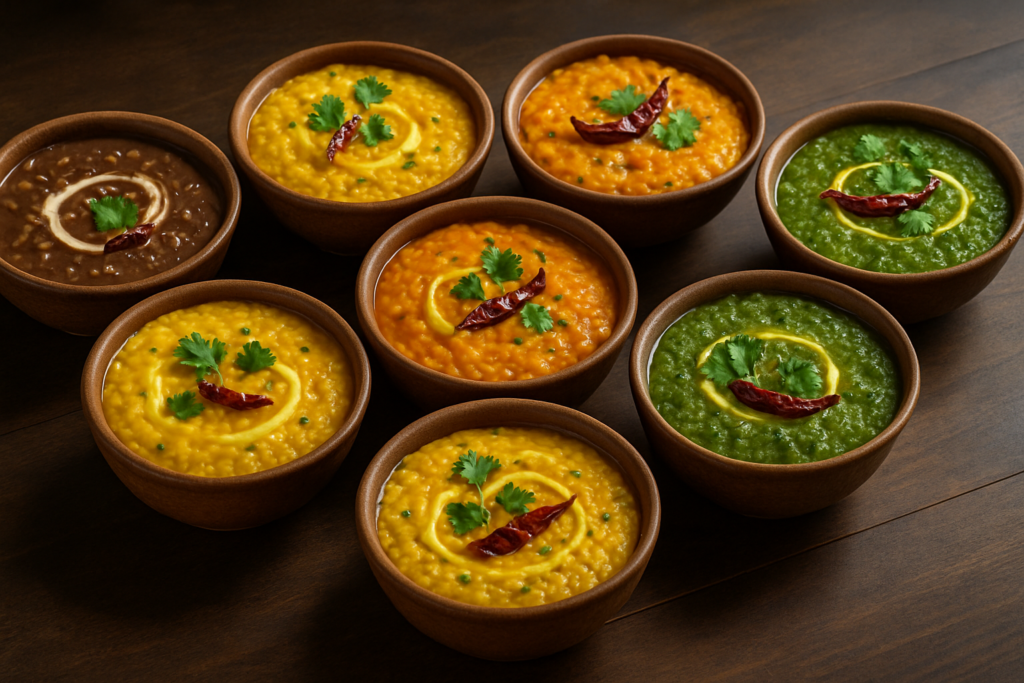
Eight Classic Indian Dal Recipes for the Instant Pot
This post covers eight classic Indian dal recipes adapted for the Instant Pot, with precise pressure cooking times, water ratios, and full stovetop conversion instructions. Each recipe includes a proper tadka, tips for restaurant-style results, and notes for vegan, Jain, and gluten-free adaptations. Dals range from 8-minute moong dal tadka to rich, creamy dal makhani.
Prep Time: 15 minutes (plus soaking time for whole dals)
Cook Time: 8–45 minutes (varies by dal variety)
Total Time: 30 minutes to 1 hour
Servings: 4 per recipe
Summary: Eight authentic Indian dal recipes adapted for the Instant Pot with precise pressure cooking times, water ratios, and full stovetop conversion instructions. Each recipe includes a proper tadka, tips for restaurant-style results, and notes for vegan, Jain, and gluten-free adaptations.
Why You’ll Love These Indian Dal in Instant Pot Recipes
- Dramatically faster cooking: Dal makhani that takes 6-8 hours on the stovetop is done in under an hour in the Instant Pot — with the same depth of flavor.
- Zero babysitting required: Set the pressure, walk away, come back to perfectly cooked dal. No stirring, no watching, no scorched bottoms.
- All eight classic dals in one place: Moong dal, masoor dal, toor dal, chana dal, dal makhani, mixed dal, palak dal, and sabut moong — you’ll never need another reference.
- Beginner-friendly with detailed sensory cues: Each stage is described in terms of what it should look and smell like, so you actually know when something’s right.
- Incredible nutrition: Lentils are one of the most nutrient-dense plant foods available — high in protein, iron, and fiber — making these dals a genuinely wholesome meal.
The 8 Instant Pot Indian Dal Recipes at a Glance
Before we dive into individual instructions, here’s a quick reference chart so you can decide what you’re making tonight:
- 1. Moong Dal Tadka — Fastest, lightest, 8 mins on High Pressure. No soaking needed.
- 2. Masoor Dal — Beautiful orange color, creamy texture, 10 mins on High Pressure. No soaking needed.
- 3. Toor Dal (Arhar Dal) — The everyday Maharashtrian/South Indian staple, 12 mins on High Pressure.
- 4. Chana Dal — Slightly nutty, holds its shape, 18 mins on High Pressure. Soak 4 hours.
- 5. Dal Makhani — The queen of all dals, rich and creamy, 25 mins + slow simmer. Soak overnight.
- 6. Panch Mel Dal (Mixed Dal) — Uses 5 different lentils, incredibly complex flavor, 15 mins on High Pressure.
- 7. Palak Dal (Spinach Dal) — Toor dal with fresh spinach stirred in after pressure cooking, 12 mins.
- 8. Sabut Moong Dal — Whole green moong, earthy and nutritious, 20 mins on High Pressure. Soak 2-3 hours.
Ingredients You’ll Need for These Instant Pot Indian Dal Recipes
Most of these ingredients are pantry staples in any Indian kitchen, but notes are included for those shopping at regular grocery stores or international supermarkets.
The Lentils
- Whole black urad dal — For dal makhani. Find at any Indian grocery store. Online on Amazon works too. No substitute — split urad will not give the same result.
- Rajma (kidney beans) — Goes into dal makhani. Regular canned kidney beans work in a pinch for the stovetop version.
- Chana dal — Bengal gram, split. Not the same as yellow split peas, though those can substitute in an emergency.
- Toor dal — Also called arhar dal or pigeon peas. Find at Indian stores or some Caribbean grocery stores.
- Moong dal — Split yellow mung lentils. These are widely available even in regular supermarkets now.
- Masoor dal — Red lentils. The most universally available; any grocery store stocks these.
- Sabut moong — Whole green mung beans. Health food stores usually carry these as “mung beans.”
The Aromatics & Spices
- Ghee — Please use ghee if you can. It makes a profound difference in the tadka. Vegan? Use coconut oil or a neutral oil.
- Asafoetida (hing) — Just a tiny pinch. It adds an irreplaceable depth and aids digestion. Outside India, find it at Indian stores or online.
- Curry leaves — Fresh are best. Frozen work nearly as well. Dried curry leaves are almost useless — skip them rather than use dried.
- Kasuri methi (dried fenugreek leaves) — The secret ingredient to add to almost every dal at the end. Adds a slightly bitter, aromatic finish.
You can read more about the history and varieties of dal as a staple Indian food on Wikipedia — it’s genuinely fascinating how deeply embedded lentils are in South Asian culinary culture.
How to Cook Dal in the Instant Pot — The Master Method
Once you understand this basic method, all eight recipes follow the same pattern. Only the dal variety, water ratio, and pressure cooking time change.
Step 1: Rinse and Soak (Where Required)
Rinse your chosen dal in 2-3 changes of cold water, swishing it around with your hand, until the water runs mostly clear. This removes surface starch and any impurities. For split dals (moong, masoor, toor) — you can cook them directly without soaking. For whole lentils (urad, chana, sabut moong) — soak in plenty of cold water for the times listed above. Soaked lentils will have swollen visibly and feel slightly softer when you press one between your fingers.
Step 2: Build the Masala Base on Sauté Mode
Press the Sauté button on your Instant Pot and let the pot heat for 1 minute. Add ghee — it should shimmer almost immediately. Add cumin seeds and watch them carefully; within 30-40 seconds they’ll turn slightly darker and release a toasty, warm aroma. This is your cue to add onions. Cook onions for 5-6 minutes, stirring every minute or so, until they’re genuinely golden brown (not just translucent — actually golden). Add ginger-garlic paste and cook another 2 minutes until the sharp raw smell gives way to something sweeter and more fragrant. Add tomatoes and dry spices, and cook until the oil separates from the masala — you’ll see little orange-red pools forming around the edges of the mixture. That’s when you know the masala is ready.
Step 3: Pressure Cook with the Right Water Ratio
Cancel Sauté mode. Add your rinsed dal and water according to these ratios:
- Moong dal, masoor dal: 1 cup dal : 2 cups water
- Toor dal, chana dal: 1 cup dal : 2.5 cups water
- Whole urad dal, sabut moong: 1 cup dal : 3 cups water (after soaking)
- Mixed dal: 1 cup dal mix : 2.5 cups water
Add salt, give everything a gentle stir, and secure the lid with the vent set to Sealing.
Step 4: Set the Correct Pressure Cook Time
Select Pressure Cook (or Manual) on High Pressure and set the time:
- Moong dal: 8 minutes
- Masoor dal: 10 minutes
- Toor dal: 12 minutes
- Palak dal (toor + spinach): 12 minutes (add spinach after cooking)
- Chana dal: 18 minutes
- Panch mel dal: 15 minutes
- Sabut moong (soaked): 20 minutes
- Dal makhani (urad + rajma, soaked): 25 minutes
Step 5: Natural Pressure Release
For all these dals, use a Natural Pressure Release (NPR) for at least 10 minutes. This means leaving the pot alone after the cooking time ends. The pressure will gradually release on its own. After 10 minutes, you can flip the vent to Venting to release any remaining steam. NPR gives a creamier, more evenly cooked dal — especially for whole lentils — compared to Quick Release, which can make lentils slightly grainy in texture.
Step 6: Adjust Consistency and Finish
Open the lid and stir the dal. It should be soft enough that a grain mashes easily between two fingers. If it’s too thick, add hot water and stir. If it’s too thin, use Sauté mode to simmer it down uncovered for a few minutes. For Palak Dal, stir in 2 cups of roughly chopped fresh spinach right now — the residual heat will wilt it perfectly in 2-3 minutes without losing that bright green color. For Dal Makhani, stir in butter and cream here, then switch to Sauté mode and let it simmer for 5-8 minutes. The longer you simmer dal makhani, the better it gets.
Step 7: Make the Final Tadka
This step is optional but it’s what separates good dal from great dal. Heat 1-2 tablespoons of ghee in a small steel or iron ladle directly on the flame (or in a small pan). Add cumin seeds, 1-2 dried red chilies, and a fat pinch of red chili powder. The moment the chili powder hits the hot ghee it’ll foam up and turn deep red — immediately pour this sizzling tadka over your dal and cover the pot for 30 seconds so the smoke and aroma infuses through the dal. Finish with crushed kasuri methi rubbed between your palms (this releases the oils), fresh coriander, and a squeeze of lemon.
The Special Case: Instant Pot Dal Makhani
Dal makhani deserves its own moment because it’s genuinely the most involved of all these recipes, and also the most rewarding. I know purists will insist that real dal makhani needs to simmer for 6-8 hours on a wood fire or slow cooker, and they’re not entirely wrong — but the Instant Pot gets you 90% of the way there in a fraction of the time, and I’ll take that trade any day of the week.
The key tip for instant pot dal makhani that often goes unmentioned: after the pressure cooking cycle, switch to the Keep Warm setting (not Sauté) and let it sit for another 30 minutes without opening the lid. The gentle residual heat continues to break down the dal and develop that characteristic creaminess. Then open, add butter and cream, and finish on Sauté mode. This extra step makes a remarkable difference.
Check out my complete standalone dal makhani recipe for even more detail on this dish.
Stovetop Conversion Instructions for Every Dal
If you don’t have an Instant Pot, don’t worry — every single one of these recipes works beautifully in a traditional Indian pressure cooker or even a regular heavy-bottomed pot. Here’s exactly how to convert:
Using a Traditional Stovetop Pressure Cooker
Follow the exact same masala-building steps in the pressure cooker base. Add soaked/rinsed dal and water (use the same ratios). Close the lid, place the weight/whistle on top, and cook on medium-high heat. Use these whistle counts:
- Moong dal: 2 whistles
- Masoor dal: 3 whistles
- Toor dal: 3-4 whistles
- Chana dal (soaked): 5-6 whistles
- Sabut moong (soaked): 5-6 whistles
- Urad dal + rajma (soaked overnight): 7-8 whistles
Always let the pressure release naturally by moving the cooker off the heat and waiting until the weight drops on its own.
Using a Regular Pot (No Pressure Cooker)
This works best for split dals. Cook the masala base in a heavy pot. Add dal and 3 cups water per cup of dal (more water evaporates this way). Bring to a boil, skim any foam, reduce heat to medium-low, partially cover, and simmer: moong/masoor for 20-25 minutes, toor dal for 30-35 minutes. Stir occasionally. Whole dals are not recommended without a pressure cooker — they can take 2+ hours.
Tips for Perfect Instant Pot Indian Dal Recipes Every Time
- Never skip the sauté step: Dal cooked by throwing everything in raw and pressure cooking is fine, but the flavor is flat. Building that onion-tomato masala first on Sauté mode is what gives the dal its soul.
- The water ratio matters more than you think: Too little water and you risk a burn notice. Too much and the dal is watery. Follow the ratios above and you’ll be golden — literally.
- Do the NPR, always: Natural Pressure Release makes the dal creamier. Quick Release can make the lentils slightly grainy in texture, especially the split varieties.
- Season after pressure cooking, not before: Adding salt before pressure cooking is fine (it doesn’t affect cooking time, that’s a myth), but always taste and re-season after. Pressure cooking concentrates flavors, so you might need less salt than you think.
- The double tadka trick: Add one tadka at the beginning when you build the masala base, and another fresh tadka right before serving. This layering of flavors makes the dal taste restaurant-quality.
Variations to Suit Every Kitchen and Dietary Need
Jain Version
Skip the onion, garlic, and ginger entirely. Instead, build your masala base with just cumin, asafoetida (hing), tomatoes, and spices. Increase the hing slightly — it does some of the flavor work that garlic would normally do. All 8 dals work beautifully this way.
No-Onion No-Garlic Version
Same as above, but you can keep ginger if you like. A good trick is to add a few more tomatoes and a teaspoon of amchur (dry mango powder) at the end to compensate for the missing depth.
Vegan Version
Replace ghee with coconut oil or a neutral vegetable oil. Skip the butter and cream in dal makhani and use full-fat coconut milk instead — stir in ¼ cup at the end. The flavor profile is slightly different but genuinely delicious. For other dals, the switch from ghee to oil is seamless.
Gluten-Free Version
All 8 of these dal recipes are naturally gluten-free as long as you check that your asafoetida (hing) is gluten-free. Many commercial hing products contain wheat flour as a filler. Look for brands that specifically say gluten-free or use pure asafoetida resin.
What to Serve With These Indian Dal in Instant Pot Recipes
Dal is one of those dishes that plays beautifully with so many things. Here’s what pairs well:
- Steamed basmati rice: The classic pairing. You can actually cook rice in the Instant Pot simultaneously using the pot-in-pot method — rice in a smaller bowl placed on a trivet inside the pot while the dal cooks below. Check out my guide on perfect basmati rice in the Instant Pot.
- Freshly made roti or phulka: For a more traditional thali experience. Dal poured over rice is a classic comfort food combination, but scooping dal with a hot roti is a completely different and equally satisfying experience.
- Jeera rice: If you want something a step up from plain rice but still simple. The cumin-flavored rice is a perfect foil for rich dals like dal makhani.
- A simple kachumber salad: Diced tomato, cucumber, onion, green chili, lemon juice, and coriander. The freshness cuts through the richness of any dal beautifully. See my quick kachumber recipe here.
Storage and Reheating
Dal is one of the best meal prep foods there is. It keeps beautifully and often tastes even better the next day once the flavors have had time to meld.
- Refrigerator: Store in an airtight container for up to 4-5 days. Dal will thicken considerably as it cools — this is normal and not a problem.
- Freezer: All 8 of these dals freeze excellently for up to 3 months. Freeze in individual portions for easy weeknight dinners. Masoor dal and moong dal freeze best; dal makhani freezes wonderfully too.
- Reheating: Add a splash of water (dal absorbs liquid as it sits), stir, and reheat on the stovetop over medium heat or in the microwave in 1-minute intervals. If reheating dal makhani, add a small knob of butter while reheating — it brings it right back to life.
- Instant Pot reheating: Use the Sauté mode on Low for 5-7 minutes, stirring occasionally. Add water as needed.
Frequently Asked Questions About Instant Pot Indian Dal Recipes
Do I need to soak dal before cooking in the Instant Pot?
For split dals like moong dal, masoor dal, and toor dal — no soaking needed at all. For whole lentils like urad dal, chana dal, and rajma, soaking for 4-6 hours dramatically reduces cooking time and improves digestibility. If you forget to soak, just add 5-10 extra minutes to the pressure cooking time.
How much water do I use for dal in the Instant Pot?
The general rule: split dals get a 1:2 ratio of dal to water, while whole dals need 1:2.5 to 1:3. So 1 cup of moong dal gets 2 cups of water, and 1 cup of whole urad dal gets about 3 cups of water (after soaking). You can always adjust consistency after cooking by adding more water or simmering to thicken.
Can I make dal makhani in the Instant Pot without soaking overnight?
It is possible by adding 10-15 extra minutes to cook time, but the texture is never quite as creamy and the skins can be a little tough. For dal makhani specifically, the overnight soak makes a meaningful difference to the final dish. Plan ahead and you won’t regret it.
Why is my Instant Pot dal watery or too thick?
If it’s too watery, simply switch to Sauté mode and simmer without the lid for 5-8 minutes — it’ll thicken right up. If it’s too thick, add ¼ cup of hot water at a time and stir. Dal continues to thicken as it cools, so always cook it a little thinner than you want to serve it.
I got a Burn Notice on my Instant Pot while making dal. What went wrong?
The most common cause is not enough liquid, or thick masala stuck to the bottom of the pot before you sealed the lid. Two fixes: always deglaze the pot (add a splash of water and scrape any browned bits off the bottom) after the Sauté step and before adding dal and water. And make sure you’re using enough water per the ratios listed above. If you get a burn notice, switch the pot off, do a quick release, open, add ¼ cup water, scrape the bottom, and restart pressure cooking.