
How to Ferment Idli Batter Perfectly: Science-Based Guide for Cold Climates, Instant Pot & Oven Methods
How to Ferment Idli Batter: Three Reliable Methods With the Science Behind Each
Fermentation is the step that makes or breaks idli batter, and it fails most often because of three fixable problems: iodised salt, cold kitchens, and chlorinated water. This guide explains the science behind why fermentation works, covers three reliable methods — oven light, Instant Pot yogurt setting, and traditional countertop — and includes troubleshooting for every common failure mode.
Prep Time: 20 minutes (plus 6–8 hours soaking) | Fermentation Time: 8–18 hours depending on method | Total Time: ~14–26 hours | Servings: Makes batter for approximately 40–50 idlis (serves 6 generously)
This guide teaches you exactly how to ferment idli batter using three reliable methods — the oven light trick, the Instant Pot yogurt setting, and the traditional countertop method — with science-backed explanations for why each step matters. Perfect for cold climates, diaspora kitchens, and anyone whose batter has ever refused to rise.
Why You’ll Love This Idli Batter Fermentation Guide
- Works everywhere — Mumbai rooftop or a cold Toronto apartment, there’s a method here for your kitchen.
- Actually explains the science — you’ll understand why fermentation fails, so you can troubleshoot on your own next time.
- No special equipment required — the oven method uses what you already have.
- Fixes bad batter — over-fermented, under-fermented, and flat batter scenarios are all covered.
- Gluten-free, vegan, and naturally probiotic — good for your gut and completely plant-based.
The Science of How to Ferment Idli Batter (Without Getting a PhD)
Here’s the short version of what’s actually happening in that bowl of batter. Urad dal and rice carry naturally occurring lactic acid bacteria (LAB) — primarily Leuconostoc mesenteroides and Lactobacillus species — on their surface. When you soak and grind them, you create a warm, moist, starch-rich environment that these bacteria love. They consume the starches, produce lactic acid (the tang), and release carbon dioxide gas (the bubbles that make idlis fluffy).
The sweet spot for these bacteria is 25°C to 32°C. Below 22°C, they become sluggish and barely reproduce. Above 40°C, you start killing them off. This is the entire reason batter won’t ferment in a cold kitchen — the bacteria aren’t dead, they’re just too cold to work. Idli has been documented as a fermented food in South Asian cuisine for over a thousand years, and the traditional method worked perfectly in South India’s warm climate — but requires adjustment everywhere else.
One more crucial point: iodised salt kills LAB. Iodine is added to table salt specifically as an antimicrobial agent — brilliant for food safety, terrible for fermentation. This is single-handedly the most common reason people have trouble fermenting idli batter outside India. Switch to rock salt, sea salt, or any non-iodised salt, and you’ll notice an immediate difference.
Ingredients You’ll Need for Perfect Idli Batter
The ingredient list looks short, but the quality of each one matters enormously here.
- 3 cups idli rice — Short-grain parboiled rice. In the US or UK, look for it at any Indian grocery store. Substitute: parboiled rice (not regular long-grain, not basmati). Sona masoori works acceptably too.
- 1 cup whole urad dal — Skinned, split black gram. Must be whole urad dal, not urad flour. In a pinch, urad dal with skin works — the idlis will be slightly darker but equally fluffy.
- 1/4 cup thick poha (flattened rice) — Adds starch and helps fermentation. Skip it if you can’t find it, but don’t skip it if you can.
- 1 tsp fenugreek seeds (methi) — Soaked with the dal. These seeds are rich in nutrients and promote beneficial bacteria, and they genuinely help fermentation kick off faster.
- 1.5–2 tsp non-iodised salt — Rock salt (sendha namak) is ideal. Sea salt works. Do NOT use regular iodised table salt.
- Water — Filtered or boiled-cooled water if your tap water is heavily chlorinated (chlorine also inhibits LAB). If your tap water is good quality, it’s usually fine.
- 1/2 tsp sugar (optional) — Useful in winter. It gives the bacteria an immediate food source and jump-starts fermentation by 1–2 hours.
How to Make and Ferment Idli Batter: Step-by-Step
Step 1: Soak Your Dal and Rice Separately
Rinse the urad dal and fenugreek seeds together until the water runs clear — usually 3 to 4 rinses. Cover with at least double the amount of cold water and soak for 6–8 hours. Rinse the idli rice and poha together and soak separately for 5–6 hours. Don’t soak them together — they grind at different textures and soaking times overlap conveniently, so this is easy to manage.
Step 2: Grind the Urad Dal First — This Step Makes or Breaks Fluffy Idlis
Drain the urad dal and fenugreek. Grind them in a wet grinder or blender with very cold water — adding a few ice cubes keeps the temperature down while grinding. The friction from blending heats the batter, and if it gets too warm, you can partially deactivate the LAB before fermentation even begins. Add water gradually, tablespoon by tablespoon. Grind for 15–20 minutes until the batter is incredibly smooth, white, and almost whipped-looking. When you drop a small amount in a bowl of water, it should float. That’s how you know you’ve ground it right. I know purists will insist on a wet grinder here, and honestly? They’re right — it makes a noticeably fluffier batter — but a powerful blender like a Vitamix or Preethi works fine for most home cooks.
Step 3: Grind the Rice to a Slightly Coarse Texture
Drain the soaked rice and poha. Grind with cold water to a slightly grainy paste — think fine semolina texture, not smooth cream. The slight coarseness gives idlis their characteristic texture. Over-grinding the rice gives you flat, rubbery idlis. Under-grinding gives you gritty ones.
Step 4: Combine, Salt, and Mix with Your Hands
Transfer both batters to a large vessel — and I mean large. The batter needs room to rise and at least double. A 5-litre stainless steel vessel works well for this quantity. Add the non-iodised salt and optional sugar. Now mix everything with your clean hands for a full 2–3 minutes. This isn’t just quaint tradition — your hands are warm, and the mixing introduces oxygen and warmth that kickstarts the LAB. The batter should be the consistency of thick pancake batter — pourable but not watery.
Step 5: Choose Your Fermentation Method
This is the heart of everything. Here are your three reliable options:
Method A — The Oven Light Trick (Best for Cold Climates, No Special Equipment)
Preheat your oven to its lowest setting (usually 150–170°F / 65–75°C) for just 5 minutes. Turn the oven completely off. Place your covered batter vessel inside and turn on just the oven light. The light bulb alone generates enough gentle heat to keep the interior at roughly 27–32°C — exactly what the bacteria need. Leave for 10–14 hours. Check at the 10-hour mark; in a cold home (under 18°C ambient), you might need the full 14. Do not open the oven repeatedly or the heat escapes.
Method B — Instant Pot Yogurt Setting (Most Consistent Results Year-Round)
Press the Yogurt button on your Instant Pot and set it to Normal mode (not Less, not More). The IP maintains around 38–40°C on this setting — slightly warmer than ideal, but the bacteria handle it fine for 10–12 hours. Place your batter vessel inside the IP insert. Use a glass lid or plate to cover — do NOT use the pressure cooking lid with the sealing ring, because CO2 needs to escape. Set the time for 10–12 hours. In very cold winters, go 12–13 hours. The batter rises beautifully and consistently every single time. This is the method I’d recommend to anyone living outside India.
Method C — Traditional Countertop Method (Works in Warm Climates or Summer)
If your kitchen is genuinely warm — 26°C or above — just cover the vessel with a loose lid or plate (not airtight — let the CO2 out) and leave it on the counter. In Chennai summers, this takes 8–10 hours. In mild seasons or air-conditioned homes hovering around 22–24°C, give it 12–16 hours. You can also wrap the vessel in a thick towel or blanket and place it near a radiator or warm appliance.
Step 6: Check If Your Batter Has Fermented Properly
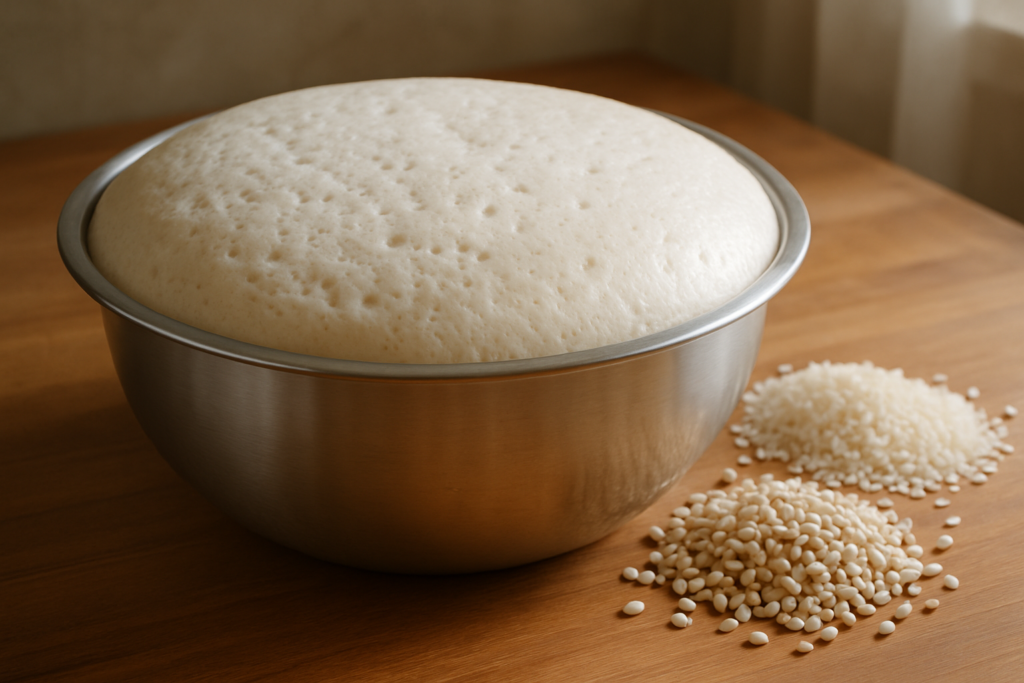
A well-fermented batter will have risen to nearly double its original volume. The surface will look bubbly, airy, slightly domed, and frothy. It will smell pleasantly tangy — like fresh yogurt or mild sourdough. If you stick a clean spoon in, it should feel light and airy, not dense. If the batter looks flat and smells just like raw dal — it needs more time and warmth. Give it another 2–4 hours using the oven method.
Step 7: Store and Use
Once fermented, stir gently only the portion you’re using. Do not aggressively stir the whole batch — you’ll deflate the air bubbles. Refrigerate everything else immediately. Cold batter lasts 4–5 days in the fridge and fermentation nearly stops, so it won’t over-sour. When making idlis, fill moulds 3/4 full and steam for 10–12 minutes on high heat.
Tips for Perfect Idli Batter Fermentation Every Time
- Never use iodised salt. This cannot be overstated — it kills the natural bacteria. Rock salt is available at every Indian store under the name sendha namak.
- Use your vessel size wisely. The batter needs space to rise. A vessel that’s only half full ferments better than one that’s 80% full, because the bacteria thrive with more surface area exposed.
- Cold water while grinding protects the bacteria. Blender friction generates heat. Keep the batter cold during grinding so you don’t accidentally kill your LAB before they even start working.
- Don’t skip the fenugreek seeds. They genuinely accelerate fermentation, and food science backs this up.
- Judge by look and smell, not just time. Every kitchen is different. A batter in a 30°C Mumbai kitchen in June might be done in 7 hours; the same batter in a 16°C London kitchen in February might need 18. Learn to read the signs.
Variations: Adapting This for Different Dietary Needs
No-Onion, No-Garlic (Satvik)
This batter is already completely satvik. No onion or garlic in the batter at all. Use the idlis with coconut chutney or plain sambar without onion.
Jain Version
Traditional idli batter contains no root vegetables, so it’s naturally suitable for a Jain diet. Just ensure your accompaniments are also root-vegetable-free.
Gluten-Free
Idli batter made with rice and urad dal is entirely gluten-free. It’s one of South India’s greatest gifts to gluten-sensitive eaters. Check that your poha (flattened rice) is certified gluten-free if you’re celiac — cross-contamination can happen in some facilities.
Vegan
Already 100% vegan. No dairy, no eggs. Idli and its batter are completely plant-based.
Quinoa Idli (High Protein Variation)
Replace 1 cup of idli rice with 1 cup of soaked quinoa. The fermentation works similarly, and the idlis are slightly denser but higher in protein. I know purists will come for me in the comments for this one — but it’s genuinely good.
What to Serve With Idlis Made from This Batter
- Coconut Chutney — The classic pairing. Fresh coconut ground with green chilli, ginger, and tempered with mustard seeds and curry leaves. Check out my easy coconut chutney recipe that takes 10 minutes flat.
- Idli Sambar — A thin, tangy lentil and vegetable soup that the idlis literally soak up. Try my restaurant-style idli sambar for the full South Indian breakfast experience.
- Tomato Chutney or Onion Chutney — For days when you don’t have fresh coconut. Quick to make and equally delicious. See my 5-minute tomato chutney.
Storage and Reheating Your Idli Batter
Unfermented batter: Do not refrigerate before fermentation — the cold will stop the process completely. Ferment first, then refrigerate.
Fermented batter in the fridge: Keeps well for 4–5 days. The batter will continue to develop mild sourness in the fridge (slowly), so days 1–3 give you the mildest, fluffiest idlis. Days 4–5 are better for dosas, which benefit from a slightly sour batter.
Freezing: Yes, you can freeze fermented batter. Pour into freezer-safe containers leaving room for expansion. Freeze for up to 1 month. Thaw overnight in the fridge — do not microwave to thaw. The idlis from frozen-then-thawed batter are about 80% as good as fresh. Fine for a weeknight, not for company.
Reheating cooked idlis: Steam them in the idli steamer for 2–3 minutes, or wrap in a damp paper towel and microwave for 30–45 seconds. Never reheat idlis in a dry microwave without moisture — they turn to rubber.
Frequently Asked Questions About How to Ferment Idli Batter
Why is my idli batter not fermenting even after 12 hours?
The most common culprits are iodised salt (which kills the natural bacteria), chlorinated tap water, or a room temperature below 24°C. Switch to rock salt or sea salt, use boiled-and-cooled or filtered water, and move the batter to a warmer spot — like an oven with just the light on, or wrapped in a blanket near a heater. Adding a pinch of sugar also gives the bacteria a quick boost.
How long to ferment idli batter in different climates?
In warm South Indian summers (28–35°C), 8–10 hours is usually enough. In mild climates or air-conditioned homes (22–26°C), expect 12–14 hours. In cold climates or winters below 20°C, you’ll need 14–18 hours with active warming methods like the oven light trick or Instant Pot yogurt setting. Always judge by the rise and bubble activity, not just time.
Can I use the Instant Pot to ferment idli batter?
Absolutely, and it’s my favourite method for winters. Use the ‘Yogurt’ setting on Normal mode. The Instant Pot maintains around 38–40°C — slightly warmer than ideal — so 10–12 hours is usually enough. Make sure your batter vessel fits inside and leave the lid slightly ajar or use a separate glass lid so CO2 can escape. The batter rises beautifully and consistently every time.
My fermented batter smells too sour or alcoholic — is it still usable?
A very sharp sour smell or a strong alcohol/yeast smell means the batter has over-fermented. This happens when it’s been left too long in a very warm spot. It’s still safe to eat, but the idlis will taste quite sour. You can use over-fermented batter for dosas or uttapam where the sourness is more welcome — just don’t steam it into idlis. Next time, reduce the fermentation time or move it to the fridge earlier.
Does the type of rice matter for fermentation?
Yes, it genuinely does. Idli rice (a short-grain parboiled rice) ferments more reliably than raw rice because parboiling gelatinises the starches slightly, making them more accessible to the lactic acid bacteria. Sona masoori also works well. Basmati is worth avoiding — it ferments poorly and makes flat, dense idlis. If you’re abroad and can’t find idli rice, parboiled rice is your best substitute.



One thought on “How to Ferment Idli Batter Perfectly: Science-Based Guide for Cold Climates, Instant Pot & Oven Methods”