Aloo Poha Recipe: Perfect Soft & Fluffy Poha That Never Turns Mushy
Aloo Poha: Fluffy, Golden, Never Mushy
This aloo poha recipe makes a fluffy, lightly spiced flattened rice dish with cubed potatoes, mustard seeds, curry leaves, and peanuts. The single most important technique is rinsing the poha briefly under running water in a strainer — never soaking it in a bowl. Get that right and the rest is straightforward. Ready in about 25 minutes from start to finish.
The secret to poha that isn’t mushy or sticky isn’t in some exotic spice or technique. It’s in the rinsing. Poha should never be soaked in a bowl. Hold the strainer under running water for about twenty seconds, shake it twice, and walk away. No pressing it down, no adding more water “just to be sure.” Just a quick rinse and trust. This is explained in full in the tips section below.
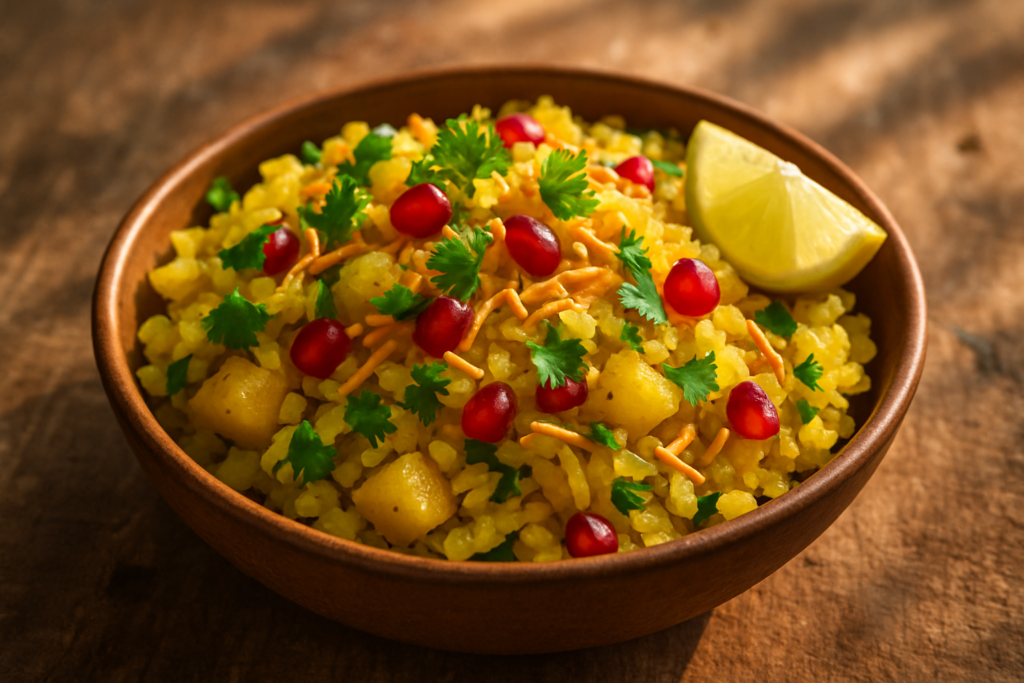
Indore is basically the poha capital of India — Indori poha topped with sev, fine chopped onion, pomegranate seeds, and a squeeze of lime is a classic. This home version is inspired by that style, kept accessible for everyday cooking. It comes together in about 20 minutes and works beautifully as a weekday breakfast, a light dinner, or even a tiffin box filler for kids.
Prep Time: 10 minutes | Cook Time: 15 minutes | Total Time: 25 minutes | Servings: 4
This aloo poha recipe makes a fluffy, golden, lightly spiced flattened rice dish cooked with cubed potatoes, mustard seeds, curry leaves, and peanuts. The key is rinsing the poha briefly under running water (never soaking it), draining thoroughly, and folding it gently into the cooked base on low heat. Ready in under 30 minutes from start to finish.
Why You’ll Love This Aloo Poha Recipe
- Genuinely beginner-friendly: If you follow the rinsing instructions carefully, you cannot go wrong.
- Ready in 25 minutes: Faster than any toast-egg situation on a busy weekday morning.
- Naturally gluten-free: Poha (flattened rice) is rice-based, making this a safe option for people avoiding gluten. Just double-check your sev if you use it — some brands contain wheat flour.
- Easily customisable: Add veggies, skip the onion, make it Jain — the base recipe works as a canvas for so many variations.
- Light but satisfying: Flattened rice is easier to digest than whole grains and gives you a good energy boost without that heavy, sluggish feeling after breakfast.
Ingredients You’ll Need for This Aloo Poha Recipe
- 2 cups thick poha (flattened rice): This is non-negotiable — use medium or thick variety only. Thin poha turns to mush. In the US, UK, or Canada, any Indian grocery store will stock it. Online, look for brands like Laxmi or Deep.
- 2 medium potatoes: Regular white potatoes or Yukon Gold work well. Sweet potato works surprisingly well if you want a different flavour — just cut the sugar in the recipe.
- 1 medium onion, finely chopped
- 2 tablespoons oil: Peanut oil is traditional and adds a lovely nutty background note. Sunflower or any neutral oil works fine.
- Mustard seeds + cumin seeds: The non-negotiable foundation of the tempering.
- 8-10 curry leaves: Fresh is best. If you can only find dried, use them but know the flavour is milder. Curry leaf plants are now available at many Indian grocery stores — worth growing one on your windowsill.
- 2 green chillies: Adjust to your heat tolerance. For kids, just skip them or deseed them.
- Turmeric powder: Gives the signature golden colour.
- 1 teaspoon sugar: Don’t skip this. It’s subtle but it rounds out the flavour and helps keep the poha from sticking. I know purists will disagree, but it makes a real difference.
- Roasted peanuts: Buy them pre-roasted or dry-roast raw peanuts in the same pan before you start.
- Fresh lemon juice: Added at the end, off the heat. Lemon juice loses its brightness and turns bitter if cooked.
- Sev for garnish: Optional but highly recommended for the Indori experience. The crunch contrast is everything.
How to Make Poha That’s Fluffy Every Single Time — Step by Step
- Rinse the poha properly: Place 2 cups of thick poha into a fine mesh strainer. Hold it under running cold water for 20-30 seconds, moving the strainer gently so all the poha gets wet. Do not press it down or submerge it. Shake the strainer a couple of times and set it aside on the counter to drain for 7-8 full minutes. After 7-8 minutes, test a flake by rubbing it between your fingers — it should be soft, pliable, and completely separate from its neighbours. If it feels waterlogged, wait longer. This step is everything. This is the answer to why poha turns mushy.
- Start the tempering: Heat 2 tablespoons of oil in a wide, heavy-bottomed pan or kadai over medium heat. When the oil is hot (a mustard seed dropped in should sizzle immediately), add the mustard seeds. Keep a lid handy to shield from splutter. Wait until they pop — about 30 seconds. Add the cumin seeds and let them sizzle for 10 seconds.
- Add aromatics: Add the curry leaves and slit green chillies. The curry leaves will splutter dramatically — that’s normal. Stir for about 15 seconds until fragrant.
- Cook the onions: Add the finely chopped onion and cook over medium heat, stirring occasionally, for 4-5 minutes until they’re translucent and just starting to go golden at the edges. Don’t brown them fully — we’re not making bhuna onions here.
- Cook the potatoes: Add the small-diced potato cubes, sprinkle with a little salt, stir to coat, then cover and cook on medium-low heat for 7-8 minutes. Stir every 2 minutes to prevent sticking. The potatoes are done when they’re cooked through and have slight golden edges. Press one piece — it should give easily.
- Add the peanuts: Stir in the roasted peanuts and let them warm through for about 30 seconds.
- Add turmeric and sugar: Turn the heat to the lowest setting. Add the turmeric powder and sugar. Stir for 30 seconds — everything will turn beautifully golden.
- Add the poha and fold gently: This is the most important step for how to make poha not sticky. Add all the drained poha to the pan. Using two forks or a spatula and gentle hands, fold the poha into the base — like folding egg whites into a batter. Do not stir vigorously. Do not press. Just keep folding and lifting until every flake is evenly coated in the golden turmeric mixture. It will look a little rough at first. Trust it.
- Steam briefly: Cover the pan and let it sit on the lowest heat for exactly 2 minutes. This gentle steam brings everything together without adding any extra moisture. Remove the lid and taste — adjust salt now.
- Finish and serve: Turn the heat off completely. Add the fresh lemon juice and chopped coriander. Fold in gently one last time. Serve immediately, piled into bowls, topped with sev and any optional garnishes like finely chopped fresh onion or pomegranate seeds.
Tips for Perfect Aloo Poha Every Time
- The strainer is non-negotiable: Rinsing poha in a bowl makes it impossible to control how much water it absorbs. A strainer under running water gives far more control. This single switch transforms the result.
- Thick poha only: Medium or thick. If your poha packet says “thin” or “nylon” — put it back and find another one. Poha comes in different thicknesses and they behave very differently when wet.
- Don’t overcrowd the pan: Use a wide pan. If poha is heaped up in layers, the bottom will steam-cook and turn mushy while the top stays dry. A wide kadai or skillet gives every flake equal heat exposure.
- Lemon goes in last, off the heat: Cooking lemon juice makes it bitter and kills the fresh brightness that makes this dish sing. Always add it after the flame is off.
- Eat it immediately: Poha is at peak fluffiness the moment it’s made. Even 20 minutes later it starts to clump slightly as the starches settle. Make it, plate it, eat it.
Variations to Try
Jain / No Onion No Garlic Aloo Poha
Simply skip the onions. Everything else stays the same. A finely chopped raw tomato added along with the potatoes gives extra body and a mild tang. Many Jain households in Gujarat make poha exactly this way for morning prayer days.
Vegan Poha
Good news — this recipe is already 100% vegan as written! Just make sure the sev you use for garnish doesn’t contain any dairy (most don’t, but a quick label check never hurts).
Gluten-Free Poha
The poha itself is naturally gluten-free since it’s made from rice. The only potential issue is the sev garnish — some commercial sev contains maida (all-purpose flour). Look for rice flour-based sev or simply skip it.
Mixed Vegetable Poha
Add finely diced carrot, green peas, or capsicum along with the potatoes. Frozen peas work beautifully — just throw them in during the last 2 minutes of potato cooking. Check out our mixed vegetable poha recipe for a detailed version of this variation.
Kanda Poha (Maharashtrian Style)
This is the style popular in Pune and Mumbai — skip the potatoes entirely and double the onions. Some Maharashtrian households also add grated fresh coconut at the end, which adds a lovely sweetness and texture to the finished dish.
What to Serve With This Aloo Poha
A cup of masala chai is the classic accompaniment. But if you’re putting together a proper breakfast spread:
- A cup of hot masala chai or filter coffee: This pairing is basically sacred across Maharashtra and Madhya Pradesh. The slight bitterness of the chai against the sweet-savoury poha is perfection.
- Tamarind chutney or green chutney on the side: If you want to take this in a more chaat-like direction, a spoonful of tamarind chutney alongside is excellent. Check out our quick coriander green chutney recipe.
- A small bowl of plain yoghurt: Especially good in summer — the cool creaminess balances the warm spices beautifully.
Storage and Reheating
Poha is not a great candidate for storage and reheating. It’s one of those dishes that is made to be eaten fresh. But here’s the best way to deal with leftovers:
Refrigerator: Store leftovers in an airtight container for up to 1 day. Beyond that, the texture deteriorates significantly.
Reheating: The best method is on the stovetop. Put the poha in a pan over low heat, sprinkle 1-2 tablespoons of water over it, cover and heat for 2-3 minutes. This creates a little steam that helps revive the flakes. Microwave reheating works but makes it slightly chewier — if you do microwave, cover the bowl with a damp paper towel and heat in 30-second bursts.
Freezing: Freezing poha is not recommended. The texture after thawing deteriorates significantly.
Frequently Asked Questions
Why does my poha turn mushy every time?
This is almost always because the poha was soaked too long or rinsed in too much water. The trick is to rinse it briefly under running water in a strainer — never soak it in a bowl. Also, using the thin poha variety instead of medium or thick makes it go mushy very fast. Stick to medium or thick poha for best results, and make sure you drain it well for at least 7-8 minutes before adding it to the pan.
How do I make poha not sticky?
Three things cause sticky poha: too much water during rinsing, overcooking it in the pan, and stirring too aggressively. Rinse briefly, drain completely, and fold gently on the lowest heat setting. Adding a pinch of sugar and a squeeze of lemon at the end also helps keep the grains separated and gives a lovely lift to the whole dish.
Can I make aloo poha without onion and garlic?
Absolutely. Just skip the onions entirely and follow the rest of the recipe as written. The potatoes, peanuts, and tempering carry enough flavour on their own. Many people who follow Jain dietary practices or observe certain fasting days make their poha exactly this way — and it still tastes completely wonderful.
Which variety of poha is best for this recipe?
Always use medium or thick poha for aloo poha. Thin poha (sometimes sold as ‘nylon poha’) turns to mush almost instantly and is better suited for making poha chivda or laddoos. If you’re in the UK, USA, or Canada, look for ‘thick beaten rice’ or ‘thick flattened rice’ at your local Indian grocery store — it’s usually sold in 1kg or 2kg bags by brands like Laxmi, Deep, or Swad.
Can I make this aloo poha recipe ahead of time?
Poha tastes best the moment it’s made and doesn’t reheat particularly well because the flakes keep absorbing moisture as they sit. That said, if you must prep ahead, keep the cooked potato mixture separate in the pan and only add the rinsed, drained poha just before serving and heating through. You can also rinse and drain the poha up to 20 minutes in advance and leave it in the strainer — it will wait patiently.