Pesarattu Recipe: The Best Andhra Green Moong Dosa Without Fermentation
The Pesarattu Recipe That Changed My Breakfast Game Forever
The first time I had a proper pesarattu recipe made the way it should be — thin, lacey, a deep jewel-green — I was sitting on the floor of my mausi’s house in Vijayawada at six in the morning. She’d been soaking the green moong overnight, ground it fresh at dawn, and had a stack of these crisp beauties ready before anyone else was even awake. I’d grown up eating the standard idli-dosa-sambar combination, so biting into something this different — no rice, no fermentation, just pure green moong — felt almost revolutionary. That morning changed my breakfast philosophy for good.
The thing about pesarattu that I love most is also the thing that surprises most people when they first hear about it: there is absolutely no fermentation involved. You soak the whole green moong (sabut moong), you grind it with ginger and green chilies, and you pour it straight onto a hot tawa. That’s it. No waiting 12 hours for a batter to bubble and rise. On weekdays when I want something genuinely nourishing that isn’t bread-and-butter toast, this is what I make. My whole family — including my eight-year-old who treats anything green with extreme suspicion — devours these.
This green moong dosa recipe is the authentic Andhra version, the kind you’d find at an Udupi-style mess in Hyderabad or a home kitchen in Guntur. I’ll also share the classic way to serve it with upma stuffed inside (the famous MLA Pesarattu!), plus tips for getting that perfect crispy edge every single time.
Quick Answer: Pesarattu Recipe at a Glance
- Prep Time: 15 minutes (+ 6-8 hours soaking)
- Cook Time: 20 minutes
- Total Time: 35 minutes active time
- Servings: 4 (makes approximately 8-10 dosas)
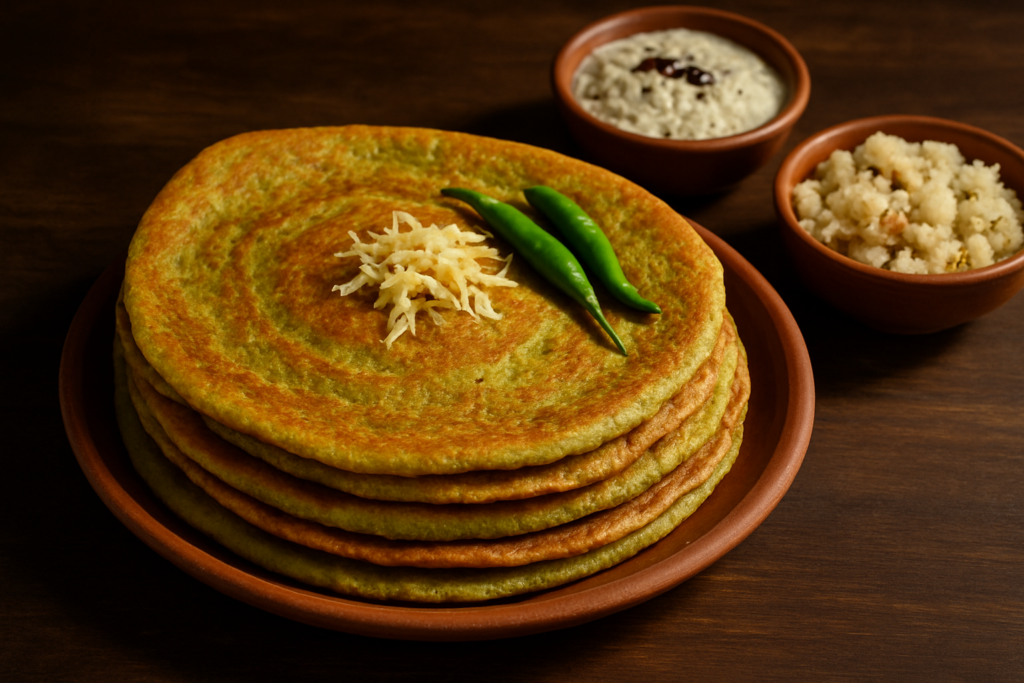
Pesarattu is a traditional Andhra breakfast dosa made entirely from soaked whole green moong — no rice, no fermentation needed. It’s crispy, protein-rich, and ready to eat in under 30 minutes of active cooking time. Serve with coconut chutney and ginger chutney for the full experience.
Why You’ll Love This Pesarattu Recipe
- Zero fermentation, zero waiting: Unlike regular dosa, this batter goes straight from the blender to the tawa. No planning a day ahead.
- Incredibly nutritious: Made entirely from whole green moong, it’s loaded with plant protein and fiber — genuinely one of the healthiest Indian breakfast options. Learn more about the health benefits of mung beans.
- Naturally gluten-free and vegan: No rice, no wheat, no dairy needed (use oil instead of ghee to keep it fully plant-based).
- That color: The vibrant green of a freshly made pesarattu is genuinely beautiful on a plate. You’ll want to photograph it before eating it — and then eat it immediately, because it waits for no one.
- Infinitely adaptable: Load it with onions and ginger on top, stuff it with upma, keep it plain with just chutney — every version is delicious.
Ingredients You’ll Need for This Andhra Breakfast Pesarattu
The ingredient list for this pesarattu without fermentation is beautifully short — which is part of its charm.
- Whole green moong (sabut moong / green gram): 1 cup. This is the star of the show. Use whole green moong with the skin intact for the classic green color and earthy flavor. Abroad? Find it at any Indian grocery store, Asian supermarket, or online as “whole mung beans.”
- Chana dal: 2 tablespoons (optional). My aunt in Vijayawada adds a small handful of chana dal to the grind — she swears it makes the dosas crispier. I’ve tested it both ways and honestly, she’s right.
- Green chilies: 3-4, depending on your heat tolerance. I use 4 because my family likes heat. Substitute: A pinch of cayenne or dried red chili flakes work in a pinch.
- Fresh ginger: 1-inch piece. Don’t skip this — ginger is non-negotiable in pesarattu. Substitute: 1/2 teaspoon ginger powder, though fresh is miles better.
- Cumin seeds (jeera): 1/2 teaspoon. Adds a warm, earthy note to the batter.
- Salt: To taste.
- Oil or ghee: For cooking. Ghee makes it slightly richer; oil keeps it vegan.
- For topping (optional but traditional): Finely chopped onion, grated ginger, fresh coriander leaves.
How to Make Pesarattu — Step by Step
Soak the moong: Rinse 1 cup of whole green moong under cold water 2-3 times until the water runs clear. Soak it in enough water (at least 3 cups) for 6-8 hours or overnight. If you are short on time, soak in hot (not boiling) water for 3-4 hours — it works almost as well.
Drain and check: Drain the soaked moong. You’ll notice the skins are slightly loosened and the beans look plump. Leave the skin on — it adds fiber and gives the pesarattu its signature green color. Don’t be tempted to peel it!
Grind the batter: Add the drained moong to a blender along with green chilies, ginger, cumin seeds, and salt. Add water gradually — start with about 1/4 cup — and blend to a smooth, slightly coarse batter. The texture should be similar to regular dosa batter: pourable but not watery. Think thicker than water, thinner than hummus. If you’re adding chana dal, soak it separately for the same time and add it to the blender too.
Taste and season: Transfer the batter to a bowl and taste it. My grandmother used to taste every batter raw — it tells you everything about the salt and spice balance. Adjust as needed. This batter needs no fermentation at all — it is ready to use immediately. This is the beauty of the pesarattu without fermentation method.
Heat the tawa: Heat a cast iron tawa or a flat non-stick pan over medium-high heat. It needs to be properly hot — sprinkle a few drops of water on the surface and they should sizzle and evaporate within 2 seconds. Wipe the surface with a halved onion dipped in oil, the classic South Indian way to prevent sticking and season the pan.
Spread the dosa: Lower the heat slightly to medium. Pour a ladleful of batter at the center of the tawa and, using the back of the ladle, spread it outward in quick concentric circles to form a thin, even round. Work fast — the batter starts setting almost immediately. A light hand gives you a crispier result. Don’t press hard.
Add oil and toppings: Drizzle about 1/2 teaspoon of oil or ghee around the edges and a few drops in the center holes. If you want the traditional topping — and I strongly recommend it — scatter finely chopped onion, grated ginger, and fresh coriander over the surface right now and press them gently into the batter with the back of your ladle.
Cook until crisp: Cook on medium heat for 2-3 minutes. Watch the edges — they’ll start lifting and turning a beautiful golden-green. If your dosa is thin, you don’t need to flip it. If it’s thicker, flip gently and cook the other side for about 30 seconds. The pesarattu should be golden on the outside and cooked through with no raw batter smell.
Serve immediately: Slide the dosa off the tawa and serve right away. Pesarattu is at its absolute best eaten the moment it comes off the heat — it loses its crispness if it sits too long. Repeat with remaining batter, reheating and wiping down the tawa between each one.
Tips for Perfect Pesarattu Every Time
- The tawa temperature is everything: Too cold and the batter sticks; too hot and it burns before it cooks through. Medium-high to start, then settle at medium. The onion-and-oil wipe between dosas keeps the temperature consistent and prevents sticking.
- Don’t add too much water: A thick batter spread thin gives you crunch. A watery batter gives you a pale, soggy disc. Add water to the blender gradually and stop when it’s just pourable.
- Use whole green moong, not split: I know purists will agree with me on this one — split yellow moong dal will give you a dosa, but it won’t give you pesarattu. The skin and the whole bean are what create that distinctive green color and flavor.
- Spread fast: Unlike rice dosa batter, moong batter sets quickly because there’s no fermented gas to keep it pliable. Have your ladle ready and spread within 3-4 seconds of pouring.
- Add a pinch of asafoetida (hing): This is my personal addition — not strictly traditional, but a tiny pinch of hing in the batter makes moong-based dishes easier to digest and adds a subtle depth. Totally optional but I never skip it.
Variations of This Green Moong Dosa Recipe
MLA Pesarattu (The Famous Stuffed Version)
This is the showstopper version from Hyderabad — named after the upscale Andhra restaurants that first popularized it. Spread your dosa, place 2-3 tablespoons of freshly made rava upma in the center, fold the dosa over it like a half-moon or roll it up. Serve with ginger chutney. It’s a complete meal in itself.
Jain / No Onion No Garlic Pesarattu
Simply skip the onion topping. The base batter is already Jain-friendly — no onion, no garlic anywhere. You can top it with grated raw coconut and finely chopped coriander instead.
Vegan Pesarattu
Use oil instead of ghee for cooking. The recipe is naturally vegan otherwise — no dairy involved at all.
Gluten-Free Version
This pesarattu recipe is already completely gluten-free as written! Just make sure your asafoetida (if you use it) is a gluten-free brand, as some commercial hing contains wheat flour.
Pesarattu with Rice (Lighter Texture)
Some families in coastal Andhra add 2-3 tablespoons of raw rice to the soak-and-grind process. It makes the dosas slightly lighter and less dense, though the color gets a little paler. If you find pure moong dosas a bit heavy, try this version.
What to Serve With Your Andhra Breakfast Pesarattu
Pesarattu has traditional accompaniments and I would honestly fight someone who serves it with the wrong chutney. Here’s what actually goes with it:
- Ginger Chutney (Allam Pachadi): The classic Andhra pairing. Fiery, tangy, and deeply flavored with tamarind, jaggery, and — obviously — lots of fresh ginger. This is the soul-mate chutney for pesarattu. Try my Allam Pachadi recipe here.
- Coconut Chutney: The milder option that works beautifully if you’ve made your dosa on the spicier side. Fresh coconut, green chilies, and a quick tempering of mustard seeds. My coconut chutney recipe comes together in under 10 minutes.
- Rava Upma: As the stuffing for MLA Pesarattu, or just served on the side. The soft, savory semolina against the crisp dosa is a textural dream.
Storage and Reheating
Batter: Store leftover batter in an airtight container in the refrigerator for up to 2 days. It may thicken slightly as it sits — add a splash of water and stir before using. After 2 days it’ll start fermenting gently, which gives a slight tang but is still perfectly usable.
Cooked Pesarattu: Honestly? Pesarattu does not hold well once cooked. It loses its crispness within 20-30 minutes. I strongly recommend cooking fresh and eating immediately. If you must reheat, a dry tawa or a hot oven (180°C for 3-4 minutes) works better than a microwave, which just makes them rubbery.
Freezing the batter: You can freeze pesarattu batter in portions for up to 1 month. Thaw overnight in the fridge and stir well before using. This is my go-to meal-prep trick for busy mornings.
A Little More About Pesarattu — Its Andhra Roots
Pesarattu comes from the Telugu word “pesara” meaning green moong, and it is one of Andhra Pradesh’s most beloved traditional breakfast dishes. Pesarattu has a rich culinary history in Andhra cuisine, and unlike most South Indian dosas, it predates the rice-and-lentil fermented tradition that most people associate with the region. It’s been a staple of Telugu households for generations — light, quick, and deeply nourishing in the way that only whole-grain legume cooking can be.
I know some food writers describe it as “just a moong dosa” and I take mild personal offense at that. There’s nothing “just” about it. Made correctly — properly soaked, freshly ground, spread thin and eaten hot with ginger chutney — a pesarattu is one of the finest things the Indian breakfast table has to offer.
Frequently Asked Questions About This Pesarattu Recipe
Can I make pesarattu without soaking overnight?
Yes! Soak the green moong in hot (not boiling) water for 3-4 hours and it’ll work beautifully. The batter might be very slightly less smooth but the taste is essentially the same. I’ve made it this way on busy mornings more times than I can count. It’s one of the reasons this pesarattu without fermentation method is so practical for everyday cooking.
Why is my pesarattu not crispy?
Three usual culprits: the batter is too thick (paradoxically — a very thick batter spread unevenly creates soft pockets), the tawa isn’t hot enough when you pour the batter, or you’re adding too much oil which steams the dosa rather than crisping it. Get your tawa properly hot, keep the batter pourable enough to spread thin, and use oil sparingly — just around the edges is enough.
Can I use split moong dal instead of whole green moong?
You can, but the color won’t be the same vibrant green — split yellow moong gives you a pale yellow dosa. Whole green moong with the skin intact is what gives pesarattu its signature color and slightly earthy flavor. The texture and taste will also be slightly different. It’ll still be delicious, just not quite the same dish.
How long can I store the pesarattu batter?
The batter keeps well in the refrigerator for up to 2 days in an airtight container. Beyond that it may start to ferment slightly — which actually isn’t terrible, it adds a mild pleasant tang. Give it a good stir before using and adjust consistency with a splash of water if it has thickened up. You can also freeze the batter for up to a month in portioned freezer bags.
Is pesarattu healthy?
Absolutely — it’s one of the most nutritious breakfast options in the South Indian repertoire. Green moong is packed with plant-based protein, dietary fiber, iron, and folate. Because there’s no refined rice and no fermented carbohydrate base, this green moong dosa recipe has a lower glycemic impact than a standard rice dosa, making it a particularly good choice for people managing blood sugar or looking for a high-protein morning meal.