
Mishti Doi Recipe: Authentic Bengali Sweet Yogurt at Home (Without a Clay Pot!)
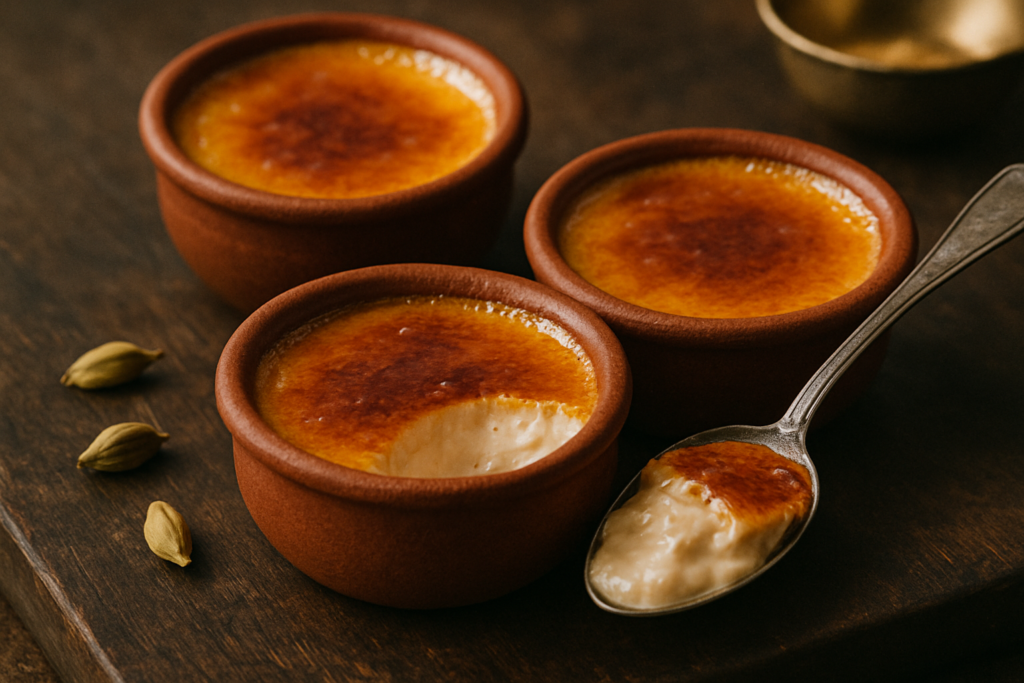
Mishti doi is a classic Bengali sweet yogurt made by fermenting caramelised, thickened milk with a spoonful of plain yogurt as a starter. It sets into a firm, amber-coloured dessert with a distinctive toffee depth and gentle tang. This recipe requires no clay pot — ramekins, glass bowls, or a muffin tin covered with foil all work well.
Prep Time: 15 minutes
Cook Time: 45 minutes (plus 6–8 hours setting time)
Total Time: Approximately 8–9 hours (mostly hands-off)
Servings: 6
Mishti doi is a classic Bengali sweet yogurt made by fermenting thickened, caramelised milk with a spoonful of yogurt as a starter. It sets into a firm, creamy dessert with a distinctive golden-brown colour and a balance of sweetness and tang. This recipe requires no clay pot — you can use ramekins, glass bowls, or even a muffin tin covered with foil.
Why You’ll Love This Mishti Doi Recipe
- Just 4 ingredients: Whole milk, sugar, a bit of condensed milk, and yogurt. That’s it. No preservatives, no fancy equipment.
- Perfectly doable without a clay pot: The technique below shows you exactly how to achieve that depth of flavour without one.
- Make-ahead dessert: This is the ideal dinner party dessert — you do all the work the night before and it’s ready when you are.
- Genuinely traditional flavour: Caramelising the sugar properly gives you that deep amber sweetness that separates real mishti doi from the pale imitations you sometimes see.
Ingredients You’ll Need for This Bengali Sweet Yogurt Recipe
This is a recipe where quality of milk genuinely matters. Please don’t use skimmed milk or UHT milk if you can help it.
- 1 litre full-fat whole milk — The higher the fat, the creamier your mishti doi. In the UK or US, look for whole milk with at least 3.5% fat. In India, use full-cream milk.
- 4 tablespoons sugar (for caramelising) — Plain white granulated sugar works best here. Don’t use brown sugar or jaggery for the caramel step — the colour and flavour profile changes completely.
- 3 tablespoons condensed milk — This helps achieve a thick, luscious texture without reducing milk for hours. I know purists will raise an eyebrow, but it saves you 30–40 minutes and the result is genuinely comparable.
- 3 tablespoons plain yogurt (at room temperature) — This is your starter culture. Use a good quality, full-fat plain yogurt — not Greek yogurt (it’s too thick and already strained) and definitely not flavoured yogurt.
Ingredient notes for the Indian diaspora abroad: If you’re in the US, Desi Natural Dahi or Nanak dahi from Indian grocery stores work beautifully as a starter. In the UK, Yeo Valley plain whole milk yogurt is a great substitute. Condensed milk is widely available everywhere — just make sure it’s sweetened.
Want to learn more about the history of mishti doi and its cultural roots in Bengal? It’s a fascinating read — this dessert goes back centuries and is deeply tied to Bengali identity and festivity.
Step-by-Step Mishti Doi Recipe (No Clay Pot Needed!)
- Reduce the milk first. Pour the full litre of milk into a heavy-bottomed pan. Bring it to a full boil over medium-high heat, stirring frequently so it doesn’t catch at the bottom. Once it boils, lower the heat to medium and let it simmer, stirring every 3–4 minutes, until it reduces to about 700–750ml. This takes roughly 20–25 minutes. The milk should thicken slightly and the sides of the pan will develop a thin coat. The milk should look a little creamier and more opaque than when you started.
- Caramelise the sugar. In a separate small pan, put 4 tablespoons of sugar with just 1 teaspoon of water. Heat over medium flame without stirring. Swirl the pan gently if needed. Watch carefully — within 4–6 minutes, the sugar will melt and turn a deep amber colour, like dark honey. The moment it turns that rich caramel brown and smells slightly nutty, take it off the heat immediately. Do not let it go dark brown or black — burnt caramel will make your mishti doi bitter. This step is the heart of the mishti doi recipe, so don’t rush it.
- Combine the caramel and milk. Very carefully (the caramel is extremely hot and will spit), pour the reduced milk into the caramel pan in a slow, steady stream while stirring constantly. Or alternatively, pour the caramel directly into the hot milk pan — be careful, it will bubble up dramatically for a few seconds. Stir everything together well until the caramel is fully dissolved into the milk. The milk will turn a lovely golden-brown colour.
- Add condensed milk. Stir in the 3 tablespoons of condensed milk while the mixture is still warm. Mix until completely combined. Taste it — it should be noticeably sweet, slightly caramel-forward, and rich. Remember, once it ferments, the tang of the yogurt will balance this sweetness.
- Cool to the right temperature — this is critical. Let the milk mixture cool down until it’s just lukewarm. The ideal temperature is between 40°C and 45°C (around 104–113°F). If you don’t have a thermometer, do the wrist test — dip your (clean) little finger in. It should feel pleasantly warm, not hot. If it’s too hot, you’ll kill the yogurt cultures and nothing will set. If it’s too cold, fermentation will be sluggish and you’ll get a watery result. Allow roughly 15–20 minutes on the counter, then check.
- Add the yogurt starter. Whisk the 3 tablespoons of room-temperature plain yogurt in a small bowl until it’s smooth and lump-free. Add about 3–4 tablespoons of the warm milk mixture to the yogurt first and whisk it together — this tempers the yogurt and prevents shocking it. Now pour this tempered yogurt-milk mixture back into the main milk pan and stir gently but thoroughly. Don’t beat vigorously — just fold it in with calm, confident strokes.
- Pour into your setting containers. Pour the mixture carefully into ramekins, small ceramic bowls, glass bowls, or even a muffin tray lined with foil cups. Fill each container about three-quarters full. This quantity fills 6 standard ramekins. If you want to go more traditional without actual clay pots, unglazed terracotta bowls (available in most Indian grocery stores and on Amazon) work wonderfully and give you that subtle earthy note.
- Set the mishti doi. Option A (Oven method): Preheat your oven to its lowest setting, then switch it OFF completely. Place the filled ramekins inside the warm (not hot!) oven. Close the door and leave undisturbed for 6–8 hours or overnight. The residual warmth creates the perfect fermentation environment. Option B (Instant Pot): Use the Yogurt setting on Low for 6–7 hours. Option C (Warm corner method): Cover each ramekin with cling film or a lid, wrap the whole tray in a thick kitchen towel, and place in the warmest corner of your kitchen — near the oven, on top of the fridge, or in a closed microwave with just a cup of hot water placed alongside (not switched on).
- Check and refrigerate. After 6–8 hours, gently tilt one ramekin — the mishti doi should be set and jiggle like a just-set pannacotta, not slosh around. If it’s still liquid, give it another 1–2 hours of warmth. Once set, transfer to the refrigerator and chill for at least 2 hours before serving. Cold mishti doi is infinitely better than room temperature — the texture firms up beautifully and the flavours deepen.
Tips for Perfect Mishti Doi Every Time
- Don’t rush the caramel. The colour of your caramel directly determines the colour and flavour of your mishti doi. A pale caramel gives you a wishy-washy result. Go for deep amber — the colour of dark honey or aged whisky.
- Temperature is everything for setting. Too hot kills cultures. Too cold and they sleep. 40–45°C is the sweet spot. When in doubt, err slightly cooler rather than hotter.
- Use fresh yogurt as your starter. Old yogurt (near expiry) has weakened cultures and gives inconsistent results. Use the freshest plain yogurt you can find.
- Don’t disturb it while it sets. Once poured into ramekins and placed in the warm oven, leave it completely alone. Opening the oven, bumping the tray — all of this disrupts the setting process.
- Reduce the milk properly. If your mishti doi comes out watery, under-reduced milk is almost certainly the culprit. Take your time in step 1 — building up the solids is what gives the dessert its body.
Variations of This Bengali Sweet Yogurt Recipe
Jain / No-Onion-No-Garlic Version
Good news — this mishti doi recipe is already completely Jain-friendly! No alliums anywhere near this recipe. Make it exactly as written.
Vegan Mishti Doi
Full-fat oat milk (Oatly Barista edition) and coconut milk (50:50 ratio with oat milk) both work here. The result is a softer set — not quite as firm — but the flavour is genuinely lovely. Use a vegan coconut yogurt as your starter culture, and add 2 tablespoons of cornstarch mixed in cold milk to help it set firmer. Chill overnight rather than just 2 hours.
Elaichi (Cardamom) Mishti Doi
Add 4 lightly crushed green cardamom pods to the milk while it’s reducing. Remove before pouring into ramekins. This is a subtle, beautiful variation — the floral cardamom lifts the caramel without overpowering it.
Mishti Doi with Saffron
Soak a generous pinch of good saffron (Kashmiri saffron works well) in 2 tablespoons of warm milk for 10 minutes, then stir into the milk mixture before adding the yogurt starter. The result is a gorgeous, golden, royally fragrant dessert. Perfect for special occasions.
Smaller Batch (Serves 2–3)
Simply halve all the quantities. Use 500ml milk, 2 tablespoons sugar for caramel, 1.5 tablespoons condensed milk, and 1.5 tablespoons yogurt. Setting time remains the same.
What to Serve With Mishti Doi
Traditionally, mishti doi is served on its own — and honestly, that’s the right call. But if you’re putting together a Bengali-inspired spread or an Indian dessert platter:
- Rasgulla or Rasmalai: The contrast between the spongy, syrupy rasgulla and the firm, tangy mishti doi is a classic pairing at Bengali weddings and pujas. Serve them side by side. Check out our easy homemade rasmalai recipe for a complete Bengali dessert table.
- Luchi (Bengali puri): In Bengal, sweet and savoury often share the table. Mishti doi alongside hot, puffy luchi is a traditional breakfast combination.
- Fresh mango slices: In summer, serve mishti doi with slices of Alphonso or Himsagar mango. The fruit’s brightness cuts through the richness perfectly.
For more ideas on building a full Bengali menu, take a look at our collection of authentic Bengali vegetarian recipes.
Storage and Reheating
Mishti doi does not need reheating — it’s always served cold or at room temperature. Here’s how to store it:
- Refrigerator: Once set and chilled, cover each ramekin tightly with cling film or a lid and store in the fridge for up to 3–4 days. The flavour actually deepens on day 2, so don’t be afraid to make it ahead.
- Freezer: Freezing mishti doi is not recommended — the texture breaks down completely upon thawing and becomes grainy and watery.
- Note on condensation: If any liquid (whey) pools on top after a day in the fridge, simply pour it off or stir it in gently before serving. This is perfectly normal and doesn’t mean your mishti doi has gone off.
Curious about the nutritional profile of fermented dairy products like this? Healthline’s breakdown of yogurt’s health benefits explains why traditional fermented yogurt is genuinely good for your gut.
Frequently Asked Questions About Making Mishti Doi
Why didn’t my mishti doi set properly — it’s still liquid?
This is the most common problem and it’s almost always one of two things: either the milk was too hot when you added the yogurt starter (killing the cultures), or the setting environment wasn’t warm enough. Try the oven method — preheat to 50°C, switch off completely, then place your ramekins inside. Also make sure your yogurt starter is fresh and at room temperature, not cold from the fridge.
Can I make mishti doi without condensed milk?
Absolutely. The condensed milk is a shortcut for convenience and extra creaminess. The traditional method involves reducing the milk much further — by almost half — which concentrates the natural sugars and fats. If you skip the condensed milk, reduce your 1 litre of milk down to about 600–650ml and add an extra tablespoon of sugar to the caramel. It takes longer but it’s completely authentic.
How is mishti doi different from regular sweetened yogurt?
Regular sweetened yogurt is just yogurt with sugar mixed in after the fact. Mishti doi is fermented with caramelised milk — the sugar is cooked into a caramel before combining with the milk, which gives it that distinctive amber colour, a subtle smoky-toffee depth, and a slightly firmer set. The fermentation also gives it a gentler tang than regular yogurt, balanced by that deep sweetness. They’re in completely different leagues.
Can I use Greek yogurt as the starter culture for this mishti doi recipe?
It’s best to avoid it. Greek yogurt is strained yogurt — much of the whey and live cultures have been removed in the straining process. It tends to give a more acidic, denser result and sometimes doesn’t ferment as reliably. Use regular full-fat plain yogurt as your starter. If you’re outside India, look for live culture yogurt (it will say ‘contains live active cultures’ on the label).
Do I really need to chill it before eating? Can I have it warm?
Mishti doi can technically be eaten at room temperature right after it sets, but chilling it for at least 2 hours is strongly recommended. Cold mishti doi has a firmer, more satisfying texture and the flavours are much more pronounced. When it’s warm, the texture is softer and the sweetness can seem overwhelming. This is a dessert that gets better the longer it sits in the cold.