Besan Chilla Recipe: Best High Protein Breakfast Pancakes with 5 Delicious Filling Variations
Besan Chilla: High-Protein Gram Flour Pancakes with 5 Filling Variations
Besan chilla is a savory Indian gram flour pancake that comes together in one bowl in under 25 minutes. It is naturally high in protein, gluten-free, and endlessly customizable. This recipe covers the classic batter, step-by-step technique, and five filling variations — plain, paneer, mixed vegetable, moong dal, and Jain — so the dish stays interesting all week.
Prep Time: 10 minutes
Cook Time: 15 minutes (about 3 minutes per chilla)
Total Time: 25 minutes
Servings: 4 chillas (serves 2)
Besan chilla is a savory Indian gram flour pancake that comes together in one bowl — just whisk, pour, cook, and eat. It’s naturally high in protein, gluten-free, and endlessly customizable with vegetables or paneer fillings. This is the recipe you’ll make every week once you try it.
Why You’ll Love This Besan Chilla Recipe
- Ready in under 25 minutes — faster than standing in line at a café, and infinitely more satisfying.
- Genuinely high in protein — besan (gram flour) packs around 20–22 grams of protein per 100g, making this one of the best plant-based breakfast options out there. (Read about chickpea flour nutrition benefits on Healthline)
- One-bowl, minimal cleanup — one bowl, one tawa, one spatula. Done.
- Naturally gluten-free — perfect for people with gluten sensitivities, and nobody at the table will even notice.
- Five filling variations — so you never get bored. There are options for Jain, vegan, and paneer lovers alike.
Ingredients You’ll Need for the Perfect Besan Chilla
For the Basic Batter (makes 4 chillas)
- 1 cup besan (gram flour / chickpea flour) — This is the star. Look for fine-ground besan, not the coarser kind used for pakoras. In the UK, US, or Australia, you’ll find this at any Indian or South Asian grocery store, or online as “chickpea flour.” Bob’s Red Mill chickpea flour works in a pinch, though authentic Indian besan gives a slightly nuttier flavor.
- ¾ cup water (approximately) — Add gradually; you want a smooth, pourable batter, not too thick, not watery.
- 1 small onion, finely chopped — Skip for Jain or no-onion-no-garlic version.
- 1 green chili, finely chopped — Adjust to taste.
- 1-inch piece ginger, grated — Adds warmth and aids digestion.
- 2 tablespoons fresh coriander leaves, chopped
- ½ teaspoon cumin seeds (jeera)
- ½ teaspoon turmeric powder (haldi)
- ½ teaspoon red chili powder
- ¼ teaspoon carom seeds (ajwain) — optional but highly recommended; helps with digestion and adds a lovely flavor.
- Salt to taste
- Oil or ghee for cooking — Ghee adds flavor, but cold-pressed sunflower oil works beautifully and keeps it vegan.
Optional Add-ins for the Batter
- 2 tablespoons grated carrot or bottle gourd (lauki) for extra nutrition
- 1 tablespoon semolina (sooji/rava) for extra crispiness
- A pinch of asafoetida (hing) — skip for Jain version
Step-by-Step Besan Chilla Recipe Instructions
- Make the batter. Add 1 cup besan to a large mixing bowl. Add turmeric, red chili powder, cumin seeds, ajwain, and salt. Mix the dry ingredients together first — this ensures even distribution of spices. Now add about half the water and whisk vigorously to break up any lumps. Besan loves to clump, so don’t rush this step. Add the remaining water gradually until you have a smooth, flowing batter — think slightly thicker than dosa batter, or like crepe batter. It should coat the back of a spoon but still pour easily.
- Add the aromatics. Fold in your finely chopped onion, green chili, grated ginger, and fresh coriander. If you’re adding grated vegetables, add them now too. Give everything a good mix. Let the batter rest for 5 minutes — this is important. Resting lets the besan hydrate properly and the flavors meld together. The batter will thicken slightly; you may need to add a splash more water to bring it back to the right consistency.
- Heat your tawa. Place a flat cast-iron tawa or non-stick pan over medium-high heat. This is crucial — if the tawa isn’t hot enough, the chilla will stick and tear. To test: sprinkle a few drops of water on the surface. If they sizzle and evaporate immediately, you’re ready. Reduce the heat to medium before adding the batter.
- Grease the tawa. Add ½ teaspoon oil or ghee and spread it across the surface using a paper towel or the back of a spoon. For the very first chilla, use slightly more oil — the first one is always the “test” chilla.
- Pour and spread. Pour about ¼ cup of batter onto the center of the tawa. Immediately use the back of a large spoon or ladle to spread the batter in gentle circular motions from the center outward, just like making a dosa. Aim for roughly 6–7 inches in diameter. Don’t press too hard — let the batter flow naturally. Work quickly; the batter starts setting within seconds.
- Cook the first side. Drizzle a few drops of oil around the edges of the chilla. Cook on medium heat for 2–3 minutes. You’ll know it’s ready to flip when the top surface looks dry and matte (no wet, shiny batter left), and the edges start looking golden and slightly crisp. Lift a corner gently with a spatula — it should come away cleanly from the pan.
- Flip and finish. Flip the chilla confidently in one smooth motion — hesitation causes tearing. Cook the second side for 1–2 minutes until golden brown patches appear. Press down gently with the spatula for extra crispiness. The chilla should feel firm, not soft and floppy.
- Serve immediately. Transfer to a plate and eat right away. Besan chilla is at its absolute best fresh off the tawa — hot, crispy-edged, and golden. Repeat with the remaining batter, greasing the pan between each chilla.
Tips for Perfect Besan Chilla Every Time
- Batter consistency is everything. Too thick and the chilla won’t spread; too thin and it tears when you flip. The right consistency should pour like buttermilk or slightly thickened cream. When in doubt, add water one tablespoon at a time.
- Hot tawa, medium flame. Start on high to heat the pan, reduce to medium when you pour. Too low and the chilla steams instead of crisping. Too high and the outside burns before the inside cooks.
- Don’t skip the resting time. Even five minutes makes a difference. The batter becomes more cohesive and the chilla is less likely to crack or tear during spreading.
- The first chilla is always a sacrifice. The first one almost never comes out perfectly — it seasons the pan. Every experienced cook knows this.
- Add sooji for crunch. Adding 1–2 tablespoons of fine sooji (semolina) to the batter creates a noticeably crispier texture. I know purists will disagree, but try it at least once.
5 Delicious Besan Chilla Variations to Try This Week
Variation 1: Classic Besan Chilla Without Vegetables (Plain)
This is the besan chilla without vegetables version — just the pure, spiced batter with onion, chili, and ginger. Simple, fast, and incredibly satisfying. Great for days when the fridge is looking sad.
Variation 2: Paneer Stuffed Besan Chilla
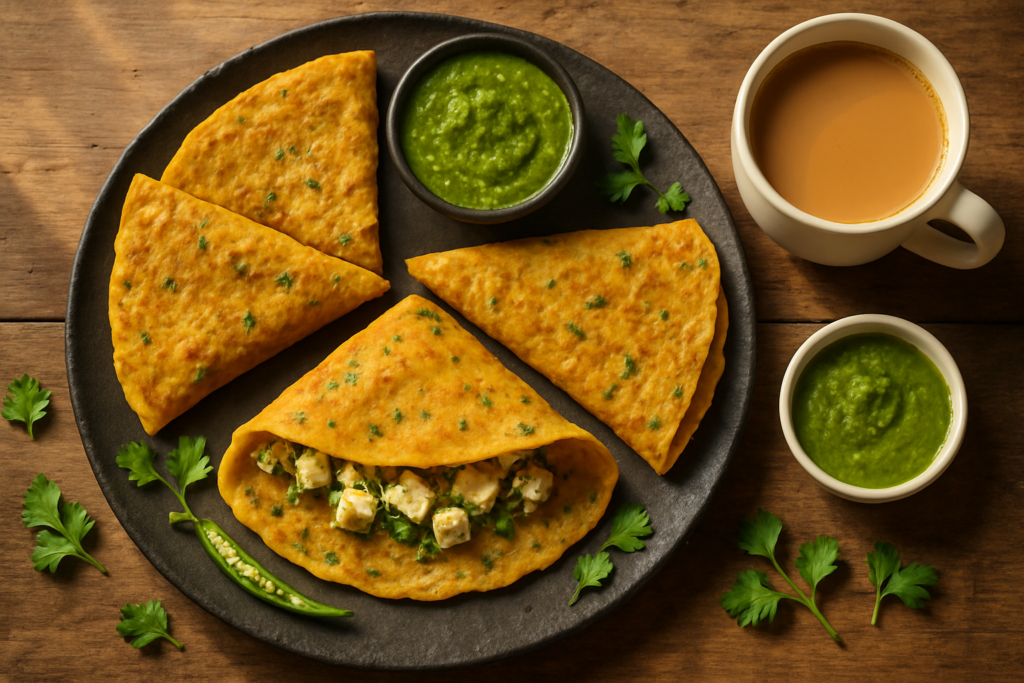
Cook the chilla halfway, then place a small mound of crumbled paneer (mixed with chili, coriander, and a pinch of chaat masala) in the center. Fold the chilla in half or roll it up like a crepe. This doubles the protein content. For the diaspora: store-bought paneer from any Indian grocery works perfectly.
Variation 3: Mixed Vegetable Masala Chilla
Add finely grated or chopped vegetables directly into the batter — try capsicum, spinach, grated zucchini, or corn kernels. This is a great gram flour pancake recipe for getting picky kids to eat their vegetables. The vegetables essentially disappear into the golden batter.
Variation 4: Moong Dal + Besan Chilla (Extra Protein Boost)
Replace half the besan with soaked and ground yellow moong dal. This makes the chilla even lighter, slightly more delicate, and significantly higher in protein. It is a staple of high protein Indian breakfast meal plans and for good reason.
Variation 5: Jain / No-Onion-No-Garlic Besan Chilla
Simply skip the onion, garlic, and ginger. Skip the asafoetida (hing) for strict Jain. Instead, bump up the cumin, add a little dry mango powder (amchur) for brightness, and add finely chopped capsicum and tomato. The flavor is completely different but equally delicious.
What to Serve With Besan Chilla
Besan chilla is wonderful on its own, but it becomes a full, restaurant-worthy breakfast spread with the right accompaniments:
- Green coriander chutney — This is the classic pairing. The cool, herby chutney against the hot, spiced chilla is perfection. Here’s my go-to green chutney recipe that takes five minutes to blend.
- Hung curd (thick yogurt) with a pinch of chaat masala — Cooling, tangy, and packed with probiotics. Great if you’re serving this to kids or someone who finds the chilla too spicy.
- A cup of masala chai — The warmth and spice of masala chai genuinely completes this breakfast. My perfect masala chai recipe is right here if you need it.
Storage and Reheating Your Besan Chilla
Besan chilla is best eaten immediately — hot-off-the-tawa. That said, here’s how to handle leftovers:
- Refrigerator: Stack cooled chillas between sheets of parchment paper and store in an airtight container. They’ll keep for up to 2 days. They will soften overnight — that’s just the nature of the beast.
- Reheating: Always reheat on a hot tawa or dry pan, not in the microwave. The microwave makes them rubbery. On a hot pan with a tiny drop of oil, they crisp right back up in 1–2 minutes per side.
- Batter storage: Plain batter (without vegetables or onion) can be refrigerated covered for up to 24 hours. Add the aromatics fresh just before cooking. Batter in the fridge means breakfast in 5 minutes — a useful weekday approach.
- Freezing: Freezing cooked chillas is not recommended. The texture doesn’t survive well. Make fresh; it’s quick enough.
For more ideas on easy Indian breakfasts, check out my complete collection of 20-minute Indian breakfast recipes.
Frequently Asked Questions About Besan Chilla
Why is my besan chilla breaking or tearing when I try to flip it?
Nine times out of ten, this happens because the chilla isn’t ready to flip yet. Wait until the entire top surface looks dry and matte — no shiny wet batter anywhere. Also check your batter consistency; if it’s too thin, the chilla will be fragile. Add a tablespoon or two more besan to thicken it slightly. And make sure your pan is at the right temperature — too cool and nothing binds together properly.
Can I make besan chilla without oil or ghee?
Technically yes, on a good non-stick pan. But even a tiny amount of oil (half a teaspoon) makes a massive difference to the texture, crispiness, and flavor. If you’re watching calories, use an oil spray to get even, minimal coverage rather than skipping oil entirely.
Is besan chilla actually a high protein breakfast?
Yes, genuinely. Gram flour (besan) is made from ground chickpeas and contains approximately 20–22g of protein per 100g — significantly more than wheat flour. One serving of two chillas (made with 1 cup besan) provides roughly 14–16 grams of protein, making it one of the best natural high-protein Indian breakfast options, especially for vegetarians.
Can I make besan chilla without vegetables for kids who are picky eaters?
Absolutely — the plain besan chilla without vegetables is actually the classic, traditional version. Just besan, spices, onion, chili, and coriander. For very young children, skip the green chili and reduce the red chili powder. A thin layer of butter on the finished chilla can also make it more appealing. Kids tend to grow into bolder flavors over time.
What is the difference between besan chilla and cheela? Are they the same?
Yes, completely the same dish! “Cheela” and “chilla” are just regional spelling and pronunciation variations of the same word. In Rajasthan and UP, it’s “chilla.” In many other parts of North India, it’s spelled and said “cheela.” You’ll see both spellings used interchangeably across Indian food blogs and cookbooks — don’t let it confuse you. Same recipe, same dish, same delicious result.